Monday, December 11, 2017

Fun with Mendelson AS2: Automating your AS2 Workflows

Mendelson AS2 is one of the widely used AS2 clients, and is also the unofficial AS2 testing tool that we use here at AdroitLogic (besides OpenAS2 etc.).

Mendelson AS2

While Mendelson does offer quite a lucrative handful of features, we needed more flexibility in order to integrate it into our testing cycles—especially when it comes to programmatic test automation of our AS2Gateway.

AS2Gateway

A spark of hope

If you have a curious eye, you might already have glimpsed the following on the log window of the Mendelson UI, right after it is fired up:

[8:30:42 AM] Client connected to localhost/127.0.0.1:1235
[8:30:44 AM] Logged in as user "admin"

So there's probably a server-client distinction among Mendelson's numerous components; a server that handles AS2 communication, and a client that authenticates to it and provides the necessary instructions.

The fact is confirmed by the docs.

What if...

So what if we can manipulate the client component of Mendelson AS2, and use it to programmatically perform AS2 operations: like sending and checking received messages under different, programmatically configured partner and local station configurations?

Guess what? That's totally possible.

Mendelson comes bundled with a wide range of Java clients, in addition to the GUI client that you see everyday. Different ones are available for different tasks, such as configuration, general commands, file transfers, etc. It's just a matter of picking and choosing the matching set of clients and request/response pairs, and wiring them together to compose the flow you want.

Which could turn out to be harder than you think, due to the lack of decent client documentation (at least for the stuff I searched for).

Digging for the gold

Fortunately the source is available online, so you could just download and extract it, plug it into an IDE like IntelliJ or Eclipse, and start hunting for classes with suspicious names, e.g. those having "client", "request" or "message" in their class or package names. If your IDE supports class decompilation, you could also simply add the main AS2 JAR (<Mendelson installation root>/as2.jar) to your project's build path (although I cannot guarantee the legality of such a move!)

Well, my understandings may not be perfect, but this is what my findings revealed regarding tapping into Mendelson's AS2 client ecosystem:

  1. You start by creating a de.mendelson.util.clientserver.BaseClient derivative of the required type, providing either a host-port-user-password combination for a server (which we already have, when running the UI; usually configurable at <Mendelson installation root>/passwd), or another pre-initialized BaseClient instance.
  2. You compose a request entity, picking one out of the wide range of request-response classes deriving from de.mendelson.util.clientserver.messages.ClientServerMessage (yup, I too wished the base class were <something>Request; looks a bit clumsy, but gotta live with it—at least the actual concrete class name ends with "Request"!).
  3. Now you submit the request entity to one of the sender methods of your client (such as sendSync()), and get hold of the response, another ClientServerMessage instance (with a name ending with, you guessed it, "Response").
  4. You now consult the response entity to see if the operation succeeded (e.g. response.getException() != null) and to retrieve what you were looking for, in case it was a query.

While it sounds simple, some operations such as sending messages and browsing through old messages requires a bit of insight into how the gears interlock.

Your first move

Let's start by creating a client for sending our commands to the server:

/*
 "NoOpClientSessionHandlerCallback" is a bare-bones implementation of
 de.mendelson.util.clientserver.ClientSessionHandlerCallback;
 you could also use one of the existing implementations, like "AnonymousTextClient"
*/

BaseClient client = new BaseClient(new NoOpClientSessionHandlerCallback(logger));
if (!client.connect(new InetSocketAddress(host, port), 1000) ||
        client.login("admin", "admin".toCharArray(), AS2ServerVersion.getFullProductName())
                .getState() != LoginState.STATE_AUTHENTICATION_SUCCESS) {
    throw new IllegalStateException("Login failed");
}
// done!

My partners!

For most of the operations, you need to possess in advance, Partner entities representing the list of configured partners (and local stations; by the way, I wish if it were possible to treat local stations as separate entities, for the sake of distinguishing their role, similar to how AS2 Gateway does it):

PartnerListRequest listReq = new PartnerListRequest(PartnerListRequest.LIST_ALL);

/*
 you can optionally receive a filtered result based on the partner ID:
 listReq.setAdditionalListOptionStr(AS2GX);
*/

// cast() is my tiny utility method for casting the response to the appropriate type (2nd argument)

List<Partner> partners = cast(client.sendSync(listReq), PartnerListResponse.class).getList();

/*
 now you can filter the "partners" list to retrieve the interested partner and local station;
 let's call them "partnerEntity" and "stationEntity"
*/

Sending stuff out

For a send, you first have to individually upload each outbound attachment via a de.mendelson.util.clientserver.clients.datatransfer.TransferClient, accumulating the returned "hashes", and finally submit a de.mendelson.comm.as2.client.manualsend.ManualSendRequest containing the hashes along with the recipient and other information. (If you hadn't noticed, this client-based approach inherently allows you to send multiple attachments in a single message, which is not facilitated via the GUI :) )

// "files" is a String array containing paths of files for upload

// create a new file transfer client, wrapping our existing "client"
TransferClient tc = new TransferClient(client);

ManualSendRequest sendReq = new ManualSendRequest();
sendReq.setSender(stationEntity);
sendReq.setReceiver(partnerEntity);

List<String> hashes = new ArrayList<>();
List<String> fileNames = sendReq.getFilenames();

// upload each file separately
for (String file : files) {
    try (InputStream in = new FileInputStream(file)) {
        fileNames.add(Paths.get(file).getFileName().toString());
        // upload as chunks, set returned hash as payload identifier
        hashes.add(tc.uploadChunked(in));
    }
}
sendReq.setUploadHashs(hashes);

// submit actual message for sending
Throwable e = client.sendSync(sendReq).getException();
if (e != null) {
    throw e;
}
// done!

Delving into the history

Message history retrieval is fairly granular, with separate requests for list, detail and attachment queries. A de.mendelson.comm.as2.message.clientserver.MessageOverviewRequest gives you the list of messages matching some filter criteria, whose message IDs can then be used in de.mendelson.comm.as2.message.clientserver.MessageDetailRequests in order to retrieve further AS2-level details of the message.

To retrieve a list of messages:

// retrieve messages received from "sender" on local station "receiver"
MessageOverviewFilter filter = new MessageOverviewFilter();
filter.setShowPartner(sender);
filter.setShowLocalStation(receiver);
List<AS2MessageInfo> msgs = cast(c.sendSync(new MessageOverviewRequest(filter)),
    MessageOverviewResponse.class).getList();

To retrieve an individual message, just send a MessageOverviewRequest with the message ID instead of a filter:

// although it returns a list, it should theoretically contain a single message matching "as2MsgId"
AS2MessageInfo msg = cast(client.sendSync(new MessageOverviewRequest(as2MsgId)),
    MessageOverviewResponse.class).getList().get(0);

If you want the actual content (attachments) delivered in a message, just send a de.mendelson.comm.as2.message.clientserver.MessagePayloadRequest with the message ID; but ensure that you invoke loadDataFromPayloadFile() on each retrieved payload entity, before you attempt to read its content via getData().

for (AS2Payload payload : cast(client.sendSync(new MessagePayloadRequest(msg.getMessageId())),
     MessagePayloadResponse.class).getList()) {

    // WARNING: this loads the payload into memory!
    payload.loadDataFromPayloadFile();
    byte[] content = payload.getData();
}

In closing

I hope the above would help you get started in your quest for Nirvana with Mendelson AS2; cheers! And don't forget to check out our new and improved AS2Gateway, which is fully compatible with Mendelson AS2 (or any other AS2 broker, for that matter)!

3 (4) things you should know about B2B security—and about AS2, the one-stop solution

In today's digitally transformed world, security is a key concern when it comes to B2B communication—may it be a simple 210-997 exchange or a sophisticated SCM document chain. Being aware and up-to-date on B2B security will always keep you ahead of the competition, and increase your chance of becoming that "largest retailer" or "leading partner" role that you and your business has always been dreaming about.

1. What it is

B2B security naturally derives from the basics of communication security:

Confidentiality

What goes on between you and your business partner (here onwards, let's simply call him/her "partner") stays between you two; in other words, nobody else ("third party") gets to see or read whatever it is that you two are communicating. (Imagine a sealed package that can be opened only by the intended recipient.)

Eyes Only

Authenticity

When your partner receives something that seemingly came from you, he/she can verify that it indeed came from you. (Picture a signature or an official seal on a business letter.)

Authentic

Integrity

What your partner receives is exactly the same thing that you sent out from your end, and vice versa; i.e. nobody else can modify or tamper the communicated content. (Just imagine if somebody were able to change the inventory in the invoice that you just sent out, before it reaches your partner!)

Verified

Non-repudiation

Once your partner receives what you sent him/her, he/she cannot refute the fact that he/she received it. (Think about the receipt that you never forget to collect once you have made a payment.)

Agreed

2. Why you (and your partner) should care

This part should be fairly obvious, from the examples I took in the previous section: without these measures, all sorts of weird and unpleasant things could happen, eventually leading to the ruination of your business:

Hacker

  • Your rival could send your supplier a fake purchase order on your behalf—perhaps even a complete order document chain, resulting in a (surprise!) delivery at your doorstep which you never actually ordered.
  • Your rivals could intercept and view every single purchase order—or any other document, for that matter—that you would be sending to your partner.
  • Your rival could impersonate your partner, and start sending fake responses to your documents that are actually intended for your partner's eyes only. You would have no way of knowing that the other party talking is not your actual partner.
  • Even more interestingly, your rival could intercept the document you (or your partner) sent out, take it off the line, make small modifications—nothing much, maybe adding or removing a few zeroes here and there!—and put it back on the line. (I hope it's needless to explain how harmless such a "small" modification could be!)

Now that would explain why your partner would have mentioned in your negotiations, "Ah, and all documents should be exchanged securely over AS2/HTTPS" (or maybe "AS3", "OFTP" or some other weird acronym, for that matter).

3. How to achieve it

Lost your peace of mind? No worries, techniques are already in place to guard you against all of those nasty rivals out there.

WARNING: Things are about to get a little G(r)eeky. Reader discretion is advised.

Encryption for confidentiality

This is all about transforming the content that you send out, into a form that can be interpreted (read) only by your partner. (In other words, no third party would be able to make sense of the document while it is in transit.)

There are actually 2 levels of achieving this, in the "AS2/HTTPS" example above:

  • HTTPS provides transport-layer encryption, meaning whatever that is being sent on the wire (or wireless radio waves, if you insist) would be encrypted, right from the time it leaves your computer right up to the time it arrives at your partner's computer.
  • AS2 provides application-layer encryption, meaning that the application (AS2 client) triggering the sending of your document would already have encrypted it (so that it is fairly secured, even in the absence of HTTPS).

Now, if that was all Greek to you, it's just enough to keep in mind that protocols like AS2 include both, providing the security equivalent to a dual-lock safe.

Signing, for authenticity and integrity

While a real-world signature deals only with authenticity, a digital signature can also ensure integrity as well. This is due to the way a digital signature is calculated; which, in plain English, involves a kind of transformation where a concise form (a hash) of the message is created, and then scrambled (encrypted, if I may) using a special token (a private key, technically speaking) that is unique to the sending party (the technical term being digest calculation). If the receiver can unscramble the scrambled chunk using another different token (technically, the public key corresponding to the above private key), it verifies that the message had indeed been scrambled using the exact-same partnet-specific token (private key) that was mentioned earlier—and hence that it actually originated from that specific partner and nobody else.

While the unscrambled chunk of data (effectively the has that was calculated earlier by your partner, before being encrypted) can also be used to verify the integrity (intactness) of the message (e.g. you could calculate the same hash against the received message, on your end, and compare it with the hash that was sent to you by your partner), usually the MIC (message integrity code) technique is employed to explicitly enforce the integrity aspect. We'll come to that later.

By the way, if you are wondering how on earth something scrambled using one token (private key) can be unscrambled using a different token (public key), you might want to read upon asymmetric key encryption and public key infrastructure (PKI); only if you dare, of course (I'll pass).

Encryption and Signing

Receipt for non-repudiation

Just like a payment receipt, your partner who successfully received the message you just sent out, is supposed to send back a "receipt" (technically a disposition notification) saying that he/she was able to successfully receive and interpret the message. By convention, a communication is considered to have been successfully completed only after the receipt has been sent back to the sender (just like a real-world transaction). Once the receipt is sent, your partner has confirmed that he/she received whatever it is that you sent, and can never deny it.

MIC for integrity

This looks like a "repeat back to me what I just said" scheme, although it's usually more concise. Here, your partner is supposed to compute a fixed-length data chunk representing the message that he/she just received from you (a "hash" (again!), technically speaking; the chunk is usually shorter than the actual message) and send it back to you. You can then do the same computation on your end and compare your "chunk" with his/her "chunk". Since the two "chunk"s were calculated independently, if they do match, you can be pretty sure that the message (document) content is the same at both ends—and hence that your partner received exactly what you sent out.

All of the above are readily available in the AS2 (Applicability Statement 2) protocol for secure document exchange. AS2 is the most widely used B2B protocol in the modern e-commerce space, which is probably why your partner explicitly requested it. When it comes to all the nitty gritty details that we discussed above, it's all there in the official AS2 RFC, in case you are curious. (But I won't click that link, if I were you!)

However, the caveat is that AS2 requires you to have a server machine running 24×7, exposed to the public internet, so that your partners could send messages to you whenever they decide to. That in itself could be a substantial problem, especially for small- and medium-scale enterprises, with the incorporated painful set-up, configuration and testing steps, operational costs, maintenance overhead and all sorts of security concerns (remember, you are exposed to the WWW (wide, wild world) and there are hackers everywhere!).

Receipt and MIC

4. (Bonus!) How the "gateway" achieves it all—and more—for you

If you are overwhelmed about all this alien stuff by this point (or wisely skipped all the way down to here), it is perfectly logical; all those technicalities are too much for the regular, business oriented minds (and rightly so). That is precisely why we have managed AS2 clients and services—which make AS2-based trading as simple as the click of a button. Better still, now there are online AS2 solutions that free you completely from having to maintain fancy servers or other forms of hard-to-manage AS2 infrastructure.

On the cloud, light as a feather

One such solution is AS2Gateway, a cloud software-as-a-service (SaaS) that brings all those AS2 goodies—and more—right into your favourite web browser. Yup, nothing to download, install or run—just log in to your AS2G account, and you have your own dedicated AS2 space, ready for action.

AS2Gateway logo

Hit-and-run, or click-and-send

Time to forget about all those pesky security entrails that you read earlier (or wisely skipped); because AS2G does it all for you. Just log in, click the New Message icon, select your partner, pick your documents and hit Send. Under the hood, AS2G does all the heavy lifting for you—composing a message with the uploaded files, encrypting, compressing and signing it as your partner has requested, sending it to your partner, and even accepting the receipt (MDN).

24×7, all ears

When it comes to receiving documents from your partner, AS2G does an equally good job to make things super simple: it automatically accepts the incoming message, saves it in your inbox, and even sends back the receipt (MDN) based on whether the whole process was successful or not. Not to mention all the complicated stuff like message decryption, decompression, signature verification, and so on.

Messaging

Space for all, on the house!

Everything is saved under your account, securely and reliably, under stringent security and privacy standards. Just log in and go to your inbox, and everything you send and received will be right there, neatly arranged. You could view any message in detail, download its attached documents, and archive or delete old stuff to keep things tidy.

Jekyll and Hyde? No problem.

AS2Gateway allows you to manage multiple partners as well as multiple "trading stations" (meaning that you could use different identities for trading with different partners). Each partner or station can be configured totally independent of each other, giving you enormous flexibility in dealing with different business partners with varying corportate security and demands.

Ahoy, mateys! There's more!

On top of all this, AS2Gateway offers many other nifty features, including fine-grained statistics for your partners and stations, email notifications for new messages, and a free SFTP service where you can send out your documents by uploading them into your own private SFTP space and also retrieve documents from incoming messages via the same space—quite handy for integrating with your own internal systems. Coupled with a fully-fledged SFTP integrator such as the UltraESB, the end-to-end solution could soon turn out to be a game changer for your business in terms of efficiency, rapid connectivity and hands-off automation.

AS2Gateway dashboard

Looking for something in-house, on-premise?

Having read all that hands-off, cloud-hosted, zero-maintenance stuff, in case you are actually looking for an on-premise solution—one you can host in your own server, and run on your own terms—there is AS2Gateway's "big brother"—AS2Station—cut out just for the job.

AS2Gateway logo

So, the next time your partner bothers you with "secure trading", "secure B2B exchange" or "AS2", you know where to look!

Wednesday, November 29, 2017

Integration simplified: Professor Calculus' assignment uploader in ten minutes!

Professor Calculus is no longer at Marlinspike Hall. (So if you happen to go there and ring for him, all you would be getting would be some Blistering Barnacles.) He's now lecturing full-time at the University of Syldavia. (Of course, he hasn't heard a single complaint from any student or staff member, since he simply doesn't hear them.)

Professor Calculus at the University of Syldavia

An age-old tradition of the university has been the submission of calculus assignments via FTP. However, things are really about to take a turn, with the recent changes in administrative powers; every lecturer is now required to set up a website where a student can upload her assignment anytime, anywhere; even from her tab or smartphone.

Web Assignment Upload

Unfortunately, being a rather conservative person, Prof. Calc has only a very vague idea of what needs to be done (from the very few words that he hardly heard during the faculty meeting).

So, dear reader, it is up to you (and me) to implement a quick solution for Prof. Calc.—before he gets heavily scolded (although inaudibly) during the next staff meeting!

The clock is ticking!

So, before we begin, let's see what challenge lies before us:

  • Present the students with a simple website having a file upload form
  • Transfer the uploaded file (with the original filename) to the site backend
  • Upload the received file into the main FTP server
  • Return a response to the frontend indicating whether the upload was successful
  • Display the received response to the student

As for the implementation, we have a few choices:

  • If we use a traditional stack (such as LAMP we would have to write and maintain code for both the backend and the frontend, probably in different languages.
  • We can reduce the overhead by using a unified language like NodeJS, so that the JS-driven frontend will be fairly compatible with the backend (with similar language semantics etc.); still, we'll have to bear the burden of coding the backend (which would be fairly complex relative to the frontend, as it would have to deal with FTP integration). Plus, we'll need a way to reliably host the NodeJS backend, of course.
  • Cloud services like Zapier may not be an option because we need the app to be hosted in-house (in-university to be exact), connecting to a local FTP server.

Fortunately, the new Project-X framework has just the right balance for all our requirements:

...and, most impressive for our case... a collection of connectors and processing elements that allows us to build our solution without writing a single line of code!

  • A HTTP ingress connector for accepting HTTP traffic (for the web UI and file uploads)
  • A Web Server processing element that can serve the frontend (static portion) of the website
  • A FTP egress connector that can take all FTP upload matters out of your hand

OK, now that we have the right tool for the job, let's start with the flashy parts—the frontend, that is.

The frontend stuff can be done easily with HTML and JS. To keep things simple (and save time), we shall build a minimal site (without CSS styling, modals and other "complex" goodies.

As for the upload, if we use a regular <form> with an <input type="file">, it would send a multipart upload request to the backend (containing the file name and payload as fields). Multipart uploads are a bit clumsy to handle on the server side, so here we will resort to a custom approach where we send the filename in a HTTP request header named Upload-Filename and the raw file content in the request body.

What follows is a very simple frontend that achieves just what we need (don't worry about the horrific look, we could polish it up later on):

<html>
<head>
    <meta charset="utf-8"/>
    <title>FilePit Uploader!</title>
</head>
<body>
<form method="post" onsubmit="return runUpload()">
    <label for="file">Select the file to upload:</label>
    <input type="file" id="file" name="file"/>
    <input type="submit" value="Upload"/>
</form>
<script type="text/javascript">

    function runUpload() {
        var file = document.forms[0].file.files[0];
        if (!file) {
            alert("Please select a file for uploading :)");
            return false;
        }

        var xhr = new XMLHttpRequest();
        xhr.open("POST", "upload");
        xhr.setRequestHeader("Upload-Filename", file.name);
        xhr.onload = function () {
            alert(this.responseText);
        };
        xhr.onerror = function (e) {
            alert("Failed to upload file: " + e);
        };

        var reader = new FileReader();
        reader.onload = function (evt) {
            xhr.setRequestHeader("Content-Type", file.type);
            xhr.send(evt.target.result);
        };
        reader.readAsArrayBuffer(file);

        return false;
    }
</script>
</body>
</html>

Now that the frontend is ready, we can download and install UltraStudio and start working on our backend by creating a new project.

One more thing before we begin: when developing the flow, we should better test things using a different FTP server than the actual university server—what if you make a small mistake and all the previously submitted assignments get mixed up, kicking out half the university? You could get hold of a simple FTP server software (e.g. vsftpd for Ubuntu/Debian, FileZilla for Windows, something like this for Mac—unless your Mac is too new), configure it (e.g. in case of vsftpd ensure that you set local_enable=YES and write_enable=YES in /etc/vsftpd.conf—and don't forget to restart the service!), and provide the respective credentials to the coming-up FTP egress connector configuration.

Now, if you're wondering, "okay, how am I supposed to switch to using the actual university server when actually deploying the end solution?", the answer is right here, in our property configuration docs; you'd simply externalize the FTP connector properties—simply by clicking the little toggle buttons to the right of each of its fields that you would be filling—so that you could simply drop a default.properties file (similar to what you would find at src/main/resources of the project) into the final deployment, and things would magically get switched over to the correct FTP server!

Cool, isn't it? (Don't worry, you'll get it later.)

For serving the website, we can get away with a very simple, standard web server flow:

Web Server Flow

Just drag in a NIO HTTP ingress connector and a Web Server processing element, connect them as in the diagram, and configure them as follows:

HTTP ingress connector:

Http port 8280
Service path /calculus/submissions.*

Web Server processing element:

Base Path /calculus/submissions
Base Page index.html

Now, create a calculus directory in the src/main/resources path of the project (via the Project side window), create a submissions directory inside it, and save the HTML code that we wrote above inside that directory by the name index.html (so that it will effectively be at src/main/resources/calculus/submissions/index.html). Henceforth, students will see your simple upload page every time they visit /calculus/submissions/ on the "website" that you would soon be hosting—ironically, without any web hosting server or service!

For the upload part, the flow is slightly more complex:

Web Upload Flow

HTTP Ingress Connector:

Http port 8280
Service path /calculus/submissions/upload

Add Variable processor:

Variable Name filename
Extraction Type HEADER
Value Upload-Filename
Variable Type String

Add New Transport Header processor:

Transport Header Name ultra.file.name
Use Variable true (enabled)
Value filename
Header Variable Type String

FTP Egress Connector (make sure to toggle the Externalize Property switch against each property, as described earlier):

Host localhost (or external FTP service host/IP)
Port 21 (or external FTP service port)
Username username of FTP account on the server
Password password of FTP account on the server
File Path absolute path on the FTP server to which the file should be uploaded (e.g. /srv/ftp/uploads)
File Name (leave empty)

String Payload Setter (connected to FTP connector's Response port, i.e. success path):

String Payload File successfully uploaded!

String Payload Setter (connected to FTP connector's On Exception port, i.e. failure path):

String Payload Oops, the upload failed :( With error: @{last.exception}

Response Code Setter (failure path):

Response Code 500
Reason Phrase Internal Server Error

In English, the above flow does the following (scream it out in the Prof's ear, in case he becomes curious):

  • accepts the HTTP file upload request, which includes the file name (Upload-Filename HTTP header) and content (payload)
  • extracts the Upload-Filename HTTP header into a scope variable (temporary stage) for future use
  • assigns the above value back into a different transport header (similar to a HTTP header), ultra.file.name, that will be used as the name of the file during the FTP upload
  • sends the received message, whose payload is the uploaded file, into a FTP egress connector, configured for the dear old assigment upload FTP server; here we have left the File Name field of the connector empty, in which case the name would be derived from the abovementioned ultra.file.name header, as desired
  • if the upload was successful, sets the content of the return message (response) to say so
  • if the upload failed due to some reason, sets the response content to include the error and the response code to 500 (reason Internal Server Error); note that the default response code is 200 (OK) which is why we didn't bother to set it in the success case, and
  • sends back the updated message as the response of the original upload (HTTP) request

Phew, that's it.

Wasn't as bad as writing a few hundred lines of scary code, was it?

Yup, that's the beauty of composable application development, and of course, of UltraStudio and Project-X!

Now you can test your brand new solution right away, by creating a run configuration (say, calculus) and clicking Run → Run 'calculus'!

Run calculus

(Note that, if it's your first time using UltraStudio, you'll have to add your client key to the UltraStudio configuration before you can run the flow.

Once the run window displays the "started successfully in n seconds" log (within a matter of seconds), simply fire up your browser and visit http://localhost:8280/calculus/submissions/. (Sorry folks, no IE support... Maybe try Edge?)

The (to-be-redesigned) Assignment Upload Page

Oh ho! There's my tiny little upload page!

Just pick a file, and click Upload.

Depending on your stars, you'd either get a "File successfully uploaded!" or "Oops, the upload failed :(" message; hopefully the first :) If not, you may have to switch back to the Run window of the IDE and diagnose what might have gone wrong.

Once you get the successful upload confirmation, just log in to your FTP server, and behold the file that you just uploaded!

That's it!

Now all that is left is to bundle the project into a deployment archive and try it out in the standalone UltraESB-X; which, dear reader, is an exercise left for the reader :)

And, of course, to shout in our Prof's ear, "IT WORKS, PROFESSOR!!!"

Thursday, November 23, 2017

Connecting the dots in style: Build your own Dropbox Sync in 10 minutes!

Integration, or "connecting the dots", is something that is quite difficult to avoid in the modern era of highly globalized business domains. Fortunately, integration, or "enterprise integration" in more "enterprise-y" terms, is no longer meant to be something that makes your hair stand, thanks to advanced yet user-friendly enterprise integration frameworks such as Project-X.

Today, we shall extend our helping hand to Jane, a nice Public Relations officer of the HappiShoppin supermarket service (never heard the name? yup, neither have I :)) in setting up a portion of her latest customer feedback aggregation mechanism. No worries, though, since I will be helping and guiding you all the way to the end!

The PR Department of HappiShoppin supermarket service has opened up new channels for receiving customer feedback. In addition to the former, conventional paperback feedback drop-ins, they now accept electronic feedback via their website as well as via a public Dropbox folder (in addition to social media, Google Drive, Google Forms etc). Jane, who is heading the Dropbox-driven feedback initiative, would like to set up an automated system to sync any newly added Dropbox feedback to her computer so that she can check them offline whenever it is convenient for her, rather than having to keep an eye on the Dropbox folder all the time.

Jane has decided to compose a simple "Dropbox sync" integration flow that would periodically sync new content from the feedback accumulation Dropbox folder, to a local folder on her computer.

  • On HappiShoppin's shared Dropbox account, /Feedback/Inbox is the folder where customers can place feedback documents, and Jane hopes to sync the new arrivals into /home/jane/dropbox-feedback on her computer.
  • Jane has estimated that it is sufficient to sync content once a day, as the company receives only a limited number of feedback over a given day; however, during the coming Christmas season, the company is expecting a spike in customer purchases, which would probably mean an accompanied increase in feedback submissions as well.
  • For easier tracking and maintenance, she wants the feedback files to be organized into daily subfolders.
  • In order to avoid repetitively syncing the same feedback file, Jane has to ensure that the successfully synced files are removed from the inbox, which she hopes to address by moving them to a different Dropbox folder: /Feedback/Synced.

Design of the Dropbox Sync solution

Now, before we begin, a bit about what Project-X is and what we are about to do with it:

  • Project-X is a messaging engine, which one could also call an enterprise service bus (which is also valid for the scenario we are about to tackle).
  • Project-X ingests events (or messages) from ingress connectors, subjects them to various transformations via processing elements, and emits them to other systems via egress connectors. For a single message, any number of such transformations and emissions can happen, in any order.
  • The message lifecycle described above, is represented as an integration flow. It is somewhat similar to a conveyor belt in a production line, although it can be much more flexible with stuff like cloning, conditional branching, looping and try-catch flows.
  • A set of integration projects make up an integration project, which is the basic deployment unit when it comes to Project-X runtimes such as UltraESB-X.

So, in our case, we should:

  • create a new integration project
  • create an integration flow inside the project, to represent Jane's scenario
  • add the necessary connectors and processors, and configure and wire them together
  • test the flow to see if what we assembled is actually capable of doing what Jane is expecting
  • build the project into a deployable artifact, ready to be deployed in UltraESB-X

While the above may sound like quite a bit of work, we already have a cool IDE UltraStudio that can do most of the work for us. With UltraStudio on your side, all you have to do is to drag, drop and connect the required connectors and processing elements, and everything else will be magically done for you. You can even try out your brand-new solution right there, inside the IDE, and trace your events or messages real-time as they pass through your integration flow.

So, before we begin, let's get UltraStudio installed on your system (unless you already have it, of course!).

Once you are ready, create a new Ultra Project using File → New → Project... option on the menu bar and selecting Empty Ultra Project. While creating the project, select the following components on the respective wizard pages (don't worry, in a moment we'll actually get to know what they actually are):

  • Timer Task Connector and Dropbox Connector on the Connectors page
  • JSON Processor and Flow Control processor on the Processors page
Dropbox Sync: Connector Selection

If you were impatient and had already created a project, you could always add the above components later on via the menu option Tools → Ultra Studio → Component Registry.

Now we can start by creating a new integration flow dropbox-sync-flow, by opening the Project side pane and right-clicking the src/main/conf directory.

Dropbox Sync: Creating a New Flow

Again, a few tips on using the graphical flow UI (in case you're wondering where on earth it is) before you begin:

  • Inside, an integration flow is a XML (Spring) configuration, which UltraStudio can alternatively represent as a composable diagram for your convenience.
  • You can switch between the XML and graphical views using the two small tabs that would appear at the bottom of an integration flow file while it is opened in the IDE. (These tabs might be missing at certain times, e.g. when the IDE is performing indexing or Maven dependency resolution; at such times, patience is a virtue!)
  • The graphical view contains a side palette with all the components (connectors and processors) that have currently been added to your project (at creation or through the Component Registry). You can browse them by clicking on the collapsible labels on the palette, and add them to the flow by simply dragging-and-dropping them into the canvas.
  • In order to mimic the message flow, components should be connected together using lines drawn between their ports (small dots of different colors that appear around the component's icon). You will get the hang of it, when you have had a look at some of the existing integration flows, or at the image of the flow that would be developing (appearing later in this article).
  • When a component requires configuration parameters, a configuration pane gets automatically opened as soon as you drop an element into the canvas (you can also open it by clicking on the component later on). If the labels or descriptions on the configuration pane are not clear enough, just switch to the Documentation tab and click on the "Read more" URL to visit the complete documentation of the element (on your favourite web browser). Also, make sure that you click the Save button (at the bottom or on the side pane) once you have made any changes.

Start the flow with a Timer Ingress Connector. This is a connector used to trigger a periodic event (similar to a clock tick) for a time-driven message flow. Let's configure it to trigger an event that would set the sync process in motion. For flexibility, we will use a cron expression instead of a simple periodic trigger.

Scheduling tab:

Polling CRON Expression 0/30 * * ? * *

Although Jane wanted to run the check only at 6 PM each day, we have set the polling time to every 30 seconds, for the sake of convenience; otherwise you'll simply have to wait until 6 PM to see if things are working :)

Dropbox Sync: Timer Configuration

Next add a Dropbox Egress Connector with a List Entities Connector operation element added to the side port. You can find the connector operations by clicking on the down arrow icon against the Dropbox Connector on the component palette, which will expand a list of available connector operations.

A connector operation is an appendage that you can, well, append to a connector, which will perform some additional processing on the outgoing message in a connector-specific way. For example, for Dropbox we have a main connector, with a bunch of connector operations that represent different API operations that you can perform against your Dropbox account, such as managing files, searching, downloading, etc.

Configure the Dropbox Connector with the shared Dropbox account credentials (App ID and Access Token), and the connector operation with the Path /Feedback/Inbox.

Basic tab:

Client ID
{client ID for your Dropbox app;
visit https://www.dropbox.com/developers/apps/create to create a new app}
Access Token
{access token for your Dropbox account, under the above app;
follow https://blogs.dropbox.com/developers/2014/05/generate-an-access-token-for-your-own-account/
to obtain an access token for personal use against your own app}

List Entities, Basic tab:

Path /Feedback/Inbox

The above contraption will return a List Folder response, containing all files that are currently inside /Feedback/Inbox, as a wrapped JSON payload:

{
    "entries": [
        {
            ".tag": "file",
            "name": "johndoe.docx",
            "id": "id:12345_67_890ABCDEFGHIJ",
            ...
        }, {
            ".tag": "file",
            "name": "janedoe.txt",
            "id": "id:JIHGF_ED_CBA9876543210",
            ...
        }
    ],
    ...
}

Ah, now there's the info that we have been looking for; sitting there in boldface. Now we need to somehow pull them out.

Dropbox Sync: Progress So Far

Next add a JSON Path Extractor processor to extract out the file paths list from the above JSON response, using a JSON Path pattern: $.entries[*].name. This will store the resulting file name list in a scope variable named files, for further processing. A scope variable is a kind of temporary storage where you can retain simple values for referring later in the flow.

Variable Name files
JSON Path $.entries[*].name

Then add a ForEach Loop to iterate over the previously mentioned scope variable, so that we can process each of the observed files separately. The next processing operations will each take place within a single iteration of the loop.

Basic tab:

Collection Variable Name files
Collection Type COLLECTION
Iterating Variable Name file

Now add a new Dropbox Connector (configured with your app and account credentials as before), along with a, Download Entity connector operation, to download the file (file) corresponding to the current iteration from Dropbox into the local directory.

Tip: When you are drawing outgoing connections from ForEach Loop, note that the topmost out port is for the loop termination (exit) path, and not for the next iteration!

Basic tab:

Client ID {client ID for your Dropbox app}
Access Token {access token for your Dropbox account, under the above app}

Advanced tab:

Retry Count 3

Download Entity, Basic tab:

Path /Feedback/Inbox/@{variable.file}
Destination /home/jane/dropbox-feedback/@{current.timestamp.yyyy-MM-dd_HH-mm}

Next add another Dropbox Connector (configured with your app and account credentials) with a Move Entity connector operation, to move the original file to /Feedback/Synced so that we would not process it again. We will set the Retry Count property of the connector to 3, to make a best effort to move the file (in case we face any temporary errors, such as network failures, during the initial move). We will also enable Auto-Rename on the connector operation to avoid any possible issues resulting from files with same name being placed at /Feedback/Inbox at different times (which could cause conflicts during movement).

Move Entity, Basic tab:

Path /Feedback/Inbox/@{variable.file}
Destination /Feedback/Synced/@{variable.file}

Now add a Successful Flow End element to signify that the message flow has completed successfully.

Now we need to connect the processing elements together, to resemble the following final flow diagram:

Dropbox Sync: Sample Flow

Finally, now we are ready to test our brand new Dropbox sync flow!

Before proceeding, ensure that your Dropbox account contains the /Feedback/Inbox and /Feedback/Synced directories.

Create an UltraStudio run configuration by clicking Run → Edit Configurations... on the menu, and selecting UltraESB-X Server under the Add New Configuration (+) button on the top left.

Now, with everything in place, select Run → Run configuration name from the menu to launch your project!

If everything goes fine, after a series of blue-colored logs, you'll see the following line at the end of the Run window:

2017-11-23T11:45:27,554 [127.0.1.1-janaka-ENVY] [main] [system-] [XEN45001I013]
INFO XContainer AdroitLogic UltraStudio UltraESB-X server started successfully in 1 seconds and 650 milliseconds

If you get any errors (red) or warnings (yellow) before this, you would have to click Stop (red square) on the Run window to stop the project, and dig into the logs to get a clue as to what might have gone wrong.

Once you have things up and running, open your Dropbox account on your favourite web browser, and drop some files into the /Feedback/Inbox directory.

After a few seconds (depending on the cron expression that you provided above), the files you dropped there will magically appear in a folder /home/jane/dropbox-feedback/. After this, if you check the Dropbox account again, you will notice that the original files have been moved from /Feedback/Inbox to /Feedback/Synced, as we expected.

Now, if you drop some more files into /Feedback/Inbox, they will appear under a different folder (named with the new timestamp) under /home/jane/dropbox-feedback. This would not be a problem for Jane, as in her case the flow will only be triggered once a day, resulting in a single directory for each day.

See? That's all!

Now, all that is left is to call Jane and let her know that her Dropbox integration task is ready to go alive!

Sunday, November 19, 2017

Out, you wretched, corrupted cache entry... OUT! (exclusively for the Fox on Fire)

While I'm a Firefox fan, I often run into tiny issues of the browser, many of which cannot be reproduced in clean environments (and hence are somehow related to the dozens of customizations and the horde of add-ons that I take for granted).

I recently nailed one that had been bugging me for well over three years—practically ever since I discovered FF's offline mode.

While the offline mode does an excellent job almost all the time, sometimes it can screw up your cache entries so bad that the only way out is a full cache clear. This often happens if you place the browser in offline mode while a resource (CSS, JS, font,... and sometimes even the main HTML page, esp. in case of Wikipedia).

If you are unfortunate enough to run into such a mess, from then onwards, whenever you load the page from cache, the cache responds with the partially fetched (hence partially cached) broken resource—apparently a known bug. No matter how many times you refresh—even in online mode—the full version of the resource will not get cached (the browser would fetch the full resource and just discard it secretly, coughing up the corrupted entry right away during the next offline fetch).

Although FF has a "Forget about this site" option that could have shed some light (as you could simply ask the browser to clear just that page from the cache), the feature is bugged as well, and ends up clearing your whole cache anyway; so you have no easy way of discarding the corrupted entry in isolation.

And the ultimate and unfortunate solution, for getting the site to work again, would be to drop several hundred megabytes of cache, so that the browser could start from zero; or to stop using the site until the expiry time of the resource is hit, which could potentially be months ahead in the future.

The good news is, FF's Cache2 API allows you to access the offending resource by URL, and kick it out of the cache. The bad news, on tbe other hand, is that although there are a few plugins that allow you to do this by hand, all of them are generic cache-browsing solutions, so they take forever to iterate through the browser cache and build the entry index, during which you cannot practically do anything useful. I don't know how things would be on a fast disk like a SSD, but on my 5400-RPM magnetic disk it takes well over 5 minutes to populate the list.

But since you already know the URL of the resource, why not invoke the Cache2 API directly with a few lines of code, and kick the bugger out yourself?

// load the disk cache
var cacheservice = Components.classes["@mozilla.org/netwerk/cache-storage-service;1"]
    .getService(Components.interfaces.nsICacheStorageService);
var {LoadContextInfo} = Components.utils.import("resource://gre/modules/LoadContextInfo.jsm",{})
var hdcache = cacheservice.diskCacheStorage(LoadContextInfo.default, true);

// compose the URL and submit it for dooming
var uri = Components.classes["@mozilla.org/network/io-service;1"]
    .getService(Components.interfaces.nsIIOService).newURI(prompt("Enter the URL to kick out:"), null, null);
hdcache.asyncDoomURI(uri, null, null);

Yes, that's all. Once the script is run on the browser console, with uri populated with the URL of the offending resource (which in this case is read in using a JS prompt()), poof! You just have to reload the resource (usually by loading the parent HTML page), taking care not to hit the offline mode prematurely, to get the site working fine again.

And that's the absolute beauty of Firefox.

Expires? Pragma? Cache-Control? Anybody home?... Yay! (exclusively for the Fox on Fire)

As you may already have noticed, from my previous articles and my (limited) GitHub contributions, that I am an absolute Firefox (FF) fan (though I cannot really call myself a Mozillian yet). Some of my recent endeavors with FF brought me closer to FF's internal and add-on APIs, which happen to be somewhat tough but quite interesting to work with.

I have been running an ancient FF version (45.0) until recent times, as I had too much to lose (and migrate) in terms of customizations if I decided to upgrade. Besides, I loved the single-process elegance of FF, amidst the endless "multiprocess Chrome is eating up my RAM!" complaints from the "Chromians" all around. I even downloaded a Nightly several months ago, but did not proceed to install it as it would simply involve too much hassle. Meanwhile, needless to say, I was continually being bombarded with sites howling "WTF is your browser? It's stone-age!" (in more civilized jargon, of course).

About a month ago I finally gave in, and installed the old nightly just to get the hang of the new FF. I must say I wasn't disappointed—in fact, I was a bit impressed. The multiprocess version didn't seem to be as bad as Chrome in terms of memory footprints (although I had to keep on restarting the browser every week; possibly due to some memory leaks introduced by my customizations?), and the addons too had matured to be e10s compatible. All was going fine...

... until I tried to reload the Gmail mobile page that I just visited, in offline mode.

I was baffled when, instead of the cached page, I was smacked with an "Offline Mode" error message.

What the... has FF stopped caching pages?

Nope, some pages still get loaded perfectly under offline mode.

Then where's the problem?

Maybe Gmail has set some brand-new cache-prevention header, right by the time I was busy setting up my new browser?

Luckily I had left my old browser intact; and no, it continued to cache the same page just fine.

Maybe the actual response from mail.google.com would give a clue.

Well, that was it. Gmail had been sending an Expires: Mon, 01 Jan 1990 00:00:00 GMT header, and my dear old FF 45.0 seems to have somehow been neglecting it all this time, hence unintentionally offering me the luxury of being able to view cached Gmail mobile pages all the way until the end of the current session.

Now that the "feature" was gone, I was basically doomed.

Worse still, the new "compiance" had rendered several other sites uncacheable: including Facebook, Twitter and even Google Search.

Of course you realize, this means war.

Reading a few MDN docs and browsing the FF Addons site, I soon realized that I was going to be all alone on this one. So I set forth, writing a response interceptor based on the Observer_Notifications framework, to strip off the expiration-related headers from all responses, hopefully before they have a chance of reaching (correction: not reaching) the Cache2.

Cc["@mozilla.org/observer-service;1"].getService(Ci.nsIObserverService).addObserver({
	observe: function(aSubject, aTopic, aData) {
		var channel = aSubject.QueryInterface(Ci.nsIHttpChannel);
		channel.setResponseHeader("Expires", "", false);
		channel.setResponseHeader("expires", "", false);
		channel.setResponseHeader("cache-control", "", false);
		channel.setResponseHeader("Cache-Control", "", false);
		channel.setResponseHeader("pragma", "", false);
		channel.setResponseHeader("Pragma", "", false);
	}
}, "http-on-modify-request", false);

That's all. Just 11 lines of code, a copy-paste into the browser console (Ctrl+Shift+F12), and a gentle touch on the Enter key.

No, hit it down hard, because you're going to nail it, once and for all!

I registered the handler on the browser, with a handy KeyConfig shortcut to toggle it when required (with some help from my own ToggleService framework; and all was back to normal. In fact it was better than normal, because some sites that were skipping the cache so far, started submitting to my desires right away; and because some self-destruct pages started to live across browser sessions—I could restart the btowser and enjoy viewing the Facebook, Gmail and other pages that usually kept on disappearing from the cache after each restart.

All of it, thanks to the amazing extensibility and customizability of Firefox.

Beating the GAS clock: Say Hello to MemsheetApp!

Google's Apps Script framework is really awesome as it helps—newbies and experts alike—to leverage the power of Google (as well as external) services for their day-to-day gimmicks—and sometimes even for enterprise-level integration. SpreadsheetApp is one of its best-known features, which allows one to create and manage Google spreadsheet documents via simple JS calls.

As simple as it may seem, misuse of SpreadsheetApp can easily lead to execution timeouts and fast exhaustion of your daily execution time quota (which is quite precious, especially when you are on the free plan). This is because most of the SpreadsheetApp operations take a considerable time to complee (possibly because they internally boil down to Google API calls? IDK) often irrespective of the amount of data read/written in each call.

In several of my projects, where huge amounts of results had to be dumped into GSheets in this manner, I ran into an impassable time barrier: no matter how much I optimized, the scripts kept on shooting beyond the 5-minute time limit. I had to bring in-memory caching to the picture, first per row, then per logical row set and finally for the whole spreadsheet (at which point the delays virtually disappeared).

  matrix = [];
  ...

      if (!matrix[row]) {
        matrix[row] = new Array(colCount);
      }
      for (k = 0; k < cols.length; k++) {
        matrix[row][k] = cols[k];
      }
  ...
  sheet.getRange(2, 2, rowCount, colCount).setValues(matrix);

Then, recently, I happened to run into a refactoring task on a GSheetd script written by a different developer. This time it was a different story, as every cell was referenced by name:

  for (i = 0; i < data.length; i++){
    spreadsheet.getRange("A" + (i + 2)).setValue((i + 2) % data.length);
    spreadsheet.getRange("B" + (i + 2)).setValue(data[i].sum);
    ...
  }

And there were simply too many references to fix by hand, and too many runtime data to utilize the default SpreadsheetApp calls without running into a timeout.

Then I had an idea, why can't I have an in-memory wrapper for SpreadsheetApp, which would give us the speed advantage without having to change existing code?

So I wrote my own MemsheetApp that uses a simple 2-D in-memory array to mimic a spreadsheet, without writing-through every operation to the API.

One problem I faced was that there is no specific way (call or event) to "flush" the data accumulated in-memory while retaining compatibility with the SpreadsheetApp API. The best thing I could find was SpreadsheetApp.flush() which, in normal use, would flush data of all open spreadsheets. In my case I had to explicitly retain references to all MemsheetApp instances created through my app, and flush them all during the global MemsheetApp.flush() call.

So, here goes the MemsheetApp source (hopefully I'll make it a GitHub gist soon):

MemsheetApp = {
  list: [],
  create: function(_name) {
    sheet = {
      //sheet: SpreadsheetApp.create(_name),
      name: _name,
      rows: [],
      maxRow: 0,
      maxCol: 0,
      getId: function() {
        return this.sheet.getId();
      },
      getRange: function(col, row) {
        if (!row) {
          row = col.substring(1);
          col = col.substring(0, 1);
        }
        
        if (isNaN(row)) {
          throw new Error("Multicell ranges not supported unless separating col and row in separate parameters");
        }
        
        c = col;
        
        if (typeof col  === "string"){
          c = col.charCodeAt(0) - 65;
        
          // this supports 2 letters in col
          if (col.length > 1) {
            //"AB": 1 * (26) + 1 = 27 
            c = ( (c + 1) * ("Z".charCodeAt(0) - 64)) + (col.charCodeAt(1) - 65);
          }
        }
        
        if (this.maxCol < c) {
          this.maxCol = c;
        }
        r = parseInt(row) - 1;
        if (this.maxRow < r) {
          this.maxRow = r;
        }
        
        if (!this.rows[r]) {
          this.rows[r] = [];
        }
        if (!this.rows[r][c]) {
          this.rows[r][c] = 0;
        }
        
        return {
          rows: this.rows,
          getValue: function() {
            return this.rows[r][c];
          },
          setValue: function(value) {
            this.rows[r][c] = value;
          }
        }
      }
    };
    this.list.push(sheet);
    return sheet;
  },
  flush: function() {
    for (i in this.list) {
      l = this.list[i];
      rowDiff = l.rows.length - Object.keys(l.rows).length;
      if (rowDiff > 0) {
        // insert empty rows at missing row entries
        emptyRow = [];
        for (c = 0; c < l.rows[0].length; c++) {
          emptyRow.push("");
        }
        for (j = 0; j < l.rows.length && rowDiff > 0; j++) {
          if (!l.rows[j]) {
            l.rows[j] = emptyRow;
            rowDiff--;
          }
        }
      }

      l.sheet.getActiveSheet().getRange(1, 1, l.maxRow + 1, l.maxCol + 1).setValues(l.rows);
    }
  }
}

As you may notice, it offers an extremely trimmed-down version of the SpreadsheetApp API, currently supporting only getValue(), setValue() and setNumberFormat() methods of Range and create() and flush() of SpreadsheetApp. One could simply add new functionalities by creating implementations (or wrappers) for additional methods at appropriate places in the returned object hierarchy.

If you are hoping to utilize MemsheetApp in your own Apps Script project, all you have to do extra is to ensure that you call MemsheetApp.flush() once you are done with inserting your data. This method is safe to call on regular SpreadsheetApp module as well, which means that you can convert your existing SpreadsheetApp-based code to be compatible with just one extra harmless line of code.

However, the coolest thing is that you can switch between SpreadsheetApp and MemsheetApp once you have refactored the code accordingly:

SheetApp = MemsheetApp;
// uncomment next line to switch back to SpreadsheetApp
// SheetApp = SpreadsheetApp;

// "SpreadsheetApp" in implementation code has been replaced with "SheetApp"
var ss1 = SheetApp.create("book1").getActiveSheet();

ss1.getRange(2, 2, 10, 3).setNumberFormat(".00");
ss1.getRange("A2").setValue(10);
...

var ss2 = SheetApp.create("book2").getActiveSheet();

ss2.getRange(2, 1, 1000, 1).setNumberFormat("yyyy-MM-dd");
ss2.getRange(2, 2, 1000, 1).setNumberFormat(".0");

// assume "inputs" is a grid of data, with dates in first column
// and 1-decimal-place precision numbers in second column
inputs.forEach(function(value, index) {
    ss2.getRange("A" + (index + 1)).setValue(value[0]);
    ss2.getRange("B" + (index + 1)).setValue(value[1]);
});
...

// this will push cached data to "ss1" and "ss2", from respective in-memory grids;
// and will have a similar effect (flushing all pending changes) when SpreadsheetApp is in use
SheetApp.flush();

MemsheetApp is a long way from being a fully-fledged wrapper, so feel free to improve it as you see fit; and share it here or somewhere public for the benefit of the Apps Script community.

Stop pulling out your (JSON-ey) hair; just drag, drop and connect!

The app is finally taking shape.

Data is sitting in your datastore.

Users are about to start bombarding the front-end with requests.

Quite a familiar scenario for any standard web/mobile app developer.

You have approached the Big Question:

How to get the balls rolling?

How to transform user actions into actual backend datastore operations?

One (obvious) way would be to build an ORM, configure a persistence provider (such as Hibernate-JPA) and link the pieces together through an MVC-style contraption.

But what if you don't want all those bells and whistles?

Or, what if all you need is just a quick 'n dirty PoC to impress your client/team/boss, while you are struggling to get the real thing rolling?

Either way, what you need is the "glue" between the frontend and the data model; or "integration" in more techy jargon.

UltraESB-X, successor of the record-breaking UltraESB, is an ideal candidate for both your requirements. Being a standalone yet lean runtime—just 9 MB in size, and runnable with well below 100 MB of heap—you could easily deploy one in your own dev machine, prod server, cloud VM, Docker, or on IPS, the dedicated lifecycle manager for on-premise and (coming up) cloud deployments.

UltraESB-X logo

As if that wasn't enough, building your backend becomes a simple drag-and-drop game, with the cool UltraStudio IDE for integration project development. Just pick the pieces, wire them together under a set of integration flows—one per each of your workflows, with interleaving subflows where necessary—and have your entire backend tested, verified and ready for deployment within minutes.

UltraStudio logo

We have internally used UltraESB-X seamlessly with JPA/Hibernate, whose details we hope to publish soon—in fact, there's nothing much to publish, as it all just works out of the box, thanks to the Spring-driven Project-X engine powering the beast.

Project-X logo

That being said, all you need right now is that QnD solution to wow your boss, right?

That's where the JSON Data Service utility comes into play.

JSON data service

Tiny as it may seem, the JSON Data Service is a powerful REST-to-CRUD mapper. It simply maps incoming REST API requests into SQL, executing them against a configured database and returning the results as JSON. Exactly what you need for a quick PoC or demo of your app!

We have a simple yet detailed sample demonstrating how to use the mapper, but all in all it's just a matter of specifying a set of path-to-query mappings. The queries can utilize HTTP path and query parameters to obtain inputs. SQL column name aliases can be used to control what fields would be returned in the response. The HTTP method of the inbound request (GET, POST, PUT, DELETE) decides what type of operation (create, read, update, delete) would be invoked. Of course, you can achieve further customization (adding/modifying fields, transforming the result to a different format such as XML, as well as audit actions such as logging the request) by simply enhancing the integration flow before the response is returned to the caller.

For example, here are some REST API operations, with their corresponding JSON Data Service configurations (all of which could be merged into a single integration flow, to share aspects like authentication and rate limiting):

Assuming

  • a book API entity to be returned to the frontend:
    {
    	"name": "book_name",
    	"author": "author_name",
    	"category": "category_name"
    }
  • a BOOK table:
    (
    	ID SMALLINT,
    	NAME VARCHAR(25),
    	AUTHOR_ID SMALLINT,
    	CATEGORY VARCHAR(25)
    )
  • and an associated AUTHOR table:
    (
    	ID SMALLINT,
    	NAME VARCHAR(25)
    )

The following API endpoints:

REST path operation
GET /books?start={offset}&limit={count} return all books, with pagination (not including author details)
GET /books/{id} return a specific book by ID, with author details
GET /books/search?author={author} return all books of a given author

could be set up with just the following data service configuration mapping (the rest of the steps being identical to those in our dedicated sample; just ensure that you maintain the order, and note the extra SINGLE: in front of the 2nd query):

JSON Data Service: Simplest Flow

key value
/books/search?author={author:VARCHAR}
SELECT B.NAME AS name, B.CATEGORY AS category
    FROM BOOK B, AUTHOR A
    WHERE B.AUTHOR_ID = A.ID AND A.NAME = :author
/books/{id:INTEGER}
SINGLE: SELECT B.NAME AS name, A.NAME AS author, B.CATEGORY AS category
    FROM BOOK B, AUTHOR A
    WHERE B.AUTHOR_ID = A.ID AND B.ID = :id
/books?start={offset:INTEGER}&limit={count:INTEGER}
SELECT NAME AS name, CATEGORY AS category 
    FROM BOOK LIMIT :offset, :count

See? Anybody with a basic SQL knowledge can now set up a fairly complex REST API, without writing a single line of code, thanks to the JSON Data Service!

Project-X S01E01: Pilot

P.S.: Okay, while the Pilot is supposed to arouse curiosity and keep you on the edge of the seat for S01E02, I'm not sure how well I've done that—rereading what I just completed writing. Anyway, see for yourself!

In February 2017, something happened. Something that has never been seen, and rarely been heard, ever before.

Project-X.

Project-X movie poster

No, not the movie! That was in 2012!

Engine. Messaging Engine.

Project-X logo

A lean (~9 MB), fast (yup, benchmarked) and reliable messaging engine.

But not just a messaging engine.

The original authors supposed it to be an Enterprise Service Bus (ESB). But, over time, it evolved.

Into a simple yet formidable integration middleware product.

Capable of connecting the dots: you, your customers, your partners, and the wide, wide world (WWW).

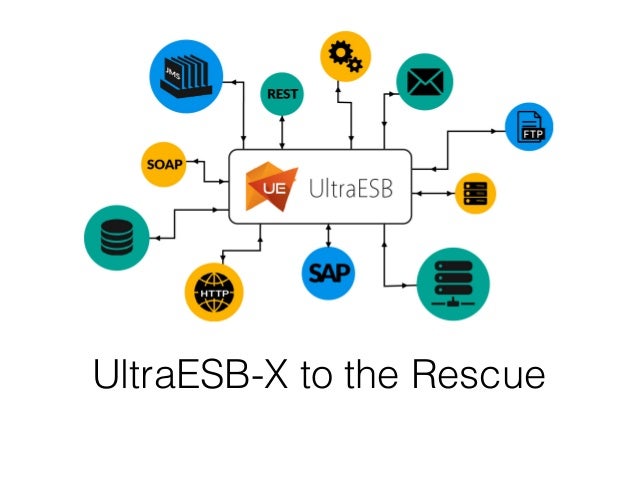
to the rescue!

Proven by powering the cores of many other integration solutions, including the famous B2B AS2 trading platform.

And, most importantly, something that can help you—and your company—tackle its integration challenges at a fraction of the time, effort and cost. Something that would allow you to draw your solution rather than coding or configuring it. Something that would make your PoC as good as your final draft, as they would essentially be the same.

Something that would make you enjoy integration, rather than hating it.

While you can always explore our official documentation to unravel how all this works (yup, I heard that yawn :)) the following couple of facts is all you need to know in order to grab Project-X by its horns:

Project-X deals with messages, or distinct and quantifiable bits of information (a clock tick, a HTTP request, an event/message over JMS/Kafka, a file dropped into your SFTP folder, a neutron emitted from a U-235, an interplanetary collision,... you name it).

U-235 fission

The beauty is the fact that almost every bit of interaction in an integration (connecting-the-dots) scenario can be mapped into a message. Care to see some examples?

  • "A consumer is calling your API" maps into "a HTTP request"
  • "Your customer just bought 3 techno-thrillers from your ebook store" could map to "an event over Kafka"
  • "Your partner just sent you an invoice" could map into "a file dropped into your SFTP folder"

Being the expert on messages, Project-X can take up the rest.

Project-X magical expertise

Project-X can consume messages from an insanely wide variety of sources. Ingress connectors bring in these messages into the Project-X engine. We already have connectors for all of the above examples, except maybe for the last (left as an exercise for the reader).

NIO HTTP ingress connector

Project-X can emit messages into an equally wide array of destinations over different media. Egress connectors are the ones that do this.

NIO HTTP egress connector

In between consumption and emission, a message can go through all sorts of weird experiences, which could consist of transormation, extraction, enrichment, conditional branching, looping, split-aggregation, throttling, exceptions,... and a lot more of other unimaginable stuff. Processing elements perform all this magic.

header conditions evaluator

(By the way, This document deals with all the gruesome details, in case you are interested.)

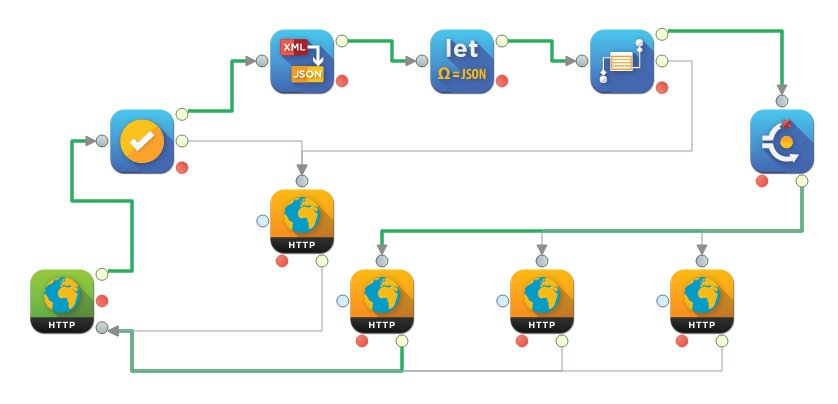
An ingress connector, a chain of processing elements and an egress connector, together make up an integration flow that represents everything that a message is destined to go through, given that it is sucked in by the ingress connector. A simple analogy is a conveyor belt on a production line, where something comes in and something (similar or different) comes out. Forget not, however, that depending on your requirement, an integration flow can be made as complex, rich and flexible as you like; your imagination being the only limit.

integration flow using the above components

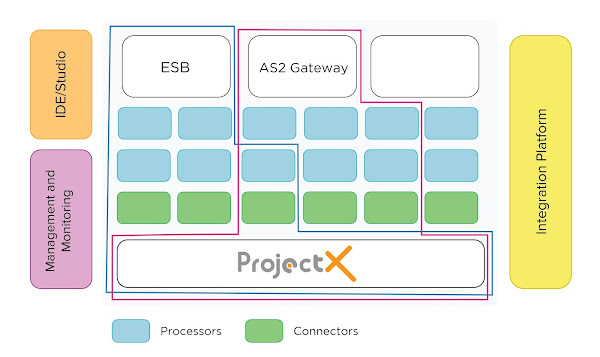
Related integration flows are often bundled into a single integration project (yup, we love that word "integration"), which can be deployed as a single unit of functionality in a Project-X engine such as UltraESB-X.

integration architecture

Project-X keeps track of each and every message flying through the integration flows in every single project that is deployed in its runtime, and fully manages the lifecycle of each message (including allocating its required resources, routing it to the correct connector, pumping it through the flow, handling failures, gathering metrics, and cleaning up after its death/completion).

On top of all this, Project-X has its own bag of tricks, goodies and other cool stuff:

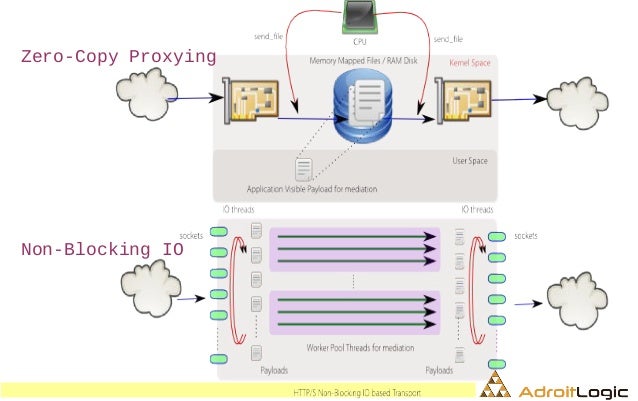
For you, the tech-savvy:

zero-copy proxying

For you, developers and architects:

  • A five-minute prototyping platform for your next integration project, whose thin-slice PoC outcome would eventually evolve into a fully-blown production deployment
  • An intuitive, DIY integration surface with the familiar notions of messages, events, connectors and flows, instead of painful XML configurations
  • A warehouse of ready-made connectors and processing elements to choose from
  • A simple and flexible way to create your own connectors and processors, and share/reuse them across projects (so you never have to reinvent the wheel across your colleagues, teams or departments... or even companies)
  • A super-cool IDE where you can graphically compose your integration solution (drag-and-drop, set-up and wire-together) and test, trace and debug it right away

UltraStudio integration flow message tracing

For you, deployers and sysadmins:

  • A pure Java-based runtime (no native libs, OSGi, voodoo or animal sacrifices)
  • Pluggable, REST-based, secure management API for remote administration
  • Pluggable analytics via Elasticsearch metrics collectors
  • Ready-made runtime bundled with the IDE for seamless dev-test cycles
  • Quick-and-dirty testing with ready-made Docker images: choose between slim and rich
  • A production bundle complete with a daemon (service-compatible) deployment, and in-built statistics and management servers
  • A tooling distribution for management operations: a CLI for engine governance, and ZooKeeper client/server bundles for clustering
  • A fully-fledged management console for tracking, monitoring and managing your deployment, complete with statistics, alerting and role-based access control
  • A fully-fledged containerized deployment platform, that can run in-cloud or on-premise, for deploying and managing Project-X clusters with just a few mouse clicks (and keystrokes)

Project-X integration solution development cycle

To be continued...

(Keep in touch for S01E02!)