Integration, or "connecting the dots", is something that is quite difficult to avoid in the modern era of highly globalized business domains. Fortunately, integration, or "enterprise integration" in more "enterprise-y" terms, is no longer meant to be something that makes your hair stand, thanks to advanced yet user-friendly enterprise integration frameworks such as Project-X.
Today, we shall extend our helping hand to Jane, a nice Public Relations officer of the HappiShoppin supermarket service (never heard the name? yup, neither have I :)) in setting up a portion of her latest customer feedback aggregation mechanism. No worries, though, since I will be helping and guiding you all the way to the end!
The PR Department of HappiShoppin supermarket service has opened up new channels for receiving customer feedback. In addition to the former, conventional paperback feedback drop-ins, they now accept electronic feedback via their website as well as via a public Dropbox folder (in addition to social media, Google Drive, Google Forms etc). Jane, who is heading the Dropbox-driven feedback initiative, would like to set up an automated system to sync any newly added Dropbox feedback to her computer so that she can check them offline whenever it is convenient for her, rather than having to keep an eye on the Dropbox folder all the time.
Jane has decided to compose a simple "Dropbox sync" integration flow that would periodically sync new content from the feedback accumulation Dropbox folder, to a local folder on her computer.
- On HappiShoppin's shared Dropbox account,
/Feedback/Inboxis the folder where customers can place feedback documents, and Jane hopes to sync the new arrivals into/home/jane/dropbox-feedbackon her computer. - Jane has estimated that it is sufficient to sync content once a day, as the company receives only a limited number of feedback over a given day; however, during the coming Christmas season, the company is expecting a spike in customer purchases, which would probably mean an accompanied increase in feedback submissions as well.
- For easier tracking and maintenance, she wants the feedback files to be organized into daily subfolders.
- In order to avoid repetitively syncing the same feedback file, Jane has to ensure that the successfully synced files are removed from the inbox, which she hopes to address by moving them to a different Dropbox folder:
/Feedback/Synced.

Now, before we begin, a bit about what Project-X is and what we are about to do with it:
- Project-X is a messaging engine, which one could also call an enterprise service bus (which is also valid for the scenario we are about to tackle).
- Project-X ingests events (or messages) from ingress connectors, subjects them to various transformations via processing elements, and emits them to other systems via egress connectors. For a single message, any number of such transformations and emissions can happen, in any order.
- The message lifecycle described above, is represented as an integration flow. It is somewhat similar to a conveyor belt in a production line, although it can be much more flexible with stuff like cloning, conditional branching, looping and try-catch flows.
- A set of integration projects make up an integration project, which is the basic deployment unit when it comes to Project-X runtimes such as UltraESB-X.
So, in our case, we should:
- create a new integration project
- create an integration flow inside the project, to represent Jane's scenario
- add the necessary connectors and processors, and configure and wire them together
- test the flow to see if what we assembled is actually capable of doing what Jane is expecting
- build the project into a deployable artifact, ready to be deployed in UltraESB-X
While the above may sound like quite a bit of work, we already have a cool IDE UltraStudio that can do most of the work for us. With UltraStudio on your side, all you have to do is to drag, drop and connect the required connectors and processing elements, and everything else will be magically done for you. You can even try out your brand-new solution right there, inside the IDE, and trace your events or messages real-time as they pass through your integration flow.
So, before we begin, let's get UltraStudio installed on your system (unless you already have it, of course!).
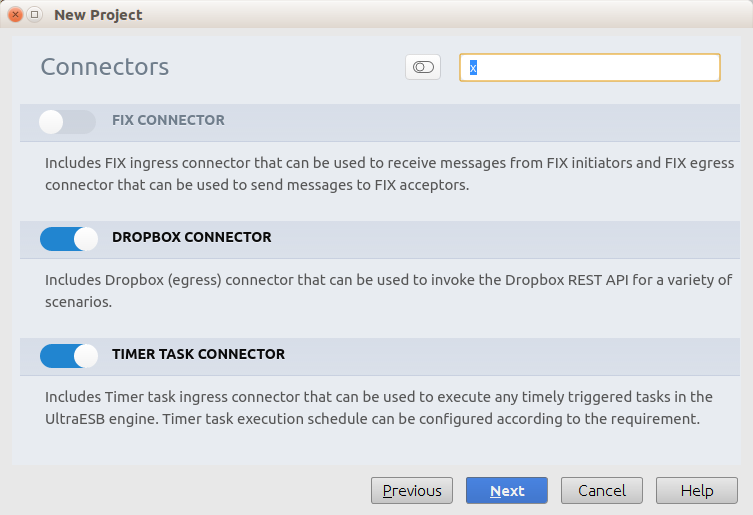
Once you are ready, create a new Ultra Project using File → New → Project... option on the menu bar and selecting Empty Ultra Project. While creating the project, select the following components on the respective wizard pages (don't worry, in a moment we'll actually get to know what they actually are):
- Timer Task Connector and Dropbox Connector on the Connectors page
- JSON Processor and Flow Control processor on the Processors page
If you were impatient and had already created a project, you could always add the above components later on via the menu option Tools → Ultra Studio → Component Registry.
Now we can start by creating a new integration flow dropbox-sync-flow, by opening the Project side pane and right-clicking the src/main/conf directory.

Again, a few tips on using the graphical flow UI (in case you're wondering where on earth it is) before you begin:
- Inside, an integration flow is a XML (Spring) configuration, which UltraStudio can alternatively represent as a composable diagram for your convenience.
- You can switch between the XML and graphical views using the two small tabs that would appear at the bottom of an integration flow file while it is opened in the IDE. (These tabs might be missing at certain times, e.g. when the IDE is performing indexing or Maven dependency resolution; at such times, patience is a virtue!)
- The graphical view contains a side palette with all the components (connectors and processors) that have currently been added to your project (at creation or through the Component Registry). You can browse them by clicking on the collapsible labels on the palette, and add them to the flow by simply dragging-and-dropping them into the canvas.
- In order to mimic the message flow, components should be connected together using lines drawn between their ports (small dots of different colors that appear around the component's icon). You will get the hang of it, when you have had a look at some of the existing integration flows, or at the image of the flow that would be developing (appearing later in this article).
- When a component requires configuration parameters, a configuration pane gets automatically opened as soon as you drop an element into the canvas (you can also open it by clicking on the component later on). If the labels or descriptions on the configuration pane are not clear enough, just switch to the Documentation tab and click on the "Read more" URL to visit the complete documentation of the element (on your favourite web browser). Also, make sure that you click the Save button (at the bottom or on the side pane) once you have made any changes.
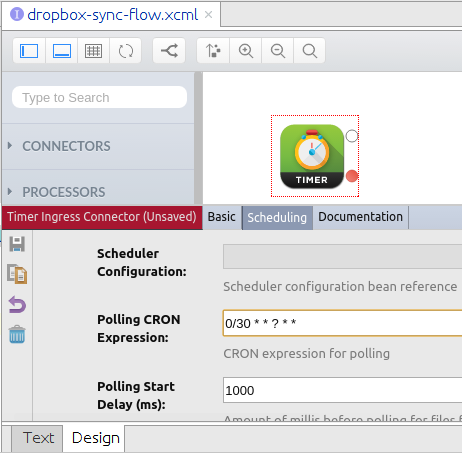
Start the flow with a Timer Ingress Connector. This is a connector used to trigger a periodic event (similar to a clock tick) for a time-driven message flow. Let's configure it to trigger an event that would set the sync process in motion. For flexibility, we will use a cron expression instead of a simple periodic trigger.
Scheduling tab:
| Polling CRON Expression | 0/30 * * ? * * |
Although Jane wanted to run the check only at 6 PM each day, we have set the polling time to every 30 seconds, for the sake of convenience; otherwise you'll simply have to wait until 6 PM to see if things are working :)
Next add a Dropbox Egress Connector with a List Entities Connector operation element added to the side port. You can find the connector operations by clicking on the down arrow icon against the Dropbox Connector on the component palette, which will expand a list of available connector operations.
A connector operation is an appendage that you can, well, append to a connector, which will perform some additional processing on the outgoing message in a connector-specific way. For example, for Dropbox we have a main connector, with a bunch of connector operations that represent different API operations that you can perform against your Dropbox account, such as managing files, searching, downloading, etc.
Configure the Dropbox Connector with the shared Dropbox account credentials (App ID and Access Token), and the connector operation with the Path /Feedback/Inbox.
Basic tab:
| Client ID | {client ID for your Dropbox app;
visit https://www.dropbox.com/developers/apps/create to create a new app} |
| Access Token | {access token for your Dropbox account, under the above app;
follow https://blogs.dropbox.com/developers/2014/05/generate-an-access-token-for-your-own-account/
to obtain an access token for personal use against your own app} |
List Entities, Basic tab:
| Path | /Feedback/Inbox |
The above contraption will return a List Folder response, containing all files that are currently inside /Feedback/Inbox, as a wrapped JSON payload:
{
    "entries": [
        {
            ".tag": "file",
            "name": "johndoe.docx",
            "id": "id:12345_67_890ABCDEFGHIJ",
            ...
        }, {
            ".tag": "file",
            "name": "janedoe.txt",
            "id": "id:JIHGF_ED_CBA9876543210",
            ...
        }
    ],
    ...
}
Ah, now there's the info that we have been looking for; sitting there in boldface. Now we need to somehow pull them out.

Next add a JSON Path Extractor processor to extract out the file paths list from the above JSON response, using a JSON Path pattern: $.entries[*].name. This will store the resulting file name list in a scope variable named files, for further processing. A scope variable is a kind of temporary storage where you can retain simple values for referring later in the flow.
| Variable Name | files |
| JSON Path | $.entries[*].name |
Then add a ForEach Loop to iterate over the previously mentioned scope variable, so that we can process each of the observed files separately. The next processing operations will each take place within a single iteration of the loop.
Basic tab:
| Collection Variable Name | files |
| Collection Type | COLLECTION |
| Iterating Variable Name | file |
Now add a new Dropbox Connector (configured with your app and account credentials as before), along with a, Download Entity connector operation, to download the file (file) corresponding to the current iteration from Dropbox into the local directory.
Tip: When you are drawing outgoing connections from ForEach Loop, note that the topmost out port is for the loop termination (exit) path, and not for the next iteration!
Basic tab:
| Client ID | {client ID for your Dropbox app} |
| Access Token | {access token for your Dropbox account, under the above app} |
Advanced tab:
| Retry Count | 3 |
Download Entity, Basic tab:
| Path | /Feedback/Inbox/@{variable.file} |
| Destination | /home/jane/dropbox-feedback/@{current.timestamp.yyyy-MM-dd_HH-mm} |
Next add another Dropbox Connector (configured with your app and account credentials) with a Move Entity connector operation, to move the original file to /Feedback/Synced so that we would not process it again. We will set the Retry Count property of the connector to 3, to make a best effort to move the file (in case we face any temporary errors, such as network failures, during the initial move). We will also enable Auto-Rename on the connector operation to avoid any possible issues resulting from files with same name being placed at /Feedback/Inbox at different times (which could cause conflicts during movement).
Move Entity, Basic tab:
| Path | /Feedback/Inbox/@{variable.file} |
| Destination | /Feedback/Synced/@{variable.file} |
Now add a Successful Flow End element to signify that the message flow has completed successfully.
Now we need to connect the processing elements together, to resemble the following final flow diagram:

Finally, now we are ready to test our brand new Dropbox sync flow!
Before proceeding, ensure that your Dropbox account contains the /Feedback/Inbox and /Feedback/Synced directories.
Create an UltraStudio run configuration by clicking Run → Edit Configurations... on the menu, and selecting UltraESB-X Server under the Add New Configuration (+) button on the top left.
Now, with everything in place, select Run → Run configuration name from the menu to launch your project!
If everything goes fine, after a series of blue-colored logs, you'll see the following line at the end of the Run window:
2017-11-23T11:45:27,554 [127.0.1.1-janaka-ENVY] [main] [system-] [XEN45001I013]
INFO XContainer AdroitLogic UltraStudio UltraESB-X server started successfully in 1 seconds and 650 milliseconds
If you get any errors (red) or warnings (yellow) before this, you would have to click Stop (red square) on the Run window to stop the project, and dig into the logs to get a clue as to what might have gone wrong.
Once you have things up and running, open your Dropbox account on your favourite web browser, and drop some files into the /Feedback/Inbox directory.
After a few seconds (depending on the cron expression that you provided above), the files you dropped there will magically appear in a folder /home/jane/dropbox-feedback/. After this, if you check the Dropbox account again, you will notice that the original files have been moved from /Feedback/Inbox to /Feedback/Synced, as we expected.
Now, if you drop some more files into /Feedback/Inbox, they will appear under a different folder (named with the new timestamp) under /home/jane/dropbox-feedback. This would not be a problem for Jane, as in her case the flow will only be triggered once a day, resulting in a single directory for each day.
See? That's all!
Now, all that is left is to call Jane and let her know that her Dropbox integration task is ready to go alive!
No comments:
Post a Comment