Yo! C'mere.
Lookn' for somethn'?
Serverless, ya?
Up there. Go strait, 'n take a right at da "Sigma" sign.
(Well, don't blame us yet; at least we thought it was that easy!)
One of our dream goals was that working with Sigma should be a no-brainer, even for a complete stranger to AWS. However, in the (very likely) event that it is not so yet, here is a short guide on how you can get the wheels turning.
Ingredients
First off, you need:
- an internet connection; since you are reading this, that's probably already ticked off!
- an AWS account; you could either create your own free account or ping us via Slack for one of our demo accounts
- a GitHub account; again, free to sign up if you don't have one already!
- a "modern" browser; we have tested ourselves on Chrome 59+, Firefox 58+, Edge 41+ and Safari 10.1.2+; other versions would probably work as well :)
- a mouse, trackball or touchpad (you'll drag quite a bit of stuff around) and a keyboard (you'll also type some stuff)
AWS Credentials
Before firing up Sigma, you need to gather or create some access credentials for allowing Sigma to access your AWS account. Sigma will do a lot on your behalf, including building and deploying your app into your AWS account, so for the moment we need full admin access to your account (we are planning on preparing a minimal set of permissions, so you can sleep well at night).
For obtaining admin credentials for your AWS account:
The easy (but not recommended) way:
Here you will allow Sigma to act as your AWS root user for gaining the required access. Although Sigma promises that it will never share your credentials with other parties (and store them, only if you ask to do so, with full encryption), using root user credentials is generally against the AWS IAM best practices.
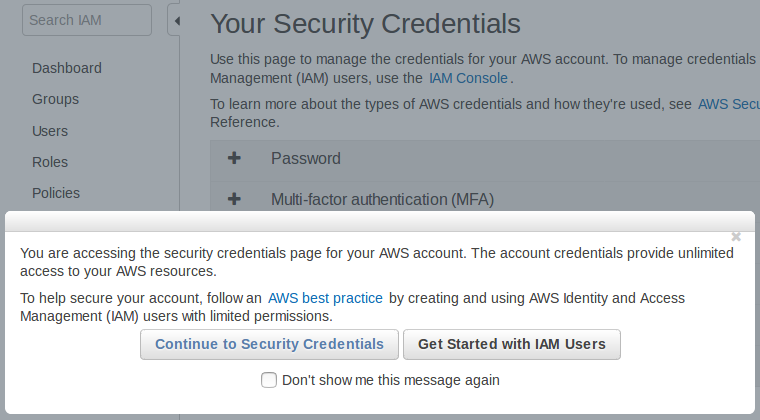
- Open the Security Credentials page of the IAM dashboard. If AWS asks for your confirmation, click Continue to Security Credentials to proceed.
- Click Access keys (access key ID and secret access key) among the list of accordions on the right pane.
- Click the Create New Access Key button. A pop-up will appear, stating that your access key has been created successfully.
- Click Show Access Key, which will display a pane with two parameters: an Access Key ID that looks like
AKIAUPPERCASEGIBBERISHand a longer, Secret Access Key. (WARNING: You'll see the latter value only once!) - Copy both of the above values to a secure location (or click Download Key File to save them to your filesystem). Combined, they can do anything against anything in your AWS account: the two keys to rule them all.


The detailed version is here.
The somewhat harder (but safer) way:
Here you will create a new administrator group inside your AWS account, create and assign a new user to that group (so that the user would have admin privileges on your account), and feed that user's access credentials to Sigma. This way, you can instantly revoke Sigma's access anytime by disabling/deleting the access keys of the new user, should you ever come to distrust/hate Sigma at some point in time (but don't do that to us, please! :))
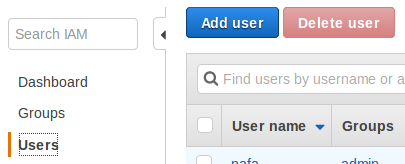
- Go to the IAM dashboard.
- Select Users on the left pane.
- Click the Add user button at the top of the right pane.
- Type a name (e.g.
sigma) for the User name field. - Under Access type, tick Programmatic access, and click Next: Permissions at the bottom right. (Tip: you can get to this point right away, using this shortcut URL.
- Click Create group under the Add user to group option. A new pop-up will open.
- Type a name (e.g.
admin) for the Group name field. - Tick off
AdministratorAccessin the list of policies. (It should usually appear at the top of the list; if not, typeAdministratorin the Filter text box to see it.) - Click Create group.
- The pop-up will close, and the brand new group will appear in the groups list of the permissions page, already selected (ticked off) for you.
- Click Next: Review.
- Double-check that your user has a nice name, and that it belongs to the new group you just created. If all looks fine, click Create user.
- Once the user is created, you will be shown a Success page with a table containing the Access Key ID and Secret Access Key (masked with
*s) of the user. - Click Show against the secret access key, to view its value. (WARNING: You'll see the latter value only once!)
- Copy both Access key ID and Secret access key to a safe location (or click Download CSV above).


Here's the official, detailed version.
Once you follow either of the above methods (and have an access key-secret key pair in hand), that's it! You'd no longer need to wander around on the AWS dashboards, as Sigma will handle it all for you.
Signing up with Sigma
Now, you're just three steps away from the awesome Sigma IDE! Let's go one step further by creating a brand new Sigma account (if you don't already have one):
- Go to the Sigma sign-in page.
- Click the "Create an account" link against the "New to Sigma?" message.
- Fill in your first and last names, email, and phone number (if it's okay with you).
- Take note of your username: we'll automatically generate one, using your first and last names. If you don't like our taste, you can always type in your own crazy one (as long as another user has not used it already).
- Choose a password. We are a bit peculiar about our passwords, so they need to be at least 8 letters long and have at least one from each of the letter categories: uppercase, lowercase, numeric and symbolic (
@,$,#etc.). You can press and hold the "show password" button (eye icon) to confirm what you have typed. - When all looks good, click Sign Up.
- If we are happy with the info you provided, we'll take you to a confirmation page (Insert Confirmation Code). We'll also send an email to the address you indicated (from
noreply@slappforge.com), with a verification code. - Check your mailbox for our email (including promotions, spam, trash etc. in case it does not show up in the inbox). Once you find it, copy the 6-digit confirmation code in the email, paste it into the confirmation page, and click Confirm.
- If all goes well, we'll show you a "Confirmation successful!" message, with a link back to the sign-in page.
- Go to the sign-in page, and log in using your username (that you took note previously, on the signup page) and password.
Powering up Sigma
Way to go! Just two more steps!
- After sign-in, you'll be in an AWS Credentials page.
- Now, dig up the "access key ID" and "secret access key" that you retrieved from the AWS console previously, and paste them in the Access Key ID and Secret Key fields, respectively.
- Now, you have a decision to make:
- Sigma can store these AWS keys on your behalf, so that you will not have to re-enter them at every log-in. We will encrypt the keys with your own password (your password will be in Cognito, AWS's own user management service, so we will never see your password either!), hence rest assured that we, or any other party, will not—and will not be able to—steal your keys :)
- If you are a bit too skeptical, you can avoid the storing option by unticking the Save Credentials tick box.
- When done, Click Load Editor.
Connecting GitHub
Yay! Last step!
- Now you will be in the projects page, with a quickstart pane (saying Integrate Sigma with GitHub!) on the left.
- Click the Sign in with GitHub button. A GitHub authorization window will pop up (if it does not, tune your browser to enable pop-ups for
sigma.slappforge.comand try again). - On the pop-up, sign in to GitHub if you are not already signed in.
- The pop-up asks you to authorize the Sigma GitHub app (made by us,
slappforge) to connect with yOnour GitHub account. Click the Authorize slappforge button to continue. - Once done, the pop-up will close, and the quickstart pane will start displaying a bunch of ready-made Sigma projects!
- Your Projects tab will display any Sigma-compatible projects that are already in your GitHub account.
- Samples tab will display the numerous samples published by SLAppForge, that you can try out right away.
- If you have the GitHub URL of any other Sigma project that you know of, just paste it in the search bar of the Public Repositories tab and hit the search button.
- Once you have the project that you were looking for, simply click to load it!


Voilà!
Here comes the Sigma editor, loaded with the project you picked, and ready for action!
No comments:
Post a Comment
Thanks for commenting! But if you sound spammy, I will hunt you down, kill you, and dance on your grave!