Friday, May 25, 2018

Hola, AS2! (a.k.a. Your First AS2 Message, with AS2Gateway)

AS2, despite being the most popular secure B2B communication protocol, is fairly complicated for a beginner, regardless of how mature he may be in the actual business domain. Not to mention the various operational caveats of maintaining an in-house AS2 server.

That is exactly why we built AS2Gateway, making it super-easy for even a five-year-old to send AS2 messages to any partner in the other corner of the world... or so we boast.

AS2Gateway: AS2 for all!

Hmm... wait... is it actually that easy?

(Are you kidding me? Partners, stations, certificates, encryption certificates, sign certificates, cert chains, async MDN, signed MDN,... sounds like ancient Greek to me! Where am I even supposed to start?)

Relax. Let's go one step at a time.

(Okay.)

Vocabulary first.

AS2 is all about sending and receiving messages (documents; POs, invoices, shipments, you name it) securely, between "partners" (yup, business partners). The format or content of the messages (EDI, X12, ebXML, ... heck, even plaintext, images or videos) doesn't matter; as long as it's a file, AS2 can deliver it, and produce a receipt (MDN) as well (so the sender can be sure that the recipient got it, securely and untampered).

Secure communication

(So there we have partners. But how about me? Am I a partner too?)

Yes you are, from the viewpoint of other partners. But we love you and want you to stand out from the crowd, so in AS2G, you are a station, not a plain old partner. You could have multiple stations (and hence, multiple identities) for trading with different partners. Messages received from partners to your different "identities" would appear under the corresponding stations. Just like having multiple mail accounts configured on the same browser.

(Alright, so I'm a station. Whatever. I don't care. How do I send a message to a partner?)

Well, you just

  • click the New Message button (rocket) on any page,

    'New Message' button

  • pick the intended partner,
  • pick your station,
  • key in a message subject,
  • upload or drag-n-drop the files, and

    Your AS2 message, ready to send!

  • click Send.

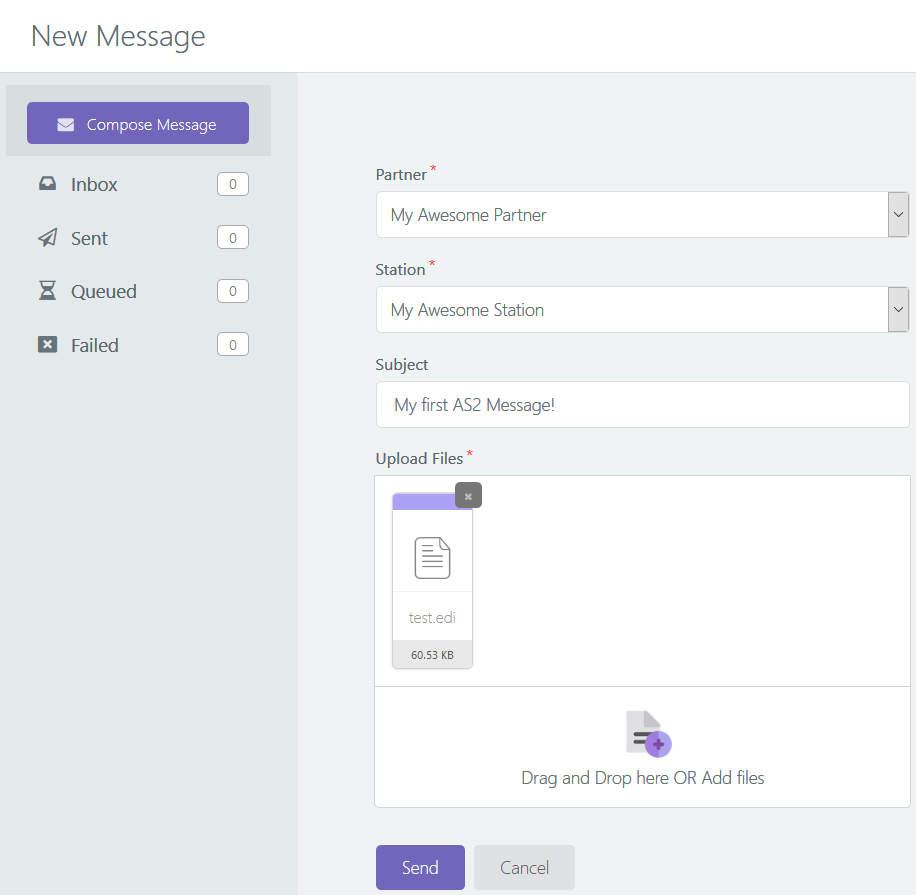
Just like in mail, except that you don't have to type a message body, but do have to select your own identity (station); in case of mail, the latter you already did (kind of) when you picked your mail account.

That is, if you have already set up your partner.

(Aha, so that's the catch! How do I set up a partner?)

Well, for that, we gotta go back to the vocabulary lesson—or more precisely, dive a bit into the world of AS2.

As you may already know, AS2 is all about security and reliability in document transfer. To achieve this, AS2 softwares have to perform quite a bit on behalf of you:

  • for outgoing messages: encrypting and signing, and compressing the content
  • for received messages: decrypting, decompressing and signature verification, generating (and optionally signing) the receipt if one has been requested

While AS2G is already a champion in all this stuff, it still needs to know the expectations of your partner (the "partner configuration") in order to perform them. That is why you need to head over to the partners page (ensure you are logged in before clicking the URL!), click the New Partner button at the top, and carefully fill up the resulting form.

(Huh, you sound like it's a piece of cake! If I knew how to fill in that form, why the heck would I be reading your article right now?!)

Calm down folks, almost there. Let's go field-by-field. Except the partner name, type and description, everything else in the form should be provided by your partner, so it basically boils down to bothering your partner until he gives up all pieces of the puzzle to fill the blanks in the form.

  • Name is, as you have guessed, the name you would like to call your partner (just for display and auditing purposes).
  • Partner Type is usually Production, unless you specifically want to do kind of a "test bed" configuration; if you pick Test you would have to make further changes when you are ready to go for production (for actual business messages), so it's better to stick to Production.
  • AS2 Identifier is an AS2 protocol-level magic word that uniquely identifies your partner. Your partner should provide this to you during the setting-up stages, just like you should send your AS2 ID to him/her; chill out, it's just a piece of text, and maybe digits (alphanumeric, in tech jargon)—you only have to ensure that no other partners of your partner are using the same token, because otherwise your partner may mix up the messages sent by you, with those from other partners.
  • Description is, again, just a blurb of text for your convenience in picking your partners apart.

Okay, that was easy enough. Now the geeky stuff.

  • URI is the HTTP/S address at which your partner is accepting incoming AS2 messages. (If this happens to be HTTPS (i.e. begins with https://), you have a bit more work coming up later, in the Advanced Options section!)
  • Encryption Certificate is a file (containing a "key"—a public key, to be exact) provided by your partner, which you can use to "unlock" (decrypt) messages received from him. Before sending, your partner will "lock" his messages with his own private key, and they can only be "unlocked" by the above public key. Since the latter can only decrypt messages encrypted by the former, it ensures that the message did actually originate from your partner, and guarantees that no evil force would be able to make any sense of the message while it is in transit (since it is "locked" (encrypted)).
  • Use different certificate as sign certificate is a bit of an advanced option which allows your partner to use a different "key" (file) to generate a "signature" of the message content (which is also sent to you, along with the message, for verification purposes). If your partner does not provide this, he would probably be using the same certificate (let's call it "cert", okay?) for encryption and signing; if he does provide one, just upload it here. Either way, not much to worry about!
  • Sign/Encrypt Chain Certificates are for establishing trust; to indicate that the certs provided by your partner actually do belong to that partner. (Otherwise, a third party could impersonate your partner and send you their certs and details, and capture all your messages that you (believe you) are sending to your partner!) If you don't get it, not to worry; if your partner provides these files, just upload them here!
  • Message Subject, again, is a down-to-earth field that specifies a default subject for messages you send out to this partner (so you don't have to tire your fingers typing it every time).

In some cases you may be able to get away with the above lot; however, if your partner mentions anything about:

  • encryption algorithm,
  • signing or digest algorithm,
  • sign or digest encryption,
  • compression,
  • async MDN or signed MDN,

it may be time to open up that Advanced Options section as well :(

Here we see four main "categories" of options (although there is no visual demarcation), the first being encryption:

  • Encrypt Messages indicates whether your partner expects you to "lock" (encrypt) messages that you are sending out to him; just like the ones he is sending to you. This time, you will have to send your own "key" (public cert) to your partner so that he can "unlock" your messages; more on that later!
  • Encryption Algorithm is the locking "mechanism" that you (AS2G, to be exact) will be using for messages being sent out to your partner—as requested by your partner, of course.

Next comes signing:

  • Sign Messages, similarly, indicates whether your partner expects a "signature" (a verifiable, summarized blurb representing the payload) along with each of your messages.
  • Sign Digest Algorithm should be set to your partner's preferred mechanism for producing the abovementioned "signature blurb".
  • Sign Encrypt Algorithm is the locking mechanism that your partner expects you to use upon the abovementioned signature (as opposed to the payload that was mentioned previously). With this, both your message and its signature would be in encrypted form during transit.

And compression:

  • Compress the messages before signing should be enabled only if your partner likes to see the incoming message in compressed form (primarily to save network overhead and speed up the transfer).
  • Compress the messages after signing is similar to above, but applies to both the message (which may already have been compressed!) and its signature combined.

And, finally (phew!), MDN:

  • Request MDN decides if you should demand your partner to send back a "receipt" (disposition notification) for every message that you send. The MDN mechanism in AS2 is cleverly crafted such that being able to receive and process an MDN guarantees that the message exchange was successful.
  • Request Asynchronous MDN, if you have enabled the above option, indicates that your partner should send back the MDN in a separate channel (i.e. you send your message in one path (HTTP request), to which the partner simply acknowledges; later on, your partner generates and sends the MDN back to you in a newly initiated path (new HTTP request; to which you send another acknowledgement).
  • Request Digitally Signed MDN demands your partner to send a signature along with the MDN, just like you (might have) signed the message itself when sending it to him.

Okay, take a deep breath. Count from one to twenty-five. Whatever. Just keep calm.

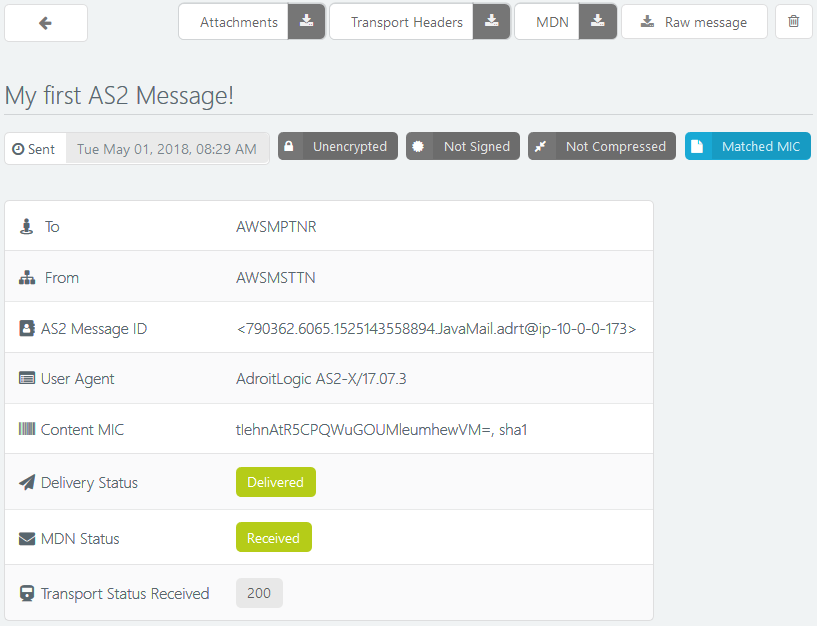
To clarify things a bit, let's have a look at an example configuration of a trading partner:

  • called My Awesome Partner
  • with AS2 ID AWSMPTNR,
  • who accepts messages at the URL http://as2.acme.com/as2/inbound

where the messages need to be:

  • compressed, right at the beginning (before signing/encryption),
  • encrypted with AES-256-CBC using the AWSMPTNR-encrypt.pem cert,
  • signed with SHA-256 using the same cert,
  • and the signature itself encrypted again, using RSA, and
  • compressed again (after signing and encryption),

and you wish the partner to:

  • send back a receipt (MDN), which is
  • asynchronous and
  • signed

Applying the above barricade of rules, our partner would appear as follows:

'AWSMPTNR' Partner Configuration, Episode 1: Pilot

'AWSMPTNR' Partner Configuration, Episode 2: Continuation

'AWSMPTNR' Partner Configuration, Episode 3: Advanced Options

Here we have requested our awesome partner to reply with a signed, async MDN (receipt) for every message that we send him.

If you assume, for a moment, that AWSMPTNR later happens to need to use a HTTPS URL for receiving messages:

the top (HTTPS-related) portion of your Advanced Options section may look like:

'AWSMPTNR' Partner Configuration, Bonus Episode 1: HTTPS

You don't trust this third-party guy who signed your partner's HTTPS cert, but the third party has its own cert signed (verified) by another CA that you do trust—which forms a trust chain wherein you trust the third party's cert because it is signed by a known CA, and in turn you trust your partner's cert because it has been signed by someone that you do trust now.

Trust chains. Now, how sick is that?!

Going a bit further, what would you see if your partner starts using a different sign certificate AWSMPTNR-sign.pem, verified by a third party verified by another third (fourth!) party verified by another (fifth!) party; where you (luckily) trust the last one?

'AWSMPTNR' Partner Configuration, Bonus Episode 2: Sign Cert, Bound in Chains

In case you lost it entirely, those two certs uploaded under Sign/Encrypt Chain Certificates are the "third" and "fourth" parties, which helps AS2G build the trust chain from the top-level trusted CA all the way down to your partner's sign cert.

If the above stuff seems totally Greek (or Chinese, gibberish, whatever) to you (and rightly so!), feel free to consult AdroitLogic for getting things in order; or, if you feel adventurous, go ahead and mess around with the switches and drop-downs your own :) It's highly unlikely that you're going to break anything!

Phew, finally we have our partner in all his glory, ready to roll.

With me so far? :)

If not, just take a deep breath and read through the stuff again, slowly and carefully (maybe skipping the techy innards, if you feel better that way); it would eventually make sense.

Though we have our partner, we don't have a station yet. So let's go ahead and create one.

Head over to the station page and click the New Station button.

Your secret passage to creating a new Station

You'll end up in another form; just like the partner configuration thing, but much simpler.

(I knew it... Another form. How many more of those until I get to actually send a message?)

Just this one, I promise.

Here you can define how your partners should send messages to you. This includes:

  • Name: again, just a name for your convenience.
  • AS2 Identifier: a unique identifier for yourself, just like in the case of a partner, kind of like your own NIC or Social Security Number.
  • Email: the email address you would like to associate with this station; just for email notifications of incoming messages.
  • Enable Email Notifications: by default AS2G will notify you via email as soon as your station receives a new message from one of your partners; you can disable this feature using this switch if it becomes too annoying.
  • Description: again, just a blurb of text for your convenience

Now begins the (thankfully, much shorter) list of geeky stuff, primarily for defining your station's keystore (where AS2G would be storing all the keys and certificates that allow you to communicate securely with your partners; similar to what you saw in the partner configurations):

  • Key Store: here, AS2G allows you to either
  1. generate a new keystore, on the house! (whose fragments you can later share with your partner)—obviously the easiest option!
  2. upload an existing keystore from your computer—handy if you are migrating stuff from a different station (or an entirely different AS2 platform) but don't want to bother your partner; i.e. your partner will see you in exactly the same way as he did before, although you are now using a new station! (Note, however, that this won't work if your new station's name differs from that of the old station :()
  3. select one that has already been uploaded, and is available in your certificate store right now.

The last two options are straightforward (upload a file, or pick one from a list), so let's have a closer look at the first one (which you would be picking anyways). You would have to fill in some details of the newly generated keypair for your brand new keystore, which are standard to the X.509 format (now, now, no need to google it!).

  • Common Name: This is the only mandatory field; put in either your own name, or maybe your station's name?
  • Organization Unit and Organization: kinda like your department, and the parent organization name
  • City, State, Country: address (you get it)

Now the geeky stuff (again!):

  • Key Length: the size of the key; generally the bigger the key, the more secure your encrypted message is—and the slower the encryption/decryption process would be. Generally 1024 or 2048 would suffice.
  • Keystore Password: a password for the new keystore, so you can inspect it later on if required
  • Certificate Password: a password for your key itself (private keys need to be stored with great care!)

'AWSMSTTN' Station Configuration, Episode 1: Pilot

'AWSMSTTN' Station Configuration, Episode 2: Finale

Now you have configured your side of the bargain. But your partner also needs to configure a "partner" on his own system, that corresponds to you (since you, after all, are his business partner). Hence you need to somehow pass your details through to him, so that his partner configuration is compatible with your station configuration.

Your new station, from a partner's-eye view

Now, how do you do that?

Lucky for you, AS2G can do it for you!

(Really? Finally, something cool.)

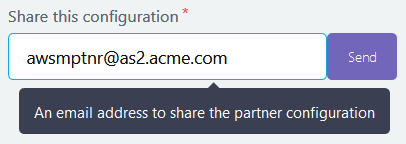
Once you open your brand new station from the Stations page, enter the email address of your partner in the Share this configuration text field, and click Send. Your partner will receive your station configuration via email, and can configure your partner profile on his side accordingly.

Go ahead, click 'Send' to pass the ball to your partner!

Now follows another wait (hopefully not too long!) until your partner confirms that he has added your info to his AS2 system; just like we did for him. Yup, patience is a virtue.

Now, for the first time in history, you are ready to send your first message!

Go ahead, click that rocket icon, pick your partner, select your files and click Send!

From this point onwards, AS2G is as simple as that!

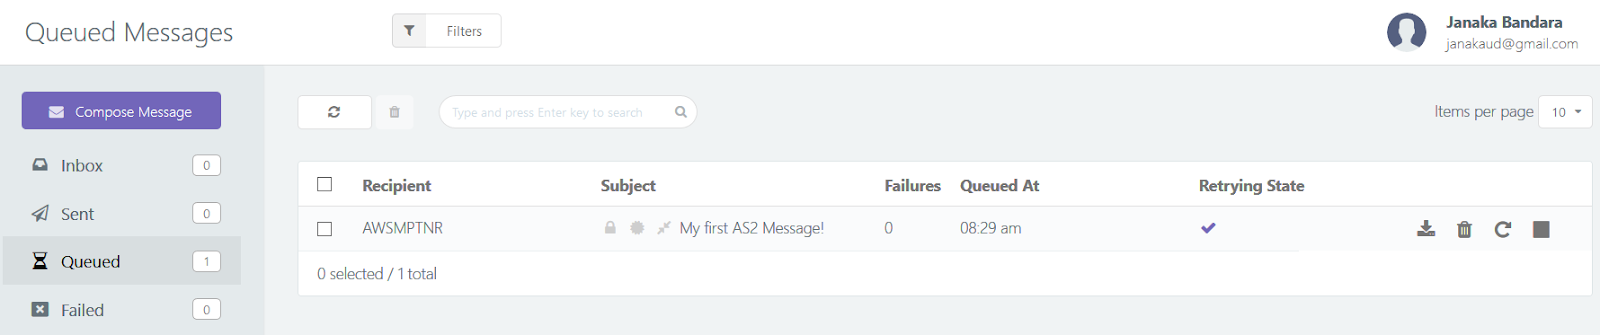
For a brief time, you may see your message in a "queued" (pending) state:

Your first message, queued, waiting impatiently to be picked up

Usually, however, AS2G will pick it up and sends it out within seconds:

Yay, she's on her way!

In the unlikely (Or likely, maybe? After all, this is your first message!) event that your message decides to play a trick on you and fails to be sent out, you will see under the "Failed" tab of the message view, along with the failure cause:

Okay, it failed; but not to worry!

In that case, you can open up the failed message and use the various controls to navigate through its metadata and failure details.

Detailed message view with diagnostic info

Oh, and did I mention that you can contact the AS2G Team anytime to learn more details, and more importantly, about how to avoid the failure in the future?

Contact AS2Gateway Team!

Now that you know the basics, things are going to get easier, way more useful, and way much fun!

Got a new partner? Add a new one on the Partners page, share your station details with him, and pick the new partner from the Partner drop-down when sending your messages!

Partner not happy with your station config? Just create a new station with different, more partner-friendly configs, share it with your partner, and select the new station from the Station drop-down when sending to that partner!

See all your inbound and outbound messages in your message view, along with corresponding acknowledgements (MDNs): just like your mailbox!

Receipt (MDN) for an outbound message

Attachments of a received message

Whenever you need to analyze a message in depth, or troubleshoot a failure, just contact the AS2G Team—or, if you feel adventurous, dive down into the details yourself, with the abovementioned detailed message view including transport-level headers, error metadata and retry information.

Message controls: dive down, right into the details!

Transport headers of a received message: what gets sent over the wire (or maybe wireless)!

AS2G has a lot more in store for you; so, my dear folks, it's time to get going!

Monday, May 14, 2018

How to rob a bank: no servers - just a ballpoint pen!

Okay, let's face it: this article has nothing to do with robbery, banks or, heck, ballpoint pens; but it's a good attention grabber (hopefully!), thanks to Chef Horst of Gusteau's. (Apologies if that broke your heart!)

Rather, this is about getting your own gossip feed—sending you the latest and the hottest, within minutes they become public—with just an AWS account and a web browser!

Maybe not as exciting as a bank robbery, but still worth reading on—especially if you're a gossip fan and like to always have an edge over the rest of your buddies.

Kicking out the server

Going with the recent hype, we will be using serverless technologies for our mission. You guessed it, there's no server involved. (But, psst, there is one!)

Let's go with AWS, which offers an attractive Free Tier in addition to a myriad of rich serverless utilties: CloudWatch scheduled events to trigger our gossip seek, DynamoDB to store gossips and track changes, and SNS-based SMS to dispatch new gossips right into your mobile!

And the best part is: you will be doing everything—from defining entities and composing lambdas to building, packaging and deploying the whole set-up—right inside your own web browser, without ever having to open up a single tedious AWS console!

All of it made possible thanks to Sigma, the brand new truly serverless IDE from SLAppForge.

Sigma: Think Serverless!

The grocery list

First things first: sign up for a Sigma account, if you haven't already. All it takes is an email address, AWS account (comes with that cool free tier, if you're a new user!), GitHub account (also free) and a good web browser. We have a short-and-sweet writeup to get you started within minutes; and will probably come up with a nice video as well, pretty soon!

A project is born

Once you are in, create a new project (with a catchy name to impress your buddies—how about GossipHunter?). The Sigma editor will create a template lambda for you, and we can start right away.

GossipHunter at t = 0

Nurtured with <3 by NewsAPI

As my gossip source, I picked the Entertainment Weekly API by newsapi.org. Their API is quite simple and straightforward, and a free signup with just an email address gets you an API key with 1000 requests per day! In case you have your own love, feel free to switch just the API request part of the code (coming up soon!), and the rest should work just fine!

The recipe

Our lambda will be periodically pulling data from this API, comparing the results with what we already know (stored in DynamoDB) and sending out SMS notifications (via SNS) to your phone number (or email, or whatever other preferred medium that SNS offers) for any already unknown (hence "hot") results. We will store any newly seen topics in DynamoDB, so that we can prevent ourselves from sending out the same gossip repeatedly.

(By the way, if you have access to a gossip API that actually emits/notifies you of latest updates (e.g. via webhooks) rather than us having to poll for and filter them, you can use a different, more efficient approach such as configuring an API Gateway trigger and pointing the API webhook to the trigger endpoint.)

Okay, let's chop away!

The wake-up call(s)

First, let's drag a CloudWatch entry from the left Resources pane and configure it to fire our lambda; to prevent distractions during working hours, we will configure it to run every 15 minutes, only from 7 PM (when you are back from work) to midnight, and from 5AM to 8 AM (when you are on your way back to work). This can be easily achieved through a New, Schedule-type trigger that uses a cron expression such as 5-7,19-23 0/15 ? * MON-FRI *. (Simply paste 0/15 , 5-7,19-23 (no spaces) and MON-FRI into the Minutes, Hours and Day of Week fields, and type a ? under Day of Month.)

CloudWatch Events trigger: weekdays

But wait! The real value of gossip is certainly in the weekend! So let's add (drag, drop, configure) another trigger to run GossipHunter all day (5 AM - midnight!) over the weekend; just another cron with 0/10 (every ten minutes this time! we need to be quick!) in Minutes, 5-23 in Hours, ? in Day of Month and SAT,SUN in Day of Week.

CloudWatch Events trigger: weekends

Okay, time to start coding!

Grabbing the smoking hot stuff

Let's first fetch the latest gossips from the API. The requests module could do this for us in a heartbeat, so we'll go get it: click the Add Dependency button on the toolbar, type in requests and click Add once our subject appears in the list:

'Add Dependency' button

Now for the easy part:

  request.get(`https://newsapi.org/v2/top-headlines?sources=entertainment-weekly&apiKey=your-api-key`,
  (error, response, body) => {

    callback(null,'Successfully executed');
  })

Gotta hide some secrets?

Wait! The apiKey parameter: do I have to specify the value in the code? Since you probably would be saving all this in GitHub (yup, you guessed right!) won't that compromise my token?

We also had the same question; and that's exactly why, just a few weeks ago, we introduced the environment variables feature!

Go ahead, click the Environment Variables ((x)) button, and define a KEY variable (associated with our lambda) holding your API key. This value will be available for your lambda at runtime, but it will not be committed into your source; you can simply provide the value during your first deployment after opening the project. And so can any of your colleagues (with their own API keys, of course!) when they get jealous and want to try out their own copy of your GossipHunter!

Defining the 'KEY' environment variable

(Did I mention that your friends can simply grab your GossipHunter's GitHub repo URL—once you have saved your project—and open it in Sigma right away, and deploy it on their own AWS account? Oh yeah, it's that easy!)

Cool! Okay, back to business.

Before we forget it, let's append process.env.KEY to our NewsAPI URL:

  request.get(`https://newsapi.org/v2/top-headlines?sources=entertainment-weekly&apiKey=${process.env.KEY}`,

And extract out the gossips list, with a few sanity checks:

  (error, response, body) => {
    let result = JSON.parse(body);
    if (result.status !== "ok") {
      return callback('NewsAPI call failed!');
    }
    result.articles.forEach(article => {

    });

    callback(null,'Successfully executed');
  })

Sifting out the not-so-hot

Now the tricky part: we have to compare these with the most recent gossips that we have dispatched, to detect whether they are truly "new" ones, i.e. filter the ones that have not already been dispatched.

For starters, we shall maintain a DynamoDB table gossips to retain the gossips that we have dispatched, serving as our GossipHunter's "memory". Whenever a "new" gossip (i.e. one that is not already available in our table) is encountered, we shall send it out via SNS, the Simple Notification Service and add it to our table so that we will not send it out again. (Later on we can improve our "memory" to "forget" (delete) old entries so that it would not keep on growing indefinitely, but for the moment, let's not worry about it.)

What's that, Dynamo-DB?

For the DynamoDB table, simply drag a DynamoDB entry from the resources pane into the editor, right into the forEach callback. Sigma will show you a pop-up where you can define your table (without a round trip to the DynamoDB dashboard!) and the operation you intend to perform on it. Right now we need to query the table for the gossip in the current iteration, so we can zip it by

  • entering gossips into the Table Name field and url for the Partition Key,
  • selecting the Get Document operation, and
  • entering @{article.url} (note the familiar, ${}-like syntax?) in the Partition Key field.

Your brand new DynamoDB table 'gossips' with a 'Get Document' operation

      result.articles.forEach(article => {
        ddb.get({
          TableName: 'gossips',
          Key: { 'url': article.url }
        }, function (err, data) {
          if (err) {
            //handle error
          } else {
            //your logic goes here
          }
        });

      });

In the callback, let's check if DynamoDB found a match (ignoring any failed queries):

        }, function (err, data) {
          if (err) {
            console.log(`Failed to check for ${article.url}`, err);
          } else {
            if (data.Item) {  // match found, meaning we have already saved it
              console.log(`Gossip already dispatched: ${article.url}`);
            } else {

            }
          }
        });

Compose (160 characters remaining)

In the nested else block (when we cannot find a matching gossip), we prepare an SMS-friendly gossip text (including the title, and optionally the description and URL if we can stuff them in; remember the 160-character limit?). (Later you can tidy things up by throwing in a URL-shortener logic and so on, but for the sake of simplicity, I'll pass.)

            } else {
              let titleLen = article.title.length;
              let descrLen = article.description.length;
              let urlLen = article.url.length;

              let gossipText = article.title;
              if (gossipText.length + descrLen < 160) {
                gossipText += "\n" + article.description;
              }
              if (gossipText.length + urlLen < 160) {
                gossipText += "\n" + article.url;
              }

Hitting "Send"

Now we can send out our gossip as an SNS SMS. For this,

  • drag an SNS entry from the left pane into the editor, right after the last if block,
  • select Direct SMS as the Resource Type,
  • enter your mobile number into the Mobile Number field,
  • populate the SMS text field with @{gossipText},
  • type in GossipHuntr as the Sender ID (unfortunately the sender ID cannot be longer than 11 characters, but it doesn't really matter since it is just the text message sender's name; besides, GossipHuntr is more catchy, right? :)), and
  • click Inject.

But...

Wait! What would happen if your best buddy grabs your repo and deploys it; his gossips would also start flowing into your phone!

Perhaps a clever trick would be to extract out the phone number into another environment variable, so that you and your best buddy can pick your own numbers (and part ways, still as friends) at deployment time. So click the (x) again and add a new PHONE variable (with your phone number), and use it in the Mobile Number field instead as (you guessed it!) @{process.env.PHONE}:

Behold: gossip SMSs are on their way!

            } else {
              let titleLen = article.title.length;
              let descrLen = article.description.length;
              let urlLen = article.url.length;

              let gossipText = article.title;
              if (gossipText.length + descrLen < 160) {
                gossipText += "\n" + article.description;
              }
              if (gossipText.length + urlLen < 160) {
                gossipText += "\n" + article.url;
              }

              sns.publish({
                Message: gossipText,
                MessageAttributes: {
                  'AWS.SNS.SMS.SMSType': {
                    DataType: 'String',
                    StringValue: 'Promotional'
                  },
                  'AWS.SNS.SMS.SenderID': {
                    DataType: 'String',
                    StringValue: 'GossipHuntr'
                  },
                },
                PhoneNumber: process.env.PHONE
              }).promise()
                .then(data => {
                  // your code goes here
                })
                .catch(err => {
                  // error handling goes here
                });
            }

(In case you got overexcited and clicked Inject before reading the but... part, chill out! Dive right into the code, and change the PhoneNumber parameter under the sns.publish(...) call; ta da!)

Tick it off, and be done with it!

One last thing: for this whole contraption to work properly, we also need to save the "new" gossip in our table. Since you have already defined the table during the query operation, you can simply drag it from under the DynamoDB list on the resources pane (click the down arrow on the DynamoDB entry to see the table definition entry); drop it right under the SNS SDK call, select Put Document as the operation, and configure the new entry as url = ${article.url} (by clicking the Add button under Values and entering url as the key and @{article.url} as the value).

Dragging the existing DynamoDB table in; for our last mission

Adding a 'sent' marker for the 'hot' gossip that we just texted out

                .then(data => {
                  ddb.put({
                    TableName: 'gossips',
                    Item: { 'url': article.url }
                  }, function (err, data) {
                    if (err) {
                      console.log(`Failed to save marker for ${article.url}`, err);
                    } else {
                      console.log(`Saved marker for ${article.url}`);
                    }
                  });
                })
                .catch(err => {
                  console.log(`Failed to dispatch SMS for ${article.url}`, err);
                });

Time to polish it up!

Since we'd be committing this code to GitHub, let's clean it up a bit (all your buddies would see this, remember?) and throw in some comments:

let AWS = require('aws-sdk');
const sns = new AWS.SNS();
const ddb = new AWS.DynamoDB.DocumentClient();
let request = require('request');

exports.handler = function (event, context, callback) {

  // fetch the latest headlines
  request.get(`https://newsapi.org/v2/top-headlines?sources=entertainment-weekly&apiKey=${process.env.KEY}`,
    (error, response, body) => {

      // early exit on failure
      let result = JSON.parse(body);
      if (result.status !== "ok") {
        return callback('NewsAPI call failed!');
      }

      // check each article, processing if it hasn't been already
      result.articles.forEach(article => {
        ddb.get({
          TableName: 'gossips',
          Key: { 'url': article.url }
        }, function (err, data) {
          if (err) {
            console.log(`Failed to check for ${article.url}`, err);
          } else {
            if (data.Item) {  // we've seen this previously; ignore it
              console.log(`Gossip already dispatched: ${article.url}`);

            } else {
              let titleLen = article.title.length;
              let descrLen = article.description.length;
              let urlLen = article.url.length;

              // stuff as much content into the text as possible
              let gossipText = article.title;
              if (gossipText.length + descrLen < 160) {
                gossipText += "\n" + article.description;
              }
              if (gossipText.length + urlLen < 160) {
                gossipText += "\n" + article.url;
              }

              // send out the SMS
              sns.publish({
                Message: gossipText,
                MessageAttributes: {
                  'AWS.SNS.SMS.SMSType': {
                    DataType: 'String',
                    StringValue: 'Promotional'
                  },
                  'AWS.SNS.SMS.SenderID': {
                    DataType: 'String',
                    StringValue: 'GossipHuntr'
                  },
                },
                PhoneNumber: process.env.PHONE
              }).promise()
                .then(data => {
                  // save the URL so we won't send this out again
                  ddb.put({
                    TableName: 'gossips',
                    Item: { 'url': article.url }
                  }, function (err, data) {
                    if (err) {
                      console.log(`Failed to save marker for ${article.url}`, err);
                    } else {
                      console.log(`Saved marker for ${article.url}`);
                    }
                  });
                })
                .catch(err => {
                  console.log(`Failed to dispatch SMS for ${article.url}`, err);
                });
            }
          }
        });
      });

      // notify AWS that we're good (no need to track/notify errors at the moment)
      callback(null, 'Successfully executed');
    })
}

All done!

3, 2, 1, ignition!

Click Deploy on the toolbar, which will set a chain of actions in motion: first the project will be saved (committed to your own GitHub repo, with a commit message of your choosing), then built and packaged (fully automated!) and finally deployed into your AWS account (giving you a chance to review the deployment summary before it is executed).

deployment progress

Once the progress bar hits the end and the deployment status says CREATE_COMPLETE (or UPDATE_COMPLETE in case you missed a spot and had to redeploy), GossipHunter is ready for action!

Houston, we're GO!

Until your DynamoDB table is primed up (populated with enough gossips to start waiting for updates), you would receive a trail of gossip texts. After that, whenever a new gossip comes up, you will receive it on your mobile within a matter of minutes!

All thanks to the awesomeness of serverless and AWS, and Sigma that brings it all right into your web browser.