Showing posts with label serverless IDE. Show all posts

Monday, November 12, 2018

Serverless Security: Putting it on Autopilot

Ack: This article is a remix of stuff learned from personal experience as well as from multiple other sources on serverless security. I cannot list down or acknowledge all of them here; nevertheless, special thanks should go to The Register, Hacker Noon, PureSec, and the Serverless Status and Serverless (Cron)icle newsletters.

We all love to imagine that our systems are secure. And then...

BREACH!!!

A very common nightmare shared by every developer, sysadmin and, ultimately, CISO.

You'd better inform the boss...

Inevitable?

One basic principle of computer security states that no system can attain absolute security. Just like people: nobody is perfect. Not unless it is fully isolated from the outside; which, by today's standards, is next to impossible - besides, what's the point of having a system that cannot take inputs and provide outputs?

Whatever advanced security precaution you take, attackers will eventually find a way around. Even if you use the most stringent encryption algorithm with the longest possible key size, attackers will eventually brute-force their way through; although it could be time-wise infeasible at present, who can guarantee that a bizaare technical leap would render it possible tomorrow, or the next day?

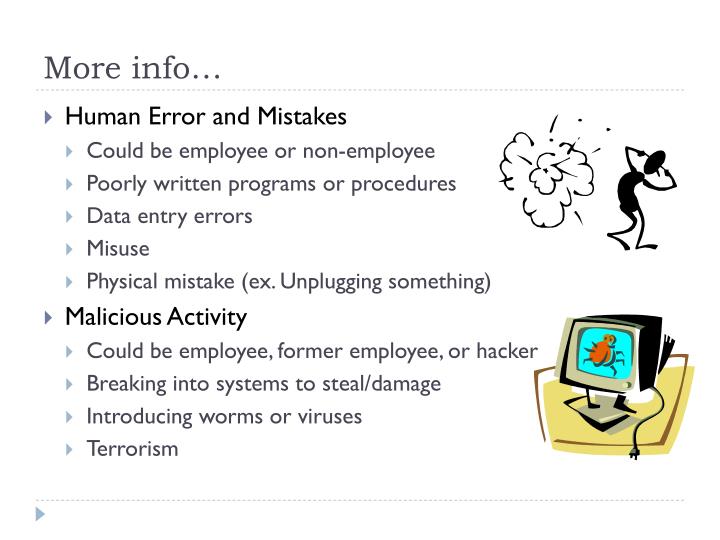
But it's not the brute-force that you should really be worried about: human errors are way more common, and can have devastating effects on systems security; much more so than a brute-forced passkey. Just have a peek at this story where some guys just walked into the U.S. IRS building and siphoned out millions of dollars, without using a single so-called "hacking" technique.

As long as systems are made and operated by people—who are error-prone by nature—they will never be truly secure.

Remember those old slides from college days?

So, are we doomed?

No.

Ever seen the insides of a ship?

How its hull is divided into compartments—so that one leaking compartment does not cause the whole ship to sink?

People often apply a similar concept in designing software: multiple modules so that one compromised module doesn't bring the whole system down.

A ship's watertight hull compartments

Combined with the principle of least privilege, this means that a component will compromise the least possible degree of security—ideally the attacker will only be able to wreak havoc within the bounds of the module's security scope, never beyond.

Reducing the blast radius of the component, and consequently the attack surface that it exposes for the overall system.

A security sandbox, you could say.

And a pretty good one at that.

PoLP: The Principle of Least Privilege

Never give someone - or something - more freedom than they need.

More formally,

Every module must be able to access only the information and resources that are necessary for its legitimate purpose. - Wikipedia

This way, if the module misbehaves (or is forced to misbehave, by an entity with malicious intent—a hacker, in English), the potential harm it can cause is minimized; without any preventive "action" being taken, and even before the "breach" is identified!

It never gets old

While the principle was initially brought up in the context of legacy systems, it is even more so applicable for "modern" architectures; SOA (well, maybe not so "modern"), microservices, and FaaS (serverless functions, hence serverless security) as well.

The concept is pretty simple: use the underlying access control mechanisms to restrict the permissions available for your "unit of execution"; may it be a simple HTTP server/proxy, web service backend, microservice, container, or serverless function.

Meanwhile, in the land of no servers...

With increased worldwide adoption of serverless technologies, the significance of serverless security, and the value of our PoLP, is becoming more obvious than ever.

Server-less = effort-less

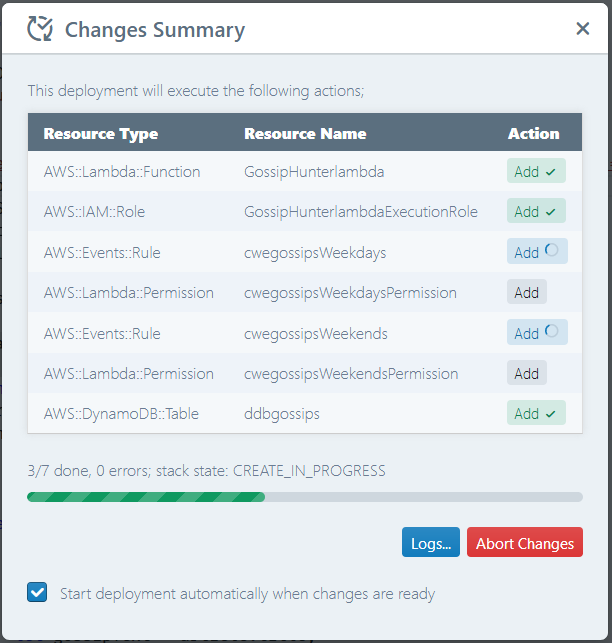
Not having to provision and manage the server (environment) means that serverless devops can proceed at an insanely rapid pace. With CI/CD in place, it's just a matter of code, commit and push; everything would be up and running within minutes, if not seconds. No SSH logins, file uploads, config syncs, service restarts, routing shifts, or any of the other pesky devops chores associated with a traditional deployment.

"Let's fix the permissions later."

Alas, that's a common thing to hear among those "ops-free" devs (like myself). You're in a haste to push the latest updates to staging, and the "easy path" to avoid a plethora of "permission denied" errors is to relax the permissions on your FaaS entity (AWS Lambda, Azure Function, whatever).

Staging will soon migrate to prod. And so will your "over-permissioned" function.

And it will stay there. Far longer than you think. You will eventually shift your traffic to updated versions, leaving behind the old one untouched; in fear of breaking some other dependent component in case you step on it.

And then come the sands of time, covering the old function from everybody's memories.

An obsolete function with unpatched dependencies and possibly flawed logic, having full access to your cloud resources.

A serverless time bomb, if there ever was one.

Waiting for the perfect time... to explode

Yes, blast radius; again!

If we adhere to the least privilege principle, right from the staging deployment, it would greatly reduce the blast radius: by limiting what the function is allowed to do, we automatically limit the "extent of exploitation" upon the rest of the system if its control ever falls into the wrong hands.

Nailing serverless security: on public cloud platforms

These things are easier said than done.

At the moment, among the leaders of public-cloud FaaS technology, only AWS has a sufficiently flexible serverless security model. GCP automatically assigns a default project-level Cloud Platform service account to all its functions in a given project, meaning that all your functions will be in one basket in terms of security and access control. Azure's IAM model looks more promising, but it still lacks the cool stuff like automatic role-based runtime credential assignments available in both AWS and GCP.

AWS has applied its own IAM role-based permissions model for its Lambda functions, granting users the flexibility to define a custom IAM role—with fully customizable permissions—for every single Lambda function if so desired. It has an impressive array of predefined roles that you can extend upon, and has well-defined strategies for scoping permission to resource or principal categories, merging rules that refer to the same set of resources or operations, and so forth.

This whole hierarchy finally boils down to a set of permissions, each of which takes a rather straightforward format:

{
    "Effect": "Allow|Deny",
    "Action": "API operation matcher (pattern), or array of them",
    "Resource": "entity matcher (pattern), or array of them"
}

In English, this simply means:

Allow (or deny) an entity (user, EC2 instance, lambda; whatever) that possesses this permission, to perform the matching API operation(s) against the matching resource(s).

(There are non-mandatory fields Principal and Condition as well, but we'll skip them here for the sake of brevity.)

Okay, okay! Time for some examples.

{
    "Effect": "Allow",
    "Action": "s3:PutObject",
    "Resource": "arn:aws:s3:::my-awesome-bucket/*"
}

This allows the assignee to put an object (s3:PutObject) into the bucket named my-awesome-bucket.

{
    "Effect": "Allow",
    "Action": "s3:PutObject",
    "Resource": "arn:aws:s3:::my-awesome-*"
}

This is similar, but allows the put to be performed on any bucket whose name begins with my-awesome-.

{
    "Effect": "Allow",
    "Action": "s3:*",
    "Resource": "*"
}

This allows the assignee to do any S3 operation (get/put object, delete object, or even delete bucket) against any bucket in its owning AWS account.

And now the silver bullet:

{
    "Effect": "Allow",
    "Action": "*",
    "Resource": "*"
}

Yup, that one allows oneself to do anything on anything in the AWS account.

The silver bullet

Kind of like the AdministratorAccess managed policy.

And if your principal (say, lambda) gets compromised, the attacker effectively has admin access to your AWS account!

A serverless security nightmare. Needless to say.

To be avoided at all cost.

Period.

In that sense, the best option would be a series of permissions of the first kind; ones that are least permissive (most restricrive) and cover a narrow, well-defined scope.

How hard can that be?

The caveat is that you have to do this for every single operation within that computation unit—say lambda. Every single one.

And it gets worse when you need to configure event sources for triggering those units.

Say, for an API Gateway-triggered lambda, where the API Gateway service must be granted permission to invoke your lambda in the scope of a specific APIG endpoint (in CloudFormation syntax):

{
  "Type": "AWS::Lambda::Permission",
  "Properties": {
    "Action": "lambda:InvokeFunction",
    "FunctionName": {
      "Ref": "LambdaFunction"
    },
    "SourceArn": {
      "Fn::Sub": [
        "arn:aws:execute-api:${AWS::Region}:${AWS::AccountId}:${__ApiId__}/*/${__Method__}${__Path__}",
        {
          "__Method__": "POST",
          "__Path__": "/API/resource/path",
          "__ApiId__": {
            "Ref": "RestApi"
          }
        }
      ]
    },
    "Principal": "apigateway.amazonaws.com"
  }
}

Or for a Kinesis stream-powered lambda, in which case things get more complicated: the Lambda function requires access to watch and pull from the stream, while the Kinesis service also needs permission to trigger the lambda:

  "LambdaFunctionExecutionRole": {
    "Type": "AWS::IAM::Role",
    "Properties": {
      "ManagedPolicyArns": [
        "arn:aws:iam::aws:policy/service-role/AWSLambdaBasicExecutionRole"
      ],
      "AssumeRolePolicyDocument": {
        "Version": "2012-10-17",
        "Statement": [
          {
            "Action": [
              "sts:AssumeRole"
            ],
            "Effect": "Allow",
            "Principal": {
              "Service": [
                "lambda.amazonaws.com"
              ]
            }
          }
        ]
      },
      "Policies": [
        {
          "PolicyName": "LambdaPolicy",
          "PolicyDocument": {
            "Statement": [
              {
                "Effect": "Allow",
                "Action": [
                  "kinesis:GetRecords",
                  "kinesis:GetShardIterator",
                  "kinesis:DescribeStream",
                  "kinesis:ListStreams"
                ],
                "Resource": {
                  "Fn::GetAtt": [
                    "KinesisStream",
                    "Arn"
                  ]
                }
              }
            ]
          }
        }
      ]
    }
  },
  "LambdaFunctionKinesisTrigger": {
    "Type": "AWS::Lambda::EventSourceMapping",
    "Properties": {
      "BatchSize": 100,
      "EventSourceArn": {
        "Fn::GetAtt": [
          "KinesisStream",
          "Arn"
        ]
      },
      "StartingPosition": "TRIM_HORIZON",
      "FunctionName": {
        "Ref": "LambdaFunction"
      }
    }
  },
  "KinesisStreamPermission": {
    "Type": "AWS::Lambda::Permission",
    "Properties": {
      "Action": "lambda:InvokeFunction",
      "FunctionName": {
        "Ref": "LambdaFunction"
      },
      "SourceArn": {
        "Fn::GetAtt": [
          "KinesisStream",
          "Arn"
        ]
      },
      "Principal": "kinesis.amazonaws.com"
    }
  }

So you see, with this granularity, comes great power as well as great responsibility. One missing permission—heck, one mistyped letter—and it's 403 AccessDeniedException.

No easy way; you just have to track down every AWS resource triggering or accessed by your function, look up the docs, pull out your hair, and come up with the necessary permissions.

But... but... that's too much work!

Yup, it is. If you're doing it manually.

But who drives manual these days? :)

Fortunately there are quite a few options, if you're already into automating stuff:

serverless-puresec-cli: thanks PureSec!

If you're using the famous Serverless Framework - which means you're already covered on the trigger permissions front - there's the serverless-puresec-cli plugin from Puresec.

Puresec

The plugin can statically analyze your lambda code and generate a least-privilege role. Looks really cool, but the caveat is that you have to run the serverless puresec gen-roles command before every deployment with code changes; I couldn't yet find a way to run it automatically - during serverless deploy, for example. Worse, it just prints the generated roles into stdout; so you have to manually copy-paste it into serverless.yml, or use some other voodoo to actually inject it into the deployment configuration (hopefully things would improve in the future :))

AWS Chalice: from the Gods

If you're a Python fan, Chalice is capable of auto-generating permissions for you, natively. Chalice is awesome in many aspects; super-fast deployments, annotation-driven triggers, little or no configurations to take care of, and so forth.

AWS Chalice

However, despite being a direct hand-down from the AWS gods, it seems to have missed the word "minimal" when it comes to permissions; if you have the code to list the contents of some bucket foo, it will generate permissions for listing content of all buckets in the AWS account ("Resource": "*" instead of "Resource": "arn:aws:s3:::foo/*"), not just the bucket you are interested in. Not cool!

No CLI? go for SLAppForge Sigma

If you're a beginner, or not that fond of CLI tooling, there's Sigma from SLAppForge.

SLAppForge Sigma

Being a fully-fledged browser IDE, Sigma will automatically analyze your code as you compose (type or drag-n-drop) it, and derive the necessary permissions—for the Lambda runtime as well as for the triggers—so you are fully covered. The recently introduced Permission Manager also allows you to modify these auto-generated permissions if you desire; for example, if you are integrating a new AWS service/operation that Sigma doesn't yet know about.

Plus, with Sigma, you never have to worry about any other configurations; resource configs, trigger mappings, entity interrelations and so forth—the IDE takes care of it all.

The caveat is that Sigma only supports NodeJS at the moment; but Python, Java and other cool languages are on their way!

(Feel free to comment below, if you have other cool serverless security policy generation tools in mind! And no, AWS Policy Generator doesn't count.)

In closing

Least privilege principle is crucial for serverless security, and software design in general; sooner or later, it will save your day.

Lambda's highly granular IAM permission model is ideal for the PoLP.

Tools like the Puresec CLI plugin, all-in-one Sigma IDE and AWS Chalice can automate security policy generation; making your life easier, and still keeping the PoLP promise.

Monday, May 14, 2018

How to rob a bank: no servers - just a ballpoint pen!

Okay, let's face it: this article has nothing to do with robbery, banks or, heck, ballpoint pens; but it's a good attention grabber (hopefully!), thanks to Chef Horst of Gusteau's. (Apologies if that broke your heart!)

Rather, this is about getting your own gossip feed—sending you the latest and the hottest, within minutes they become public—with just an AWS account and a web browser!

Maybe not as exciting as a bank robbery, but still worth reading on—especially if you're a gossip fan and like to always have an edge over the rest of your buddies.

Kicking out the server

Going with the recent hype, we will be using serverless technologies for our mission. You guessed it, there's no server involved. (But, psst, there is one!)

Let's go with AWS, which offers an attractive Free Tier in addition to a myriad of rich serverless utilties: CloudWatch scheduled events to trigger our gossip seek, DynamoDB to store gossips and track changes, and SNS-based SMS to dispatch new gossips right into your mobile!

And the best part is: you will be doing everything—from defining entities and composing lambdas to building, packaging and deploying the whole set-up—right inside your own web browser, without ever having to open up a single tedious AWS console!

All of it made possible thanks to Sigma, the brand new truly serverless IDE from SLAppForge.

Sigma: Think Serverless!

The grocery list

First things first: sign up for a Sigma account, if you haven't already. All it takes is an email address, AWS account (comes with that cool free tier, if you're a new user!), GitHub account (also free) and a good web browser. We have a short-and-sweet writeup to get you started within minutes; and will probably come up with a nice video as well, pretty soon!

A project is born

Once you are in, create a new project (with a catchy name to impress your buddies—how about GossipHunter?). The Sigma editor will create a template lambda for you, and we can start right away.

GossipHunter at t = 0

Nurtured with <3 by NewsAPI

As my gossip source, I picked the Entertainment Weekly API by newsapi.org. Their API is quite simple and straightforward, and a free signup with just an email address gets you an API key with 1000 requests per day! In case you have your own love, feel free to switch just the API request part of the code (coming up soon!), and the rest should work just fine!

The recipe

Our lambda will be periodically pulling data from this API, comparing the results with what we already know (stored in DynamoDB) and sending out SMS notifications (via SNS) to your phone number (or email, or whatever other preferred medium that SNS offers) for any already unknown (hence "hot") results. We will store any newly seen topics in DynamoDB, so that we can prevent ourselves from sending out the same gossip repeatedly.

(By the way, if you have access to a gossip API that actually emits/notifies you of latest updates (e.g. via webhooks) rather than us having to poll for and filter them, you can use a different, more efficient approach such as configuring an API Gateway trigger and pointing the API webhook to the trigger endpoint.)

Okay, let's chop away!

The wake-up call(s)

First, let's drag a CloudWatch entry from the left Resources pane and configure it to fire our lambda; to prevent distractions during working hours, we will configure it to run every 15 minutes, only from 7 PM (when you are back from work) to midnight, and from 5AM to 8 AM (when you are on your way back to work). This can be easily achieved through a New, Schedule-type trigger that uses a cron expression such as 5-7,19-23 0/15 ? * MON-FRI *. (Simply paste 0/15 , 5-7,19-23 (no spaces) and MON-FRI into the Minutes, Hours and Day of Week fields, and type a ? under Day of Month.)

CloudWatch Events trigger: weekdays

But wait! The real value of gossip is certainly in the weekend! So let's add (drag, drop, configure) another trigger to run GossipHunter all day (5 AM - midnight!) over the weekend; just another cron with 0/10 (every ten minutes this time! we need to be quick!) in Minutes, 5-23 in Hours, ? in Day of Month and SAT,SUN in Day of Week.

CloudWatch Events trigger: weekends

Okay, time to start coding!

Grabbing the smoking hot stuff

Let's first fetch the latest gossips from the API. The requests module could do this for us in a heartbeat, so we'll go get it: click the Add Dependency button on the toolbar, type in requests and click Add once our subject appears in the list:

'Add Dependency' button

Now for the easy part:

  request.get(`https://newsapi.org/v2/top-headlines?sources=entertainment-weekly&apiKey=your-api-key`,
  (error, response, body) => {

    callback(null,'Successfully executed');
  })

Gotta hide some secrets?

Wait! The apiKey parameter: do I have to specify the value in the code? Since you probably would be saving all this in GitHub (yup, you guessed right!) won't that compromise my token?

We also had the same question; and that's exactly why, just a few weeks ago, we introduced the environment variables feature!

Go ahead, click the Environment Variables ((x)) button, and define a KEY variable (associated with our lambda) holding your API key. This value will be available for your lambda at runtime, but it will not be committed into your source; you can simply provide the value during your first deployment after opening the project. And so can any of your colleagues (with their own API keys, of course!) when they get jealous and want to try out their own copy of your GossipHunter!

Defining the 'KEY' environment variable

(Did I mention that your friends can simply grab your GossipHunter's GitHub repo URL—once you have saved your project—and open it in Sigma right away, and deploy it on their own AWS account? Oh yeah, it's that easy!)

Cool! Okay, back to business.

Before we forget it, let's append process.env.KEY to our NewsAPI URL:

  request.get(`https://newsapi.org/v2/top-headlines?sources=entertainment-weekly&apiKey=${process.env.KEY}`,

And extract out the gossips list, with a few sanity checks:

  (error, response, body) => {
    let result = JSON.parse(body);
    if (result.status !== "ok") {
      return callback('NewsAPI call failed!');
    }
    result.articles.forEach(article => {

    });

    callback(null,'Successfully executed');
  })

Sifting out the not-so-hot

Now the tricky part: we have to compare these with the most recent gossips that we have dispatched, to detect whether they are truly "new" ones, i.e. filter the ones that have not already been dispatched.

For starters, we shall maintain a DynamoDB table gossips to retain the gossips that we have dispatched, serving as our GossipHunter's "memory". Whenever a "new" gossip (i.e. one that is not already available in our table) is encountered, we shall send it out via SNS, the Simple Notification Service and add it to our table so that we will not send it out again. (Later on we can improve our "memory" to "forget" (delete) old entries so that it would not keep on growing indefinitely, but for the moment, let's not worry about it.)

What's that, Dynamo-DB?

For the DynamoDB table, simply drag a DynamoDB entry from the resources pane into the editor, right into the forEach callback. Sigma will show you a pop-up where you can define your table (without a round trip to the DynamoDB dashboard!) and the operation you intend to perform on it. Right now we need to query the table for the gossip in the current iteration, so we can zip it by

  • entering gossips into the Table Name field and url for the Partition Key,
  • selecting the Get Document operation, and
  • entering @{article.url} (note the familiar, ${}-like syntax?) in the Partition Key field.

Your brand new DynamoDB table 'gossips' with a 'Get Document' operation

      result.articles.forEach(article => {
        ddb.get({
          TableName: 'gossips',
          Key: { 'url': article.url }
        }, function (err, data) {
          if (err) {
            //handle error
          } else {
            //your logic goes here
          }
        });

      });

In the callback, let's check if DynamoDB found a match (ignoring any failed queries):

        }, function (err, data) {
          if (err) {
            console.log(`Failed to check for ${article.url}`, err);
          } else {
            if (data.Item) {  // match found, meaning we have already saved it
              console.log(`Gossip already dispatched: ${article.url}`);
            } else {

            }
          }
        });

Compose (160 characters remaining)

In the nested else block (when we cannot find a matching gossip), we prepare an SMS-friendly gossip text (including the title, and optionally the description and URL if we can stuff them in; remember the 160-character limit?). (Later you can tidy things up by throwing in a URL-shortener logic and so on, but for the sake of simplicity, I'll pass.)

            } else {
              let titleLen = article.title.length;
              let descrLen = article.description.length;
              let urlLen = article.url.length;

              let gossipText = article.title;
              if (gossipText.length + descrLen < 160) {
                gossipText += "\n" + article.description;
              }
              if (gossipText.length + urlLen < 160) {
                gossipText += "\n" + article.url;
              }

Hitting "Send"

Now we can send out our gossip as an SNS SMS. For this,

  • drag an SNS entry from the left pane into the editor, right after the last if block,
  • select Direct SMS as the Resource Type,
  • enter your mobile number into the Mobile Number field,
  • populate the SMS text field with @{gossipText},
  • type in GossipHuntr as the Sender ID (unfortunately the sender ID cannot be longer than 11 characters, but it doesn't really matter since it is just the text message sender's name; besides, GossipHuntr is more catchy, right? :)), and
  • click Inject.

But...

Wait! What would happen if your best buddy grabs your repo and deploys it; his gossips would also start flowing into your phone!

Perhaps a clever trick would be to extract out the phone number into another environment variable, so that you and your best buddy can pick your own numbers (and part ways, still as friends) at deployment time. So click the (x) again and add a new PHONE variable (with your phone number), and use it in the Mobile Number field instead as (you guessed it!) @{process.env.PHONE}:

Behold: gossip SMSs are on their way!

            } else {
              let titleLen = article.title.length;
              let descrLen = article.description.length;
              let urlLen = article.url.length;

              let gossipText = article.title;
              if (gossipText.length + descrLen < 160) {
                gossipText += "\n" + article.description;
              }
              if (gossipText.length + urlLen < 160) {
                gossipText += "\n" + article.url;
              }

              sns.publish({
                Message: gossipText,
                MessageAttributes: {
                  'AWS.SNS.SMS.SMSType': {
                    DataType: 'String',
                    StringValue: 'Promotional'
                  },
                  'AWS.SNS.SMS.SenderID': {
                    DataType: 'String',
                    StringValue: 'GossipHuntr'
                  },
                },
                PhoneNumber: process.env.PHONE
              }).promise()
                .then(data => {
                  // your code goes here
                })
                .catch(err => {
                  // error handling goes here
                });
            }

(In case you got overexcited and clicked Inject before reading the but... part, chill out! Dive right into the code, and change the PhoneNumber parameter under the sns.publish(...) call; ta da!)

Tick it off, and be done with it!

One last thing: for this whole contraption to work properly, we also need to save the "new" gossip in our table. Since you have already defined the table during the query operation, you can simply drag it from under the DynamoDB list on the resources pane (click the down arrow on the DynamoDB entry to see the table definition entry); drop it right under the SNS SDK call, select Put Document as the operation, and configure the new entry as url = ${article.url} (by clicking the Add button under Values and entering url as the key and @{article.url} as the value).

Dragging the existing DynamoDB table in; for our last mission

Adding a 'sent' marker for the 'hot' gossip that we just texted out

                .then(data => {
                  ddb.put({
                    TableName: 'gossips',
                    Item: { 'url': article.url }
                  }, function (err, data) {
                    if (err) {
                      console.log(`Failed to save marker for ${article.url}`, err);
                    } else {
                      console.log(`Saved marker for ${article.url}`);
                    }
                  });
                })
                .catch(err => {
                  console.log(`Failed to dispatch SMS for ${article.url}`, err);
                });

Time to polish it up!

Since we'd be committing this code to GitHub, let's clean it up a bit (all your buddies would see this, remember?) and throw in some comments:

let AWS = require('aws-sdk');
const sns = new AWS.SNS();
const ddb = new AWS.DynamoDB.DocumentClient();
let request = require('request');

exports.handler = function (event, context, callback) {

  // fetch the latest headlines
  request.get(`https://newsapi.org/v2/top-headlines?sources=entertainment-weekly&apiKey=${process.env.KEY}`,
    (error, response, body) => {

      // early exit on failure
      let result = JSON.parse(body);
      if (result.status !== "ok") {
        return callback('NewsAPI call failed!');
      }

      // check each article, processing if it hasn't been already
      result.articles.forEach(article => {
        ddb.get({
          TableName: 'gossips',
          Key: { 'url': article.url }
        }, function (err, data) {
          if (err) {
            console.log(`Failed to check for ${article.url}`, err);
          } else {
            if (data.Item) {  // we've seen this previously; ignore it
              console.log(`Gossip already dispatched: ${article.url}`);

            } else {
              let titleLen = article.title.length;
              let descrLen = article.description.length;
              let urlLen = article.url.length;

              // stuff as much content into the text as possible
              let gossipText = article.title;
              if (gossipText.length + descrLen < 160) {
                gossipText += "\n" + article.description;
              }
              if (gossipText.length + urlLen < 160) {
                gossipText += "\n" + article.url;
              }

              // send out the SMS
              sns.publish({
                Message: gossipText,
                MessageAttributes: {
                  'AWS.SNS.SMS.SMSType': {
                    DataType: 'String',
                    StringValue: 'Promotional'
                  },
                  'AWS.SNS.SMS.SenderID': {
                    DataType: 'String',
                    StringValue: 'GossipHuntr'
                  },
                },
                PhoneNumber: process.env.PHONE
              }).promise()
                .then(data => {
                  // save the URL so we won't send this out again
                  ddb.put({
                    TableName: 'gossips',
                    Item: { 'url': article.url }
                  }, function (err, data) {
                    if (err) {
                      console.log(`Failed to save marker for ${article.url}`, err);
                    } else {
                      console.log(`Saved marker for ${article.url}`);
                    }
                  });
                })
                .catch(err => {
                  console.log(`Failed to dispatch SMS for ${article.url}`, err);
                });
            }
          }
        });
      });

      // notify AWS that we're good (no need to track/notify errors at the moment)
      callback(null, 'Successfully executed');
    })
}

All done!

3, 2, 1, ignition!

Click Deploy on the toolbar, which will set a chain of actions in motion: first the project will be saved (committed to your own GitHub repo, with a commit message of your choosing), then built and packaged (fully automated!) and finally deployed into your AWS account (giving you a chance to review the deployment summary before it is executed).

deployment progress

Once the progress bar hits the end and the deployment status says CREATE_COMPLETE (or UPDATE_COMPLETE in case you missed a spot and had to redeploy), GossipHunter is ready for action!

Houston, we're GO!

Until your DynamoDB table is primed up (populated with enough gossips to start waiting for updates), you would receive a trail of gossip texts. After that, whenever a new gossip comes up, you will receive it on your mobile within a matter of minutes!

All thanks to the awesomeness of serverless and AWS, and Sigma that brings it all right into your web browser.