Okay, let's face it: this article has nothing to do with robbery, banks or, heck, ballpoint pens; but it's a good attention grabber (hopefully!), thanks to Chef Horst of Gusteau's. (Apologies if that broke your heart!)
Rather, this is about getting your own gossip feed—sending you the latest and the hottest, within minutes they become public—with just an AWS account and a web browser!
Maybe not as exciting as a bank robbery, but still worth reading on—especially if you're a gossip fan and like to always have an edge over the rest of your buddies.
Kicking out the server
Going with the recent hype, we will be using serverless technologies for our mission. You guessed it, there's no server involved. (But, psst, there is one!)
Let's go with AWS, which offers an attractive Free Tier in addition to a myriad of rich serverless utilties: CloudWatch scheduled events to trigger our gossip seek, DynamoDB to store gossips and track changes, and SNS-based SMS to dispatch new gossips right into your mobile!
And the best part is: you will be doing everything—from defining entities and composing lambdas to building, packaging and deploying the whole set-up—right inside your own web browser, without ever having to open up a single tedious AWS console!
All of it made possible thanks to Sigma, the brand new truly serverless IDE from SLAppForge.

The grocery list
First things first: sign up for a Sigma account, if you haven't already. All it takes is an email address, AWS account (comes with that cool free tier, if you're a new user!), GitHub account (also free) and a good web browser. We have a short-and-sweet writeup to get you started within minutes; and will probably come up with a nice video as well, pretty soon!
A project is born
Once you are in, create a new project (with a catchy name to impress your buddies—how about GossipHunter?). The Sigma editor will create a template lambda for you, and we can start right away.

Nurtured with <3 by NewsAPI
As my gossip source, I picked the Entertainment Weekly API by newsapi.org. Their API is quite simple and straightforward, and a free signup with just an email address gets you an API key with 1000 requests per day! In case you have your own love, feel free to switch just the API request part of the code (coming up soon!), and the rest should work just fine!
The recipe
Our lambda will be periodically pulling data from this API, comparing the results with what we already know (stored in DynamoDB) and sending out SMS notifications (via SNS) to your phone number (or email, or whatever other preferred medium that SNS offers) for any already unknown (hence "hot") results. We will store any newly seen topics in DynamoDB, so that we can prevent ourselves from sending out the same gossip repeatedly.
(By the way, if you have access to a gossip API that actually emits/notifies you of latest updates (e.g. via webhooks) rather than us having to poll for and filter them, you can use a different, more efficient approach such as configuring an API Gateway trigger and pointing the API webhook to the trigger endpoint.)
Okay, let's chop away!
The wake-up call(s)
First, let's drag a CloudWatch entry from the left Resources pane and configure it to fire our lambda; to prevent distractions during working hours, we will configure it to run every 15 minutes, only from 7 PM (when you are back from work) to midnight, and from 5AM to 8 AM (when you are on your way back to work). This can be easily achieved through a New, Schedule-type trigger that uses a cron expression such as 5-7,19-23 0/15 ? * MON-FRI *. (Simply paste 0/15 , 5-7,19-23 (no spaces) and MON-FRI into the Minutes, Hours and Day of Week fields, and type a ? under Day of Month.)

But wait! The real value of gossip is certainly in the weekend! So let's add (drag, drop, configure) another trigger to run GossipHunter all day (5 AM - midnight!) over the weekend; just another cron with 0/10 (every ten minutes this time! we need to be quick!) in Minutes, 5-23 in Hours, ? in Day of Month and SAT,SUN in Day of Week.

Okay, time to start coding!
Grabbing the smoking hot stuff
Let's first fetch the latest gossips from the API. The requests module could do this for us in a heartbeat, so we'll go get it: click the Add Dependency button on the toolbar, type in requests and click Add once our subject appears in the list:

Now for the easy part:
  request.get(`https://newsapi.org/v2/top-headlines?sources=entertainment-weekly&apiKey=your-api-key`,
  (error, response, body) => {

    callback(null,'Successfully executed');
  })
Gotta hide some secrets?
Wait! The apiKey parameter: do I have to specify the value in the code? Since you probably would be saving all this in GitHub (yup, you guessed right!) won't that compromise my token?
We also had the same question; and that's exactly why, just a few weeks ago, we introduced the environment variables feature!
Go ahead, click the Environment Variables ((x)) button, and define a KEY variable (associated with our lambda) holding your API key. This value will be available for your lambda at runtime, but it will not be committed into your source; you can simply provide the value during your first deployment after opening the project. And so can any of your colleagues (with their own API keys, of course!) when they get jealous and want to try out their own copy of your GossipHunter!

(Did I mention that your friends can simply grab your GossipHunter's GitHub repo URL—once you have saved your project—and open it in Sigma right away, and deploy it on their own AWS account? Oh yeah, it's that easy!)
Cool! Okay, back to business.
Before we forget it, let's append process.env.KEY to our NewsAPI URL:
request.get(`https://newsapi.org/v2/top-headlines?sources=entertainment-weekly&apiKey=${process.env.KEY}`,And extract out the gossips list, with a few sanity checks:
  (error, response, body) => {
    let result = JSON.parse(body);
    if (result.status !== "ok") {
      return callback('NewsAPI call failed!');
    }
    result.articles.forEach(article => {

    });

    callback(null,'Successfully executed');
  })
Sifting out the not-so-hot
Now the tricky part: we have to compare these with the most recent gossips that we have dispatched, to detect whether they are truly "new" ones, i.e. filter the ones that have not already been dispatched.
For starters, we shall maintain a DynamoDB table gossips to retain the gossips that we have dispatched, serving as our GossipHunter's "memory". Whenever a "new" gossip (i.e. one that is not already available in our table) is encountered, we shall send it out via SNS, the Simple Notification Service and add it to our table so that we will not send it out again. (Later on we can improve our "memory" to "forget" (delete) old entries so that it would not keep on growing indefinitely, but for the moment, let's not worry about it.)
What's that, Dynamo-DB?
For the DynamoDB table, simply drag a DynamoDB entry from the resources pane into the editor, right into the forEach callback. Sigma will show you a pop-up where you can define your table (without a round trip to the DynamoDB dashboard!) and the operation you intend to perform on it. Right now we need to query the table for the gossip in the current iteration, so we can zip it by
- entering
gossipsinto the Table Name field andurlfor the Partition Key, - selecting the Get Document operation, and
- entering
@{article.url}(note the familiar,${}-like syntax?) in the Partition Key field.

      result.articles.forEach(article => {
        ddb.get({
          TableName: 'gossips',
          Key: { 'url': article.url }
        }, function (err, data) {
          if (err) {
            //handle error
          } else {
            //your logic goes here
          }
        });

      });
In the callback, let's check if DynamoDB found a match (ignoring any failed queries):
        }, function (err, data) {
          if (err) {
            console.log(`Failed to check for ${article.url}`, err);
          } else {
            if (data.Item) {  // match found, meaning we have already saved it
              console.log(`Gossip already dispatched: ${article.url}`);
            } else {

            }
          }
        });
Compose (160 characters remaining)
In the nested else block (when we cannot find a matching gossip), we prepare an SMS-friendly gossip text (including the title, and optionally the description and URL if we can stuff them in; remember the 160-character limit?). (Later you can tidy things up by throwing in a URL-shortener logic and so on, but for the sake of simplicity, I'll pass.)
            } else {
              let titleLen = article.title.length;
              let descrLen = article.description.length;
              let urlLen = article.url.length;

              let gossipText = article.title;
              if (gossipText.length + descrLen < 160) {
                gossipText += "\n" + article.description;
              }
              if (gossipText.length + urlLen < 160) {
                gossipText += "\n" + article.url;
              }
Hitting "Send"
Now we can send out our gossip as an SNS SMS. For this,
- drag an SNS entry from the left pane into the editor, right after the last
ifblock, - select Direct SMS as the Resource Type,
- enter your mobile number into the Mobile Number field,
- populate the SMS text field with
@{gossipText}, - type in
GossipHuntras the Sender ID (unfortunately the sender ID cannot be longer than 11 characters, but it doesn't really matter since it is just the text message sender's name; besides,GossipHuntris more catchy, right? :)), and - click Inject.
But...
Wait! What would happen if your best buddy grabs your repo and deploys it; his gossips would also start flowing into your phone!
Perhaps a clever trick would be to extract out the phone number into another environment variable, so that you and your best buddy can pick your own numbers (and part ways, still as friends) at deployment time. So click the (x) again and add a new PHONE variable (with your phone number), and use it in the Mobile Number field instead as (you guessed it!) @{process.env.PHONE}:

            } else {
              let titleLen = article.title.length;
              let descrLen = article.description.length;
              let urlLen = article.url.length;

              let gossipText = article.title;
              if (gossipText.length + descrLen < 160) {
                gossipText += "\n" + article.description;
              }
              if (gossipText.length + urlLen < 160) {
                gossipText += "\n" + article.url;
              }

              sns.publish({
                Message: gossipText,
                MessageAttributes: {
                  'AWS.SNS.SMS.SMSType': {
                    DataType: 'String',
                    StringValue: 'Promotional'
                  },
                  'AWS.SNS.SMS.SenderID': {
                    DataType: 'String',
                    StringValue: 'GossipHuntr'
                  },
                },
                PhoneNumber: process.env.PHONE
              }).promise()
                .then(data => {
                  // your code goes here
                })
                .catch(err => {
                  // error handling goes here
                });
            }
(In case you got overexcited and clicked Inject before reading the but... part, chill out! Dive right into the code, and change the PhoneNumber parameter under the sns.publish(...) call; ta da!)
Tick it off, and be done with it!
One last thing: for this whole contraption to work properly, we also need to save the "new" gossip in our table. Since you have already defined the table during the query operation, you can simply drag it from under the DynamoDB list on the resources pane (click the down arrow on the DynamoDB entry to see the table definition entry); drop it right under the SNS SDK call, select Put Document as the operation, and configure the new entry as url = ${article.url} (by clicking the Add button under Values and entering url as the key and @{article.url} as the value).


                .then(data => {
                  ddb.put({
                    TableName: 'gossips',
                    Item: { 'url': article.url }
                  }, function (err, data) {
                    if (err) {
                      console.log(`Failed to save marker for ${article.url}`, err);
                    } else {
                      console.log(`Saved marker for ${article.url}`);
                    }
                  });
                })
                .catch(err => {
                  console.log(`Failed to dispatch SMS for ${article.url}`, err);
                });
Time to polish it up!
Since we'd be committing this code to GitHub, let's clean it up a bit (all your buddies would see this, remember?) and throw in some comments:
let AWS = require('aws-sdk');
const sns = new AWS.SNS();
const ddb = new AWS.DynamoDB.DocumentClient();
let request = require('request');

exports.handler = function (event, context, callback) {

  // fetch the latest headlines
  request.get(`https://newsapi.org/v2/top-headlines?sources=entertainment-weekly&apiKey=${process.env.KEY}`,
    (error, response, body) => {

      // early exit on failure
      let result = JSON.parse(body);
      if (result.status !== "ok") {
        return callback('NewsAPI call failed!');
      }

      // check each article, processing if it hasn't been already
      result.articles.forEach(article => {
        ddb.get({
          TableName: 'gossips',
          Key: { 'url': article.url }
        }, function (err, data) {
          if (err) {
            console.log(`Failed to check for ${article.url}`, err);
          } else {
            if (data.Item) {  // we've seen this previously; ignore it
              console.log(`Gossip already dispatched: ${article.url}`);

            } else {
              let titleLen = article.title.length;
              let descrLen = article.description.length;
              let urlLen = article.url.length;

              // stuff as much content into the text as possible
              let gossipText = article.title;
              if (gossipText.length + descrLen < 160) {
                gossipText += "\n" + article.description;
              }
              if (gossipText.length + urlLen < 160) {
                gossipText += "\n" + article.url;
              }

              // send out the SMS
              sns.publish({
                Message: gossipText,
                MessageAttributes: {
                  'AWS.SNS.SMS.SMSType': {
                    DataType: 'String',
                    StringValue: 'Promotional'
                  },
                  'AWS.SNS.SMS.SenderID': {
                    DataType: 'String',
                    StringValue: 'GossipHuntr'
                  },
                },
                PhoneNumber: process.env.PHONE
              }).promise()
                .then(data => {
                  // save the URL so we won't send this out again
                  ddb.put({
                    TableName: 'gossips',
                    Item: { 'url': article.url }
                  }, function (err, data) {
                    if (err) {
                      console.log(`Failed to save marker for ${article.url}`, err);
                    } else {
                      console.log(`Saved marker for ${article.url}`);
                    }
                  });
                })
                .catch(err => {
                  console.log(`Failed to dispatch SMS for ${article.url}`, err);
                });
            }
          }
        });
      });

      // notify AWS that we're good (no need to track/notify errors at the moment)
      callback(null, 'Successfully executed');
    })
}
All done!
3, 2, 1, ignition!
Click Deploy on the toolbar, which will set a chain of actions in motion: first the project will be saved (committed to your own GitHub repo, with a commit message of your choosing), then built and packaged (fully automated!) and finally deployed into your AWS account (giving you a chance to review the deployment summary before it is executed).
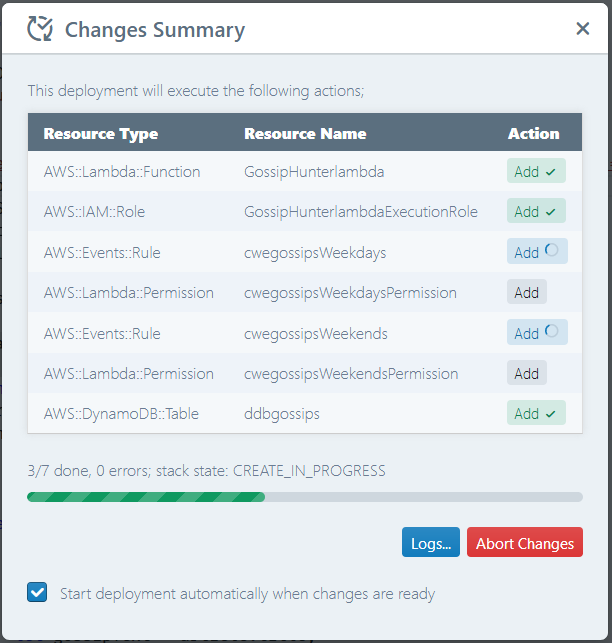
Once the progress bar hits the end and the deployment status says CREATE_COMPLETE (or UPDATE_COMPLETE in case you missed a spot and had to redeploy), GossipHunter is ready for action!
Houston, we're GO!
Until your DynamoDB table is primed up (populated with enough gossips to start waiting for updates), you would receive a trail of gossip texts. After that, whenever a new gossip comes up, you will receive it on your mobile within a matter of minutes!
All thanks to the awesomeness of serverless and AWS, and Sigma that brings it all right into your web browser.
No comments:
Post a Comment