Wednesday, July 18, 2018

My bots are now placeless. Homeless. Serverless.

I usually keep an eye on various websites - for latest publications, hot new offers, limited-time games and contests, and the like.

Most of these do not offer a "clean" notification system, such as an RSS feed. So I often have to scrape their HTML to get to what I need.

Which means I often need to run some custom string manipulation magic to get to what I need.

And I need it to be periodic (who knows when the next hot update would surface?).

And automatic (I have more important things to do during my day).

And remotely hosted (I don't want to keep my laptop running 24×7, with an uninterrupted internet connection).

So far I have been relying on Google Apps Script (and more recently, Google App Engine) for driving these sorts of home-made integration "snippets"; however, with the whole world immersing itself in serverless, why shouldn't I?

So I set out to migrate one of my scripts, written for monitoring a Chinese retail website. The site occasionally publishes various discounted offers and seasonal games where I can earn nice coupons and credits via daily plays. But for some reason the site does not send out promotional emails to my email address, which means I have to keep checking the site every once in a while just to make sure that I won't miss something cool.

And you know the drill.

I forget things easily. Sometimes, when I'm away from my computer, I miss the reminder as well. Sometimes I'm just too lazy to look things up, because I end up with nothing new, 75-80% of the time. So many excuses...

Besides, who in their right developer mind wants to do something as boring as that, when you can just set up a bot, sit back, and relax?!

I started off with AWS Lambda, the obvious choice for free serverless computing. Its non-expiring free tier gives me an unbelievable 3.2M (yes, million) seconds of runtime per month - I can virtually keep one lambda running forever, and a little bit more! - across 1M (million again!) invocations. Previously on Apps Script or App Engine I had just 90 minutes per day - a little over 160K seconds per month - meaning that I had to use my quotas very sparingly; but now I can let go of my fears and fully enjoy my freedom of development. Not to mention the fully-fledged container environment in contrast to the framework confinements of Apps Script or App Engine.

Enough talk. Let's code!

Rather than taking the standard path, I picked Sigma from SLAppForge as my development framework; primarily because it had some reputation for supporting external dependencies, and taking care of packaging and deploying stuff on my behalf - including all the external services (APIs, tables, crons and whatnot).

First I had to sign up for Sigma. Although I could have gone ahead with their demo feature (the big yellow button), I already had an AWS account and a GitHub account (not to mention an email address); so why not give it a shot?

The sign-up form

When completed the registration and logged in, I was greeted with a project selection pane, where I opted for a new project with name site-monitor:

Creating 'site-monitor'

The app was blazingly fast, and the editor popped up as soon as I hit Create Project:

The Sigma editor

Without further ado, I grabbed the content of my former Apps Script function and dropped it into Sigma!

let AWS = require('aws-sdk');

exports.handler = function(event, context, callback) {

    // Here Goes Nothing

    PROPS = PropertiesService.getScriptProperties();
    page = UrlFetchApp.fetch("http://www.my-favorite-site.com").getResponseText();
    url = page.match(/(lp|\?r=specialTopic)\/[^"]*/)[0];
    if (url != PROPS.getProperty("latest")) {
        GmailApp.sendEmail("janakaud@gmail.com", "MyFavSite Update!", url);
        PROPS.setProperty("latest", url);
    }

    // end of Here Goes Nothing

    callback(null,'Successfully executed');
}

(I know, I know, that didn't work. Bear with me :))

The next several minutes, I spent transforming my Apps Script code into NodeJS. It was not that hard (both are JS, after all!) once I got the request module added to my project:

'Add Dependency' button

Searching for 'request' dependency

But I must say I did miss the familiar, synchronous syntax of the UrlFetchApp module.

Under App Engine I had the wonderfully simple PropertiesService to serve as the "memory" of my bot. Under Sigma (AWS) things were not that simple; after some look-around I decided to go with DynamoDB (although I still felt it was way much overkill).

Once I have extracted the URL from the page, I needed to check if I have already notified myself of it; the equivalent of querying my table (formerly the PropertiesService) for an existing entry. In DynamoDB-land this was apparently a Get Document operation, so I tried dragging in DynamoDB into my code:

DynamoDB incoming!

Once dropped, the DynamoDB entry transformed into a pop-up where I could define my table and provide the code-level parameters as well. Hopefully Sigma would remember the table configuration so I won't have to enter it again and again, all over my code.

Configuring a new DynamoDB table, and a 'Get Document' operation

Since DynamoDB isn't a simple key-value thingy, I spent a few minutes scratching my head on how to store my "value" in there; eventually I decided to use a "document" structure of the form

{
    "domain": "my-favorite-site.com",
    "url": "{the stored URL value}"
}

where I could query the table using a specific domain value for each bot, and hence reuse the table for different bots.

In my old code I had used a GmailApp.sendEmail() call to send myself a notification when I got something new. In Sigma I tried to do the same by dragging and dropping a Simple Email Service (SES) entry:

SES: verifying a new email

Here there was a small hiccup, as it appeared that I would need to verify an email address before I could send something out. I wasn't sure how bumpy my ride would be, anyway I entered my email address and clicked Send verification email.

SES

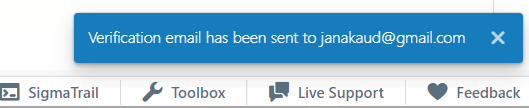
Sure enough, I received a verification link via email which, when clicked, redirected me to a "Verification successful" page.

And guess what: when I switched back to Sigma, the popup had updated itself, stating that the email was verified, and guiding me through the next steps!

Email verified; SES popup automagically updated!

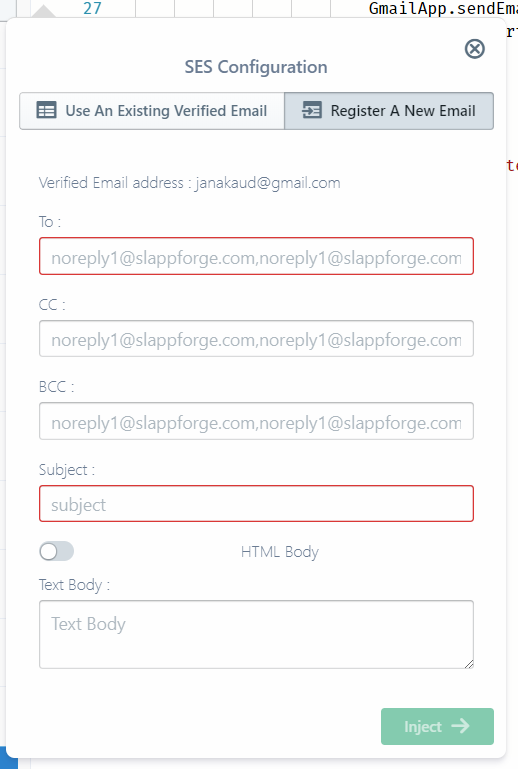
I filled in the details right away (To myself, no CC's or BCC's, Subject MyFavSite Update! and Text Body @{url} (their own variable syntax; I wish it were ${} though)):

SES configuration

In the callback of SES email sender, I had to update the DynamoDB table to reflect the new entry that was emailed out (so I won't email it again). Just like the PROPS.setProperty("latest", url) call in my original bot.

That was easy, with the same drag-n-drop thingy: selecting the previously created table under Existing Tables and selecting a Put Document operation with domain set to my-favorite-site.com (my "search query"; equivalent of "latest" in the old bot) and a url entry set to the emailed URL:

DynamoDB Put Document configuration

Eventually I ended up with a fairly good piece of code (although it was way longer than my dear old Apps Script bot):

let AWS = require('aws-sdk');
const ses = new AWS.SES();
const ddb = new AWS.DynamoDB.DocumentClient();
const request = require("request");

exports.handler = function (event, context, callback) {
    request.get("http://www.my-favorite-site.com",
        (error, response, body) => {
            if (!body) {
                throw new Error("Failed to fetch homepage!");
            }

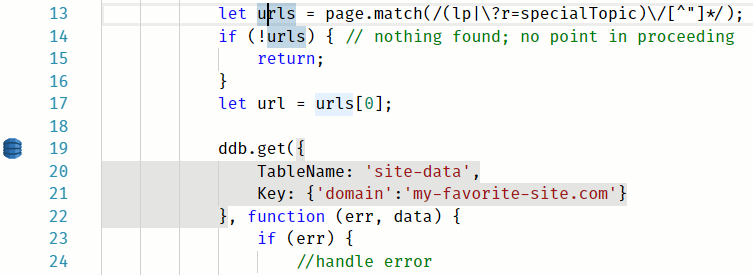
            let urls = page.match(/(lp|\?r=specialTopic)\/[^"]*/);
            if (!urls) { // nothing found; no point in proceeding
                return;
            }
            let url = urls[0];

            ddb.get({
                TableName: 'site-data',
                Key: { 'domain': 'my-favorite-site.com' }
            }, function (err, data) {
                if (err) {
                    throw err;
                } else {
                    if (!data.Item || data.Item.url != url) {
                        ses.sendEmail({
                            Destination: {
                                ToAddresses: ['janakaud@gmail.com'],
                                CcAddresses: [],
                                BccAddresses: []
                            },
                            Message: {
                                Body: {
                                    Text: {
                                        Data: url
                                    }
                                },
                                Subject: {
                                    Data: 'MyFavSite Update!'
                                }
                            },
                            Source: 'janakaud@gmail.com',
                        }, function (err, data) {
                            if (err) {
                                throw err;
                            }
                            ddb.put({
                                TableName: 'site-data',
                                Item: { 'domain': 'my-favorite-site.com', 'url': url }
                            }, function (err, data) {
                                if (err) {
                                    throw err;
                                } else {
                                    console.log("New URL saved successfully!");
                                }
                            });
                        });
                    } else {
                        console.log("URL already sent out; ignoring");
                    }
                }
            });
        });

    callback(null, 'Successfully executed');
}

Sigma was trying to help me all the way, by providing handy editing assistance (code completion, syntax coloring, variable suggestions...), and even highlighting the DynamoDB and SES operations and displaying tiny icons in front; which, when clicked, displayed (re)configuration pop-ups similar to what I got when I drag-dropped them the first time.

DynamoDB operation highlighted, with indicator icon in front

DynamoDB operation edit pop-up

Due to the async, callback-based syntax, I had to move around bits 'n' pieces of my code several times. Sigma handled it pretty well, re-doing the highlighting stuff a second or two after I pasted the code in its new location.

Just for fun, I tried editing the code manually (without using the pop-up) and, fair enough, the pop-up understood the change and updated itself the next time I checked. Pretty neat for a newbie who wants to get stuff done without diving into the docs.

Now, how can I run my bot periodically?

Sigma shows a red lightning sign near the function header, and highlights the event parameter in the same. Possibly indicating it's the point of invocation or triggering of the lambda.

highlighted 'event' variable on function header, with red lightning icon in front

Yup. Their docs say the same.

AWS docs and Sigma's own ones pointed me to CloudWatch scheduled event triggers that could trigger a lambda with a predefined schedule - like Apps Script triggers but much more powerful; more like App Engine cron expressions.

As mentioned in their docs, I dragged a CloudWatch entry on to the event variable and configured it like so:

CloudWatch trigger configuration

And the whole event thing changed from red to green, possibly indicating that my trigger was set up successfully.

Right. Time to test it out.

The toolbar has a Test (play) button, with a drop-down to select your test case. Like Apps Script, but much better in the sense that you can defne the input payload for the invocation (whereas Apps Script just runs the function without any input arguments):

Test button on Sigma toolbar

Test case configuration dialog

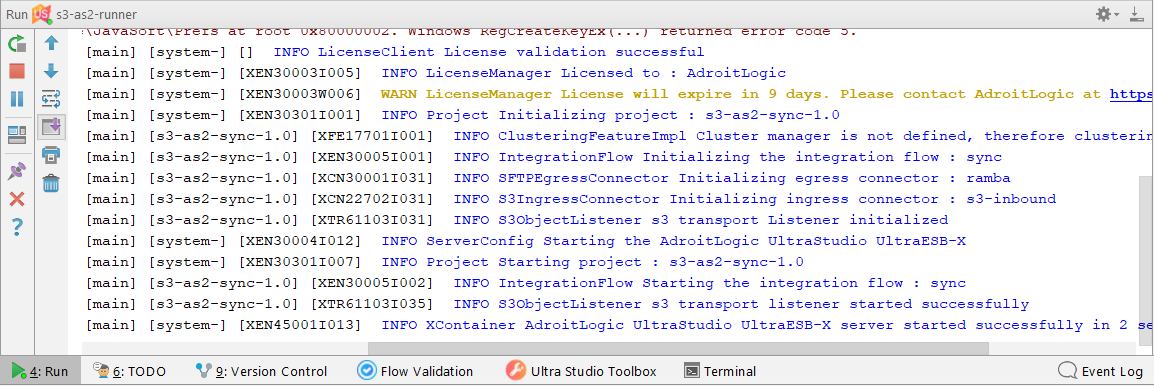
As soon as I configured a test case and hit the run button, the status bar started showing a running progress:

Test ongoing!

Few seconds later, a SigmaTrail log output window automagically popped up, and started showing some logs:

SigmaTrail automagically pops up when you run a test!

errorMessage:"RequestId: 87c59aba-8822-11e8-b912-0f46b6510aa8 Process exited before completing request"
[7/15/2018][5:00:52 PM] Updating dependencies. This might make runtime longer than usual.
[7/15/2018][5:00:55 PM] Dependencies updated.
[7/15/2018][5:00:57 PM] ReferenceError: page is not defined
at Request.request.get [as _callback] (/tmp/site-monitor/lambda.js:13:24)
at Request.self.callback (/tmp/site-monitor/node_modules/request/request.js:185:22)

Oops, looks like I got a variable name wrong.

A simple edit, and another test.

[7/15/2018][5:04:50 PM] ResourceNotFoundException: Requested resource not found
at Request.extractError (/tmp/site-monitor/node_modules/aws-sdk/lib/protocol/json.js:48:27)
at Request.callListeners (/tmp/site-monitor/node_modules/aws-sdk/lib/sequential_executor.js:105:20)

Hmm, what does that mean?

Looks like this one's coming from the AWS SDK itself.

Maybe the AWS "resources" I dragged-n-dropped into my app are not yet available on AWS side; besides, many of the Sigma tutorials mention a "deployment" step before they go into testing.

Oh well, let's try deploying this thing.

Deploy button on Sigma toolbar

I was hoping a seamless "one-click deploy", but when I clicked the Deploy button I just got a pop-up saying I need to authenticate to GitHub. Sigma might probably be saving my stuff in a GitHub repo and then using it for the rest of the deployment.

'GitHub Authentication' pop-up

Seeing no evil, I clicked the sign-in, and authorized their app on the pop-up window that followed. Within a few seconds, I got another pop-up asking me to pick a repo name and a commit message.

GitHub commit dialog

I didn't have a repo site-monitor in my account, so I was curious to see what Sigma would do. Just as I suspected, after a few seconds from clicking Commit, another dialog popped-up asking whether I would like it to create a new repo on my behalf.

GitHub repo creation confirmation dialog

Sigma was so kind that it even offered to create a private repository; but alas, I didn't have the luxury, so I just clicked Create Repo and Commit.

From there onwards, things were fairly automated: after the "Successfully commmitted" notification, there was a lightningly fast "build" step (accompanied by a progress bar in the bottom status pane).

Next I got another pop-up, this time a Changes Summary; which, after a few more seconds, populated itself with a kind of "deployment summary":

Deployment summary

I wasn't much interested in the low-level detail (though I did recognize the cweOneAM as my cron trigger and siteMonitorLambda as my bot), so I just hit Execute; and this time there was a fairly long wait (accompanied by another progress bar, this time within the pop-up itself).

Deployment progress

Once it hit the 100% mark, Sigma stated that my deployment completed with a CREATE_COMPLETE state (sounds good!).

Now let's try that testing thing, again.

"Successfully executed"
[7/15/2018][5:39:34 PM] New URL saved successfully!

SigmaTrail: success!

Yay!

Wait, will it resend if I run it again?

"Successfully executed"
[7/15/2018][5:39:41 PM] URL already sent out; ignoring

All good; no duplicates!

Now to check my inbox, to see if Sigma is telling the truth.

Initially I was a bit confused because I didn't actually receive an email; but eventually I found it sitting in my Spam folder (probably because it was sent by a third party (AWS)?), and unmarking it as spam did the trick.

Email received! (confused? I use Gmail Mobile: https://mail.google.com/mail/u/0/x/a)

Hopefully my CloudWatch trigger would fire tomorrow at 1 AM, bringing me the good news if there are any!

All in all, the graphical IDE is quite slick and recommendable to my colleagues. Except for the deployment time (which I guess is characteristic to serverless apps, or Lambda, or perhaps AWS), I felt almost at home - and even more so, with all the nifty features - autocompletion, drag-n-drop, GUI configs, testing, logs, and so forth.

Time for a cuppa coffee, and then to start migrating my other bots to Sigma... um... AWS.

Monday, July 16, 2018

Android touch not working? Not to worry.

It's fairly rare to see a non-smartphone these days among the masses. Despite their numerous benefits, smartphones can sometimes be a PITA—especially the touchscreen.

I have a (somewhat aged) Greentel Safari M1 which suffers from an occasional hiccup - the touchscreen simply refuses to work. No matter how hard I try, there's no hint of a response - not a flicker, not a movement, not a button/icon highlight, nothing.

I have taken it to the vendor for repair, and all they do is factory-reset the phone (which then—for obvious reasons—starts running smoothly right away). None of the other suggestions—rebooting, tapping the corners, heating (which I didn't really try)—ever worked.

What if I can do the reset myself—without having to run to a repair shop every couple weeks?

Fortunately I can.

No, it's not a recovery option. That one I gave up a long time ago, after so many fruitless attempts to find a working button combination.

Now I always enable USB debugging right after I reset the phone (while the touch is back in its full glory) and authorize my developer machine to connect to it via adb.

Good thing with Android is that you get an impressive bunch of utility commands that run with adb, out of the box. Not much useful for a regular user, but handy for a developer, hacker or someone going through a hard time fixing his phone—like myself.

In my case, input is the tool that helps me get through my mess. input allows you to send arbitrary user inputs to your phone via your computer—touches, drags, long presses, keystrokes, home, back, shakes—whatever you wish.

Thankfully, now I can just get into the phone's shell (using adb shell) and run a series of inputs that would unlock my screen and reset the phone via [open top drawer] → Settings → [scroll down] → Backup and resetReset phone button:

# unlock
input swipe 120 320 0 320

# there will probably be unread SMS pop-ups: dismiss them with back button
input tap 10 180

# bonus: check missed calls!
input tap 20 450
input tap 120 180
input swipe 120 440 120 200

# BEWARE! factory reset!
input keyevent HOME
input keyevent MENU
input tap 300 420
input swipe 120 440 120 200
input tap 300 420
input swipe 120 440 120 200
input tap 300 420
input tap 120 420
input tap 120 240

It's worth noting that my device runs a customized Android 4.4 OS, on a 240×320 screen. If you wish to utilize the same script for your phone, you might need to tweak it to suit your OS, menus and UI elements; the best way to do this would be to run the commands incrementally, checking the result at each stage and tweaking as you go along. (I myself had to spend about 15 minutes to get this one in order, the first time.)

Happy resetting!

Google, Here We Come!

Google is catching up fast on the serverless race.

And we are, too.

That's how our serverless IDE Sigma recently started supporting integrations with Google Cloud Platform, pet-named GCP.

What the heck does that mean?

To be extra honest, there's nothing new so far. Sigma had had the capability to interact with GCP (and any other cloud service, for that matter) right from the beginning; we just didn't have the scaffolding to make things easy and fun—the nice drag-n-drops and UI pop-ups, and the boilerplate code for handling credentials.

Now, with the bits 'n' pieces in place, you can drag, drop and operate on your GCP stuff right inside your Sigma project!

(*) Conditions apply

Of course, there are some important points (well, let's face it, limitations):

  • GCP access is confined to one project, meaning that all cloud resources accessed in a Sigma project should come from a single GCP project. You can of course work around this by writing custom authorization logic on your own, but drag-n-drop stuff will still work only for the first project you configured.
  • You can only interact with existing resources, and only as operations (no trigger support). New resource creation and trigger configurations require deeper integration with GCP, which will become available soon (fingers crossed).
  • Only a handful of resource types are currently supported—including Storage, Pub/Sub, Datastore and SQL. These should, however, cover most of the common scenarios; we are hoping to give more attention to big data and machine learning stuff in the immediate future—which Google also seems to be thriving upon—but feel free to shout out so we can reconsider our strategy!

So, where can I get this thing?

'GCP Resources' button on the Resources pane

  • Now you can provide a service account key from the desired GCP project in order to access its resources via Sigma. Click Authorize, paste the JSON service account key, and press Save.

GCP Resources pane with 'Authorize' button

GCP Service Account Key pop-up

  • The Resources pane will now display the available GCP resource types. You can drag-n-drop them into your code, configure new operations and edit existing ones, just like you would do with AWS resources.

Resources pane displaying available GCP resource types

(Disclaimer: The list you see may be different, depending on how old this post is.)

But you said there's nothing new!

How could I have done this earlier?

Well, if you look closely, you'll see what we do behind the scenes:

  • We have two environment variables, GCP_SERVICE_TOKEN and GCP_PROJECT_ID, which expose the GCP project identity and access to your Sigma app.
  • Sigma has an Authorizer file that reads this content and configures the googleapis NodeJS client library, using them as credentials.
  • Your code imports Authorizer (which runs the abovementioned configuration stuff), and invokes operations via googleapis, effectively operating on the resources in your GCP project.

See? No voodoo.

Of course, back in those days, you won't have seen the nice UI pop-ups, or the drag 'n' drop capability; so we've had to do a bit of work, after all.

Not cool! I want more!!

Relax, the really cool stuff is already on the way:

  • Ability to define new GCP resources, right within the IDE (drag-drop-configure, of course!)
  • Ability to use GCP resources as triggers (say, fire a cloud function via a Cloud Storage bucket or a Pub/Sub topic)

And, saving the best for the last,

  • Complete application deployments on Google Cloud Platform!

And...

  • A complete cross-cloud experience: operating on AWS from within GCP, and vice versa!
  • With other players (MS Azure, Alibaba Cloud and so forth) joining the game, pretty soon!

So, stay tuned!

Sunday, July 1, 2018

Modernize your business flow - with AWS, AS2G and UE-X!

(TL;DR: it's all here.)

Your retail business is growing like never before.

More and more trading partners. Way more transactions. Loads of documents to exchange.

But, should that mean...

Sleepless nights?

Exhausting phone calls?

Hours of finger-numbing data entry?

Not anymore. The world is moving on. Fast.

In fact, it has moved on.

AS2Gateway: AS2 for all!

AS2

Back in 2002, when Walmart enforced AS2 for all business data exchanges with its partners, it looked more like a joint business propaganda rather than a honest attempt for enhanced communication.

But today, Walmart or no Walmart, AS2 is the most popular way of secure business document exchange.

Combined with automated trading document standards like UN/EDIFACT, ANSI X12, TRADACOMS and ebXML, AS2 continues to rule the business domain with first-class support from all major trading platforms.

Not to mention the variety of third-party integrations, made possible by the sheer flexibility and "automatability" of AS2, EDI and all related technologies.

The "Gateway"

In case you haven't already, AS2Gateway by AdroitLogic is a nice place to get you started with all the goodies of AS2, and beyond. It is free to get started, and presents a mailbox-like interface to easily manage and exchange trading messages (documents, effectively) with all your trading partners.

AS2G offers multiple identities (stations) for dealing with different partners, along with AS2-level facilities like certificate management, auto-verification and auto-acknowledgement for incoming messages, and support for popular messaging modes like encryption, compression and signing.

And it is a hosted service that awaits for, accepts and acknowledges all AS2 messages sent by your partners, 24x7.

One step towards a good night's sleep. A big one.

But wait, we can do better than that!

SFTP, you beauty.

One nifty feature offered by AS2G (our pet name for AS2Gateway) is its SFTP capability - which allows you to effectively send and receive AS2 messages through SFTP. Drop your files into a SFTP folder, and AS2G will send them out to the corresponding partner; a partner sends you some files over AS2, and the next moment they are available for download via a SFTP folder.

It's that simple.

And insanely flexible.

Because, from that point onwards, it's just a set of files in a folder.

With which you can do anything. Anything you like.

Up in the Cloud

Just for a moment, let's assume you want to take your business to the next level - the cloud.

(If you haven't already, here are 10 good reasons that would make you reconsider your options.)

You are now months—or weeks—away from a full-time migration into a cloud-based order processing system, which would generate and persist all transactional documents - invoices, POs, receipts, shipment details and whatnot - into cloud storage (say, a S3 bucket or an Azure Blob Store).

And you want to send these documents out to your partners, via AS2 - like you have always been doing.

Cloud to AS2; how?

At a glance, we see two possible options:

  • uploading the file directly into AS2G, using an API or other similar mechanism
  • copying the file into your AS2G account's SFTP space, allowing AS2G to pick it and send it automatically

While the first would have been awesome, AS2G does not currently offer public API access (although the team is actively working on it). So we shall follow the SFTP approach which, thanks to the recent advancements in business integration software, can be set up quite easily with just a few drag-n-drops.

Cloud to AS2, no hands!

Let's assume that your order processing system runs on AWS, and the generated documents are being placed in a S3 bucket. Our integration would be as simple as keeping watch on the bucket and automatically copying any files that appear therein, into the appropriate folder in your AS2G SFTP account!

The "Studio", where it all comes alive

For the drag-n-drop integration we can use UltraStudio, the official dev toolkit for the UltraESB-X Enterprise Integrator that will be used to host and run our custom integration flow.

Simply pick your platform, fill in your details and download the toolkit from the link that will be e-mailed to you.

If you already have the IntelliJ IDEA IDE, you can settle for a plugin distribution as well (available on the same page), instead of downloading and installing the full IDE bundle.

An "Ultra" Project

Once you are ready,

  • Create a new project, using the Create New Project link on the welcome screen, or via the menu: File → New → Project... (if you already have a project open).

New Project via the Welcome Screen

New Project via the menu: File → New → Project...

  • Pick the Empty Ultra Project type from the left pane, and click Next.

    Step 1: Selecting 'Empty Ultra Project'

  • Nothing much to do on the second screen either; maybe remove the ugly -SNAPSHOT part in the Version field, and click Next.

Step 2: Maven settings for your new project

"Connectors" and "Processors"?

  • At the next, Connector selection phase (step 3), select AWS Connector (since we would be reading files from S3) and SFTP Connector (since we will be writing files into AS2G's SFTP directory).

Step 3.1: 'AWS Connector' selected

Step 3.2: 'SFTP Connector' selected

  • No need to select anything in the next phase (Processor selection); just click Next.

A project is born

  • In the next window (don't panic, this is the last one!), pick a location to create your project (Project location), enter a nice name for Project name (how about s3-as2-sync?), and click Finish.

Step 4: Project details

  • Wait till project has finished loading, at which point the spinner (and any progress indicators) will disappear from the status bar at the bottom of the window. This could take a bit of time, especially if it's your first time using UltraStudio.

Project created, and is being initialized... Patience is a virtue!

Your first "Integration Flow"

Once the IDE has settled down, we're ready to have some fun; drawing our integration path as a graphical flow!

  • Expand the src/main/conf directory in the Project pane on the left, right-click the conf directory entry and select NewIntegration Flow.

Creating your first integration flow: 'src/main/conf' → 'New' → 'Integration Flow'

  • Enter a nice name for the flow (note that it should be different from the project name; I have picked sync) and click OK. A new sync.xcml file will get created inside the src/main/conf directory, and UltraStudio will automagically open it for you!

Naming your new flow

Your new integration flow file, open in the editor, ready for action!

  • At the bottom of the file, switch to the Design view. You will see a graphical editor, with a canvas where you can draw your workflow and a palette containing components that you can drag into your flow.

Flow view with palette and canvas

Connecting with S3

  • Expand the ConnectorsIngress entry on the palette, and drag-n-drop an S3 Ingress Connector into the canvas. UltraStudio will immediately ask you for a name for the newly dragged component (it likes to keep things well-named and well-organized).

UltraStudio asking you to provide an ID (name) for the S3 ingress connector component

  • Enter an ID (not to worry, this should just be a unique "name"; say, s3-inbound) and click OK so that the IDE can add the S3 connector to your flow. It will act as our "watchdog", checking for documents being output from your cloud system into S3, and retrieving them for the SFTP transfer.

S3 ingress connector added to the canvas, with the configuration pane open

Configure, configure!

As shown above, when the connector is dropped in the canvas, a configuration pane will automatically open up at the bottom. Provide the following information under the respective tabs so that the connector can access the S3 bucket via your AWS account:

Basic tab:

  • Temporary buffer location: a folder for temporarily storing data (files) fetched from S3; a subdirectory path under the system temp directory (/tmp on Linux/Mac or \Windows\Temp on Windows) would do.
  • Use profile credentials: if you already have some AWS tools (such as aws-cli) configured on your machine, they might already have configured "profile credentials". If you have it, you can keep this switch in the on position, and skip the next two steps. Otherwise switch it off (this would most likely be the case, unless you're a developer or cloud geek yourself). In order to decide, check for a credentials file under a .aws subfolder in your user's home folder:
    1. \Users\{username}\.aws\credentials in Windows
    2. /home/{username}/.aws/credentials on Linux
    3. /Users/{username}/.aws/credentials on Mac
  • AWS Access Key Id (not available if Use profile credentials is on): an access key obtained via the AWS IAM console for enabling s3-as2-sync to read content from your S3 bucket. If you are not familiar with IAM, you can follow this guide and pick AmazonS3FullAccess (or a customized role that allows read+write access only on the specific bucket) in the 8th step instead of AdministratorAccess. Of course AWS already has comprehensive documentation for this as well.
  • AWS Access Secret Key (not available if Use profile credentials is on): the secret key corresponding to the access key above. The access and secret keys come in pairs, so you'll also have the latter once you have the former. Be forewarned that the secret key may only be shown to you once (since it's a secret!).
  • Source bucket name: the name of the source S3 bucket where the processing system will output the files (be aware that, if you're creating a new bucket, you probably won't be able to use my example name (acme-processed-orders since bucket names are globally unique).

S3 connector configuration: Basic tab

Scheduling tab:

  • Polling Repeat Interval: how often our flow should look for new files appearing on the S3 bucket. I have set this to 300000 (milliseconds, meaning 5 minutes) to reduce the number of calls being made to S3. Alternatively, if you want to use a more complex configuration (e.g. "9 AM to 6 PM on weekdays"), you can instead populate the Polling CRON Expression field with a fully-blown cron expression representing your scenario.

It is fine to leave the other fields untouched; at least for now.

S3 connector configuration: Scheduling tab

Don't forget to click the Save button below the configurations (or the floppy disk icon on the top left corner of the pane) once you're done filling things up!

S3 connector configurations saved successfully!

Now we're done with the S3 side!

Preparing for the SFTP journey

Before we can send stuff to AS2G via SFTP, we need to gain SFTP access to AS2G. Luckily, this one's just a few clicks away!

  • If you haven't already enabled SFTP, you'll see a "You are almost there!" page, similar to the following:

AS2Gateway: SFTP not yet configured

Simply enter a SFTP username, and a good password (you'll need both of these later!) for the SFTP authentication ("private") key that will be created for you in a moment, and click Setup SFTP.

  • Within seconds, you'll have a ready-for-action SFTP account on AS2G!

AS2Gateway: SFTP setup complete!

  • Click on Export Key to save your private key. This will serve as your, well, "key" for accessing AS2G's SFTP server (kinda like the password you used for logging in to the AS2G webapp).
  • The page will display some instructions to follow when accessing AS2G via SFTP:
  1. restricting access to the key file you just downloaded (chmod 400 {private key file} on Linux or Mac)
  2. connecting to the AS2G SFTP server (sftp -P 9193 -i {private key file} {username}@sftp.as2gateway.com),
  3. sending files (location for uploading outbound files; as2gateway/{station ID from which you want to send}/{partner ID of the recipient}/outbox)
  4. receiving files (location for downloading inbound files; as2gateway/{station ID which received the message}/{partner ID of the sender}/inbox/{timestamp})

AS2Gateway: SFTP instructions

In our case, we won't have to worry about most of these; since our integration flow is going to take care of all the SFTP stuff! We just need to know the correct path to upload our files.

That is, as2gateway/{station ID}/{partner ID}/outbox.

If you haven't defined your station (sender identity) and partner (recipient identity), now would be a good time to do it (since you are already logged in). Just refer to the official documentation or this (hopefully!) simplified guide.

Here onwards, let's assume that I have an awesome station (AWSMSTTN) through which I want to send AS2 messages to my awesome partner (AWSMPTNR).

Once you have the AS2 stuff in place, let's go and finish up our integration flow!

Back to UltraStudio!

Now that we have SFTP access, let's complete the second part of our adventure—by uploading the file to AS2G SFTP server.

  • Expand the ConnectorsEgress entry on the palette, and drag-n-drop an SFTP egress connector into the canvas, right beside the S3 connector. This will transfer each received document via SFTP, into the appropriate outbox directory of the SFTP space of your AS2G account.

SFTP egress connector

  • Configure properties for the SFTP connector:

Basic tab:

  • Host Name: hostname of the AS2G SFTP server; sftp.as2gateway.com
  • Port: network port where the above SFTP server accepts connections; 9193
  • File Path: the upload path where we need to place our files, so that they would be delivered to AWSMPTNR via AWSMSTTN; in our case, as2gateway/AWSMSTTN/AWSMPTNR/outbox/
  • User Name: the username that you chose when enabling SFTP on AS2G. This is also contained in the name of your private key file; for example, my private key is id_rsa_janakaud so I know I had used the username janakaud for my SFTP account!

SFTP connector configuration: Basic tab

Leave the other fields (File Name, Password, Append Mode) untouched.

Key Authentication tab:

  • Key File Path: the place where you saved the downloaded private key from AS2G.
  • Key Password: the password you provided when enabling SFTP on AS2G. (If you're unlucky and you can't remember it, just shout out for help!

SFTP connector configuration: Key Authentication tab

Connecting 'em

Now click on the Processor port of the S3 connector (white circle on the margin, top right), and drag your mouse all the way to the Input port of the SFTP connector (dark circle on the margin, center left). You will see an arrow getting drawn from the former to the latter, connecting the two, allowing the message to flow from S3 to SFTP.

Connecting the source and sink connectors

Almost there!

Failsafe

One more thing before we wrap up the whole "integration flow" thing: if the SFTP upload fails, we would need to try again later, so we'd have to notify our flow that there was a failure. On the other hand, if the upload succeeds, our flow should remove the original file from S3 (so that it won't get picked up again later on—resulting in duplicate AS2 messages).

Thankfully, with UltraStudio you can do all of this, just by drag, drop and connect!

  • Expand the ProcessorsFlow Controller entry on the palette, and drag-n-drop a Successful Flow End right after the SFTP connector. Just like before, connect the Processor port of the SFTP connector to the Input port of the new element. This will signify that our flow would come to a successful completion once the SFTP upload is done; as a result, the original file will be removed from S3, preventing repeated processing which could result in duplicate AS2 messages being sent out.
  • Drag-n-drop an Exceptional Flow End element as well, from the same palette location, below the Successful Flow End processor. Connect the On Exception port of the SFTP connector (red circle on the margin, bottom right) to the Input port of this element. With this in place, our flow will be considered as a failure if the SFTP upload errors out, and the original file will be kept intact on S3 side so that it would be picked up and retried later.

The complete flow in all its glory

Done!

The hard part is over!

It's playtime!

To test what you just built,

  • Open the Maven Projects pane on the right.
  • Expand your project (should be the only top-level entry in the list), and double-click Lifecycle → Package.

Maven: Package project

  • A window will open (usually at the bottom) indicating the progress of the build. Wait until it completes (and displays BUILD SUCCESS.

Maven: 'BUILD SUCCESS'!

Ready for Launch

  • Now, click Run → Edit Configurations... (or the same under the drop-down next to the Run (play) button on the toolbar).

Edit Configurations entry on the toolbar

  • From the top toolbar, click the + button, and select UltraESB-X Server to create a new run configuration.

Adding a new UltraESB-X Server run configuration

  • Give a nice Name to your new config (e.g. s3-as2-runner), and click OK.

The new UltraESB-X Server run configuration

When done,

  • Click Run → Run s3-as2-runner (or the Run (play) button on the toolbar, where s3-as2-runner should already be selected on the drop-down).

Running 's3-as2-runner' from the toolbar

Ignition!

  • The integration runtime will start up, and a console window (similar to the Maven Package command output) will open up and display the progress. Wait until the window displays a line similar to:
2018-07-01T08:15:02,885 [192.168.56.1-DESKTOP-M314LAB] [main] [system-] [XEN45001I013]  INFO XContainer AdroitLogic UltraStudio UltraESB-X server started successfully in 2 seconds and 464 milliseconds

The project is running successfully!

It works!

Now that our integration logic is running, you can do a test run by either:

  • dropping a file manually into the S3 bucket (via the S3 management console or aws-cli or s3cmd command-line tools, or
  • triggering the generation of a new document on your order processing system (which will then be automatically put into your S3 bucket).

How do I know?

You can verify that the file was transferred to your AS2G SFTP space by checking whether the file has been removed from your bucket, via the S3 console or CLI tools, and that the file was picked and dispatched via AS2 by checking your AS2 outbox.

Something wrong? Chill out.

If anything goes wrong, the console window will display an error (either in red or yellow). The accompanying message would usually indicate what went wrong; such as an invalid S3 bucket name, wrong credentials, non-existing SFTP key file path, etc., in which case you can simply update the corresponding processing element with the correct configuration, and stop and re-run the integration flow. If the message does not make sense, by any chance, feel free to forward it to us or shout out for help so we can provide a speedy resolution.

Next steps

Once the flow is working fine, you can deploy it on a standalone UltraESB-X Enterprise Integrator instance, which comes in multiple flavours:

Alternatively, if you are already using the AS2Gateway On-premise (a.k.a. AS2Station), the dedicated, on-premise AS2Gateway solution, the new workflow can be directly deployed on your existing AS2Station infrastructure without incurring any additional costs. If you are interested, contact the AS2Gateway development team for further details.

You can always write to AS2Gateway for further instructions or clarifications - regarding further clarifications or customizations of this sample, its architecture, deployment options, or any other queries related (or unrelated) to AS2Gateway.

Congratulations, and welcome to The Age of UltraIntegration!