(TL;DR: it's all here.)
Your retail business is growing like never before.
More and more trading partners. Way more transactions. Loads of documents to exchange.
But, should that mean...
Sleepless nights?
Exhausting phone calls?
Hours of finger-numbing data entry?
Not anymore. The world is moving on. Fast.
In fact, it has moved on.
![]()
AS2
Back in 2002, when Walmart enforced AS2 for all business data exchanges with its partners, it looked more like a joint business propaganda rather than a honest attempt for enhanced communication.
But today, Walmart or no Walmart, AS2 is the most popular way of secure business document exchange.
Combined with automated trading document standards like UN/EDIFACT, ANSI X12, TRADACOMS and ebXML, AS2 continues to rule the business domain with first-class support from all major trading platforms.
Not to mention the variety of third-party integrations, made possible by the sheer flexibility and "automatability" of AS2, EDI and all related technologies.
The "Gateway"
In case you haven't already, AS2Gateway by AdroitLogic is a nice place to get you started with all the goodies of AS2, and beyond. It is free to get started, and presents a mailbox-like interface to easily manage and exchange trading messages (documents, effectively) with all your trading partners.
AS2G offers multiple identities (stations) for dealing with different partners, along with AS2-level facilities like certificate management, auto-verification and auto-acknowledgement for incoming messages, and support for popular messaging modes like encryption, compression and signing.
And it is a hosted service that awaits for, accepts and acknowledges all AS2 messages sent by your partners, 24x7.
One step towards a good night's sleep. A big one.
But wait, we can do better than that!
SFTP, you beauty.
One nifty feature offered by AS2G (our pet name for AS2Gateway) is its SFTP capability - which allows you to effectively send and receive AS2 messages through SFTP. Drop your files into a SFTP folder, and AS2G will send them out to the corresponding partner; a partner sends you some files over AS2, and the next moment they are available for download via a SFTP folder.
It's that simple.
And insanely flexible.
Because, from that point onwards, it's just a set of files in a folder.
With which you can do anything. Anything you like.
Up in the Cloud
Just for a moment, let's assume you want to take your business to the next level - the cloud.
(If you haven't already, here are 10 good reasons that would make you reconsider your options.)
You are now months—or weeks—away from a full-time migration into a cloud-based order processing system, which would generate and persist all transactional documents - invoices, POs, receipts, shipment details and whatnot - into cloud storage (say, a S3 bucket or an Azure Blob Store).
And you want to send these documents out to your partners, via AS2 - like you have always been doing.
Cloud to AS2; how?
At a glance, we see two possible options:
- uploading the file directly into AS2G, using an API or other similar mechanism
- copying the file into your AS2G account's SFTP space, allowing AS2G to pick it and send it automatically
While the first would have been awesome, AS2G does not currently offer public API access (although the team is actively working on it). So we shall follow the SFTP approach which, thanks to the recent advancements in business integration software, can be set up quite easily with just a few drag-n-drops.
Cloud to AS2, no hands!
Let's assume that your order processing system runs on AWS, and the generated documents are being placed in a S3 bucket. Our integration would be as simple as keeping watch on the bucket and automatically copying any files that appear therein, into the appropriate folder in your AS2G SFTP account!
The "Studio", where it all comes alive
For the drag-n-drop integration we can use UltraStudio, the official dev toolkit for the UltraESB-X Enterprise Integrator that will be used to host and run our custom integration flow.
Simply pick your platform, fill in your details and download the toolkit from the link that will be e-mailed to you.
If you already have the IntelliJ IDEA IDE, you can settle for a plugin distribution as well (available on the same page), instead of downloading and installing the full IDE bundle.
An "Ultra" Project
Once you are ready,
- Create a new project, using the Create New Project link on the welcome screen, or via the menu: File → New → Project... (if you already have a project open).


- Pick the Empty Ultra Project type from the left pane, and click Next.

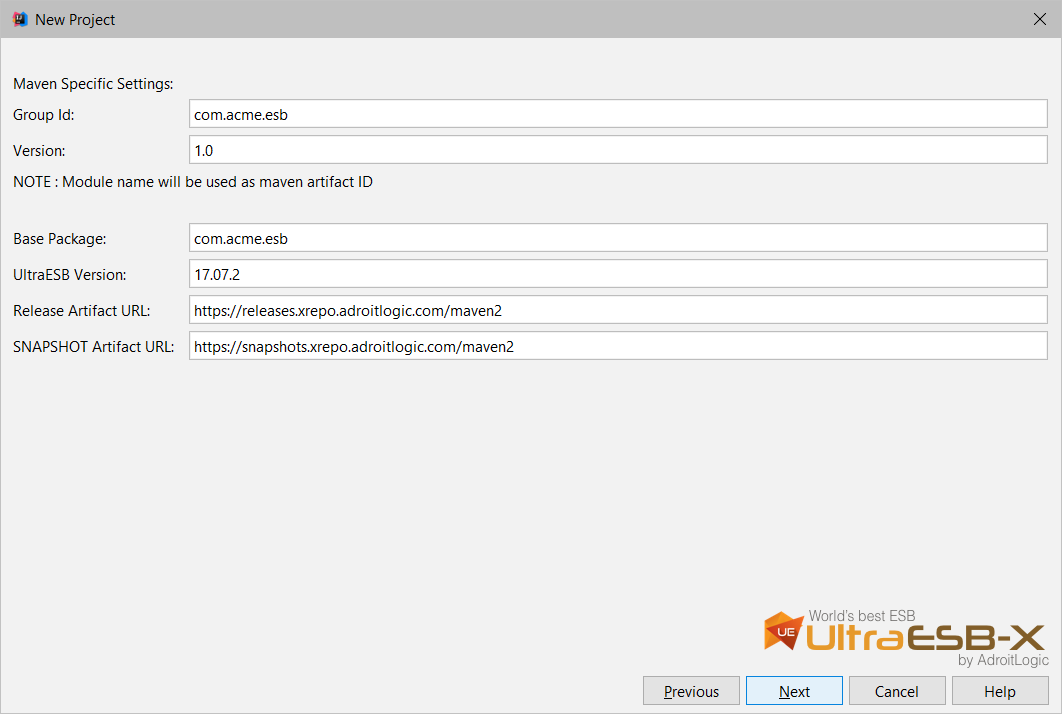
- Nothing much to do on the second screen either; maybe remove the ugly
-SNAPSHOTpart in the Version field, and click Next.
"Connectors" and "Processors"?
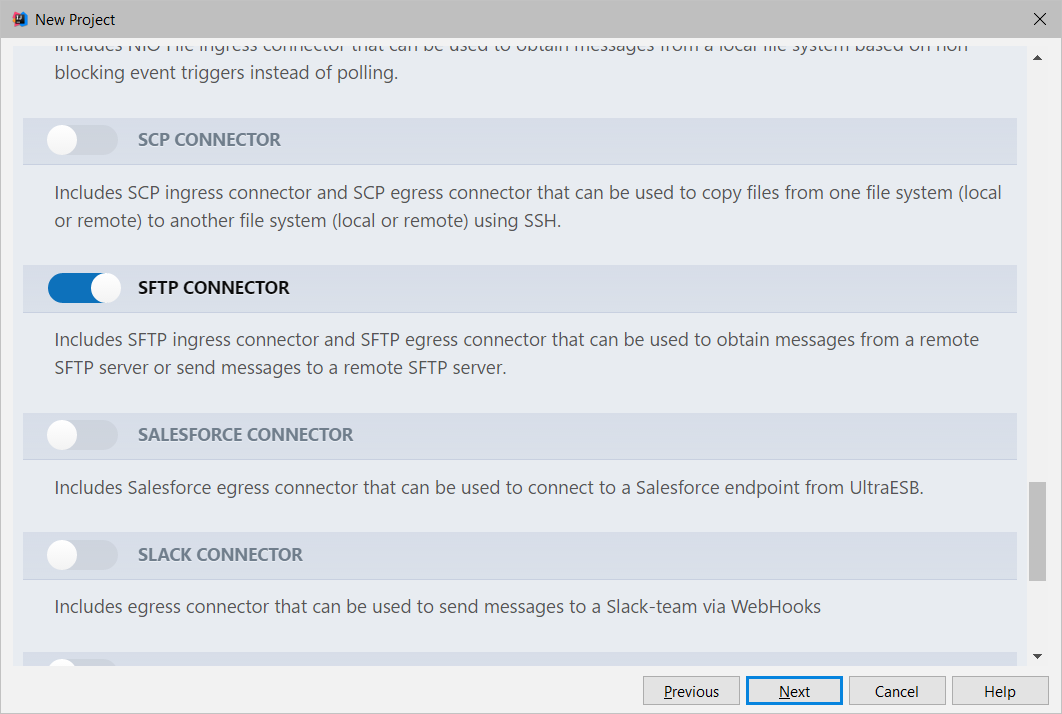
- At the next, Connector selection phase (step 3), select AWS Connector (since we would be reading files from S3) and SFTP Connector (since we will be writing files into AS2G's SFTP directory).

- No need to select anything in the next phase (Processor selection); just click Next.
A project is born
- In the next window (don't panic, this is the last one!), pick a location to create your project (Project location), enter a nice name for Project name (how about
s3-as2-sync?), and click Finish.
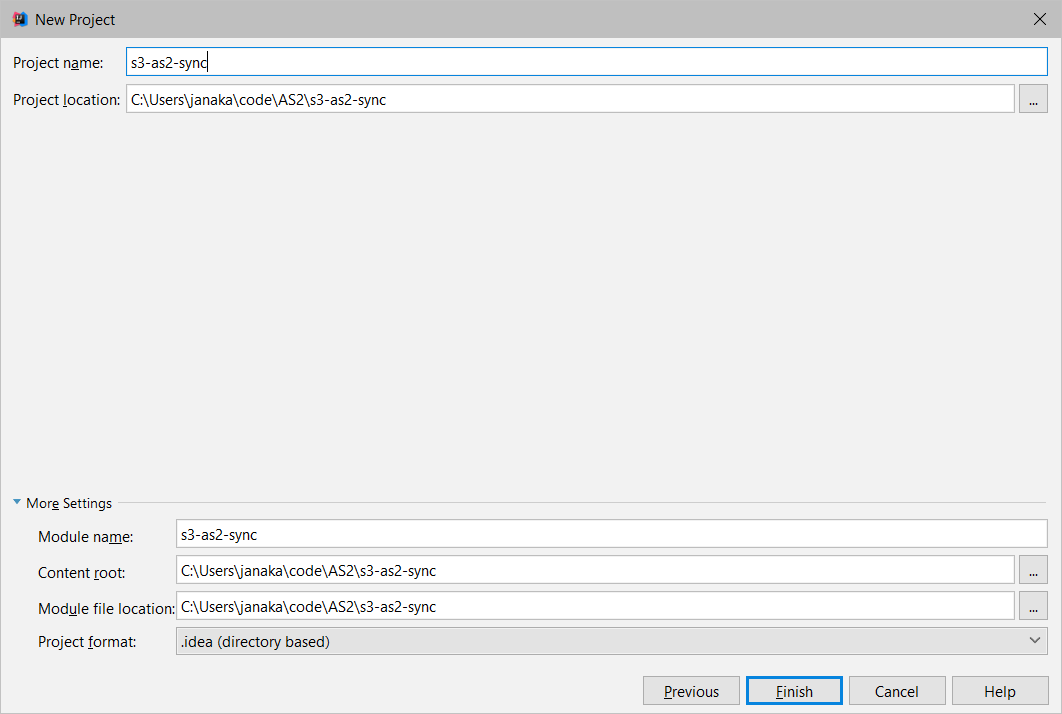
- Wait till project has finished loading, at which point the spinner (and any progress indicators) will disappear from the status bar at the bottom of the window. This could take a bit of time, especially if it's your first time using UltraStudio.

Your first "Integration Flow"
Once the IDE has settled down, we're ready to have some fun; drawing our integration path as a graphical flow!
- Expand the
src/main/confdirectory in the Project pane on the left, right-click theconfdirectory entry and select New → Integration Flow.

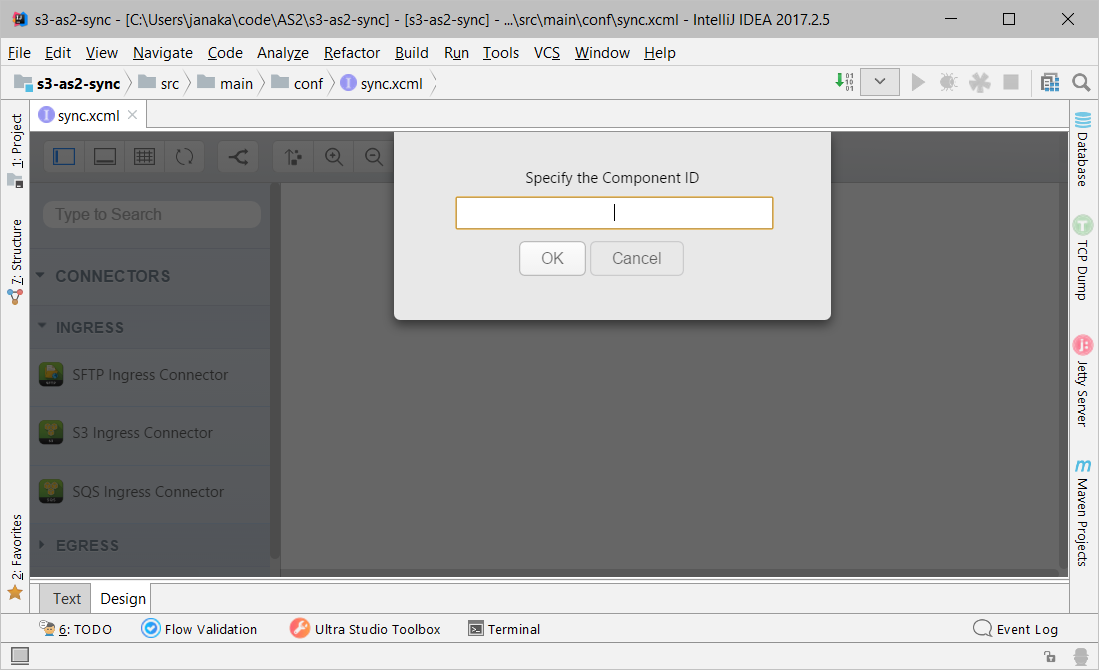
- Enter a nice name for the flow (note that it should be different from the project name; I have picked
sync) and click OK. A newsync.xcmlfile will get created inside thesrc/main/confdirectory, and UltraStudio will automagically open it for you!


- At the bottom of the file, switch to the Design view. You will see a graphical editor, with a canvas where you can draw your workflow and a palette containing components that you can drag into your flow.

Connecting with S3
- Expand the Connectors → Ingress entry on the palette, and drag-n-drop an S3 Ingress Connector into the canvas. UltraStudio will immediately ask you for a name for the newly dragged component (it likes to keep things well-named and well-organized).
- Enter an ID (not to worry, this should just be a unique "name"; say,
s3-inbound) and click OK so that the IDE can add the S3 connector to your flow. It will act as our "watchdog", checking for documents being output from your cloud system into S3, and retrieving them for the SFTP transfer.

Configure, configure!
As shown above, when the connector is dropped in the canvas, a configuration pane will automatically open up at the bottom. Provide the following information under the respective tabs so that the connector can access the S3 bucket via your AWS account:
Basic tab:
- Temporary buffer location: a folder for temporarily storing data (files) fetched from S3; a subdirectory path under the system temp directory (
/tmpon Linux/Mac or\Windows\Tempon Windows) would do.
- S3 region: the region where the S3 bucket was created. You can check this via the AWS S3 console or the
aws s3api get-bucket-locationcommand onaws-cli.
- Use profile credentials: if you already have some AWS tools (such as
aws-cli) configured on your machine, they might already have configured "profile credentials". If you have it, you can keep this switch in the on position, and skip the next two steps. Otherwise switch it off (this would most likely be the case, unless you're a developer or cloud geek yourself). In order to decide, check for acredentialsfile under a.awssubfolder in your user's home folder:\Users\{username}\.aws\credentialsin Windows/home/{username}/.aws/credentialson Linux/Users/{username}/.aws/credentialson Mac
- AWS Access Key Id (not available if Use profile credentials is on): an access key obtained via the AWS IAM console for enabling
s3-as2-syncto read content from your S3 bucket. If you are not familiar with IAM, you can follow this guide and pickAmazonS3FullAccess(or a customized role that allows read+write access only on the specific bucket) in the 8th step instead ofAdministratorAccess. Of course AWS already has comprehensive documentation for this as well.
- AWS Access Secret Key (not available if Use profile credentials is on): the secret key corresponding to the access key above. The access and secret keys come in pairs, so you'll also have the latter once you have the former. Be forewarned that the secret key may only be shown to you once (since it's a secret!).
- Source bucket name: the name of the source S3 bucket where the processing system will output the files (be aware that, if you're creating a new bucket, you probably won't be able to use my example name (
acme-processed-orderssince bucket names are globally unique).

Scheduling tab:
- Polling Repeat Interval: how often our flow should look for new files appearing on the S3 bucket. I have set this to
300000(milliseconds, meaning 5 minutes) to reduce the number of calls being made to S3. Alternatively, if you want to use a more complex configuration (e.g. "9 AM to 6 PM on weekdays"), you can instead populate the Polling CRON Expression field with a fully-blown cron expression representing your scenario.
It is fine to leave the other fields untouched; at least for now.

Don't forget to click the Save button below the configurations (or the floppy disk icon on the top left corner of the pane) once you're done filling things up!

Now we're done with the S3 side!
Preparing for the SFTP journey
Before we can send stuff to AS2G via SFTP, we need to gain SFTP access to AS2G. Luckily, this one's just a few clicks away!
- Log in to AS2G, if you haven't already.
- Navigate to the SFTP Feature page (the key icon on the left navigation pane; you can also use this direct link).
- If you haven't already enabled SFTP, you'll see a "You are almost there!" page, similar to the following:

Simply enter a SFTP username, and a good password (you'll need both of these later!) for the SFTP authentication ("private") key that will be created for you in a moment, and click Setup SFTP.
- Within seconds, you'll have a ready-for-action SFTP account on AS2G!

- Click on Export Key to save your private key. This will serve as your, well, "key" for accessing AS2G's SFTP server (kinda like the password you used for logging in to the AS2G webapp).
- The page will display some instructions to follow when accessing AS2G via SFTP:
- restricting access to the key file you just downloaded (
chmod 400 {private key file}on Linux or Mac) - connecting to the AS2G SFTP server (
sftp -P 9193 -i {private key file} {username}@sftp.as2gateway.com), - sending files (location for uploading outbound files;
as2gateway/{station ID from which you want to send}/{partner ID of the recipient}/outbox) - receiving files (location for downloading inbound files;
as2gateway/{station ID which received the message}/{partner ID of the sender}/inbox/{timestamp})

In our case, we won't have to worry about most of these; since our integration flow is going to take care of all the SFTP stuff! We just need to know the correct path to upload our files.
That is, as2gateway/{station ID}/{partner ID}/outbox.
If you haven't defined your station (sender identity) and partner (recipient identity), now would be a good time to do it (since you are already logged in). Just refer to the official documentation or this (hopefully!) simplified guide.
Here onwards, let's assume that I have an awesome station (AWSMSTTN) through which I want to send AS2 messages to my awesome partner (AWSMPTNR).
Once you have the AS2 stuff in place, let's go and finish up our integration flow!
Back to UltraStudio!
Now that we have SFTP access, let's complete the second part of our adventure—by uploading the file to AS2G SFTP server.
- Expand the Connectors → Egress entry on the palette, and drag-n-drop an SFTP egress connector into the canvas, right beside the S3 connector. This will transfer each received document via SFTP, into the appropriate
outboxdirectory of the SFTP space of your AS2G account.
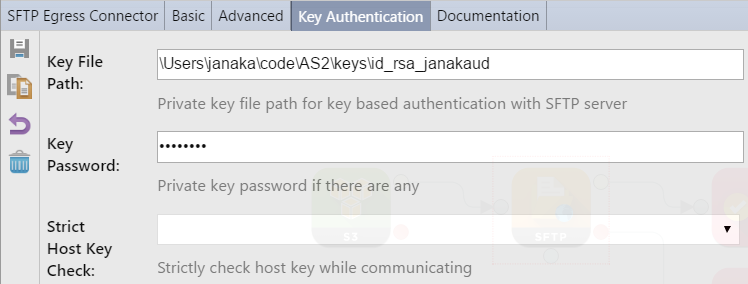
- Configure properties for the SFTP connector:
Basic tab:
- Host Name: hostname of the AS2G SFTP server;
sftp.as2gateway.com
- Port: network port where the above SFTP server accepts connections;
9193
- File Path: the upload path where we need to place our files, so that they would be delivered to
AWSMPTNRviaAWSMSTTN; in our case,as2gateway/AWSMSTTN/AWSMPTNR/outbox/
- User Name: the username that you chose when enabling SFTP on AS2G. This is also contained in the name of your private key file; for example, my private key is
id_rsa_janakaudso I know I had used the usernamejanakaudfor my SFTP account!

Leave the other fields (File Name, Password, Append Mode) untouched.
Key Authentication tab:
- Key File Path: the place where you saved the downloaded private key from AS2G.
- Key Password: the password you provided when enabling SFTP on AS2G. (If you're unlucky and you can't remember it, just shout out for help!
Connecting 'em
Now click on the Processor port of the S3 connector (white circle on the margin, top right), and drag your mouse all the way to the Input port of the SFTP connector (dark circle on the margin, center left). You will see an arrow getting drawn from the former to the latter, connecting the two, allowing the message to flow from S3 to SFTP.

Almost there!
Failsafe
One more thing before we wrap up the whole "integration flow" thing: if the SFTP upload fails, we would need to try again later, so we'd have to notify our flow that there was a failure. On the other hand, if the upload succeeds, our flow should remove the original file from S3 (so that it won't get picked up again later on—resulting in duplicate AS2 messages).
Thankfully, with UltraStudio you can do all of this, just by drag, drop and connect!
- Expand the Processors → Flow Controller entry on the palette, and drag-n-drop a Successful Flow End right after the SFTP connector. Just like before, connect the Processor port of the SFTP connector to the Input port of the new element. This will signify that our flow would come to a successful completion once the SFTP upload is done; as a result, the original file will be removed from S3, preventing repeated processing which could result in duplicate AS2 messages being sent out.
- Drag-n-drop an Exceptional Flow End element as well, from the same palette location, below the Successful Flow End processor. Connect the On Exception port of the SFTP connector (red circle on the margin, bottom right) to the Input port of this element. With this in place, our flow will be considered as a failure if the SFTP upload errors out, and the original file will be kept intact on S3 side so that it would be picked up and retried later.

Done!
The hard part is over!
It's playtime!
To test what you just built,
- Open the Maven Projects pane on the right.
- Expand your project (should be the only top-level entry in the list), and double-click Lifecycle → Package.
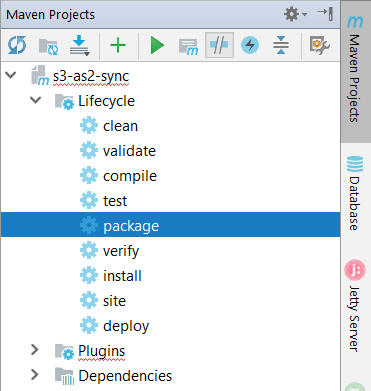
- A window will open (usually at the bottom) indicating the progress of the build. Wait until it completes (and displays
BUILD SUCCESS.

Ready for Launch
- Now, click Run → Edit Configurations... (or the same under the drop-down next to the Run (play) button on the toolbar).

- From the top toolbar, click the + button, and select UltraESB-X Server to create a new run configuration.

- Give a nice Name to your new config (e.g.
s3-as2-runner), and click OK.

When done,
- Click Run → Run s3-as2-runner (or the Run (play) button on the toolbar, where
s3-as2-runnershould already be selected on the drop-down).

Ignition!
- The integration runtime will start up, and a console window (similar to the Maven Package command output) will open up and display the progress. Wait until the window displays a line similar to:
2018-07-01T08:15:02,885 [192.168.56.1-DESKTOP-M314LAB] [main] [system-] [XEN45001I013] INFO XContainer AdroitLogic UltraStudio UltraESB-X server started successfully in 2 seconds and 464 milliseconds
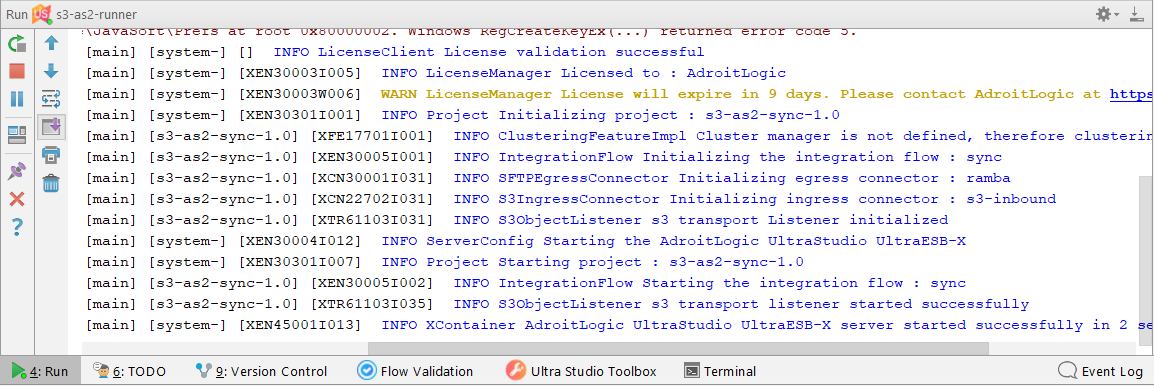
It works!
Now that our integration logic is running, you can do a test run by either:
- dropping a file manually into the S3 bucket (via the S3 management console or
aws-cliors3cmdcommand-line tools, or - triggering the generation of a new document on your order processing system (which will then be automatically put into your S3 bucket).
How do I know?
You can verify that the file was transferred to your AS2G SFTP space by checking whether the file has been removed from your bucket, via the S3 console or CLI tools, and that the file was picked and dispatched via AS2 by checking your AS2 outbox.
Something wrong? Chill out.
If anything goes wrong, the console window will display an error (either in red or yellow). The accompanying message would usually indicate what went wrong; such as an invalid S3 bucket name, wrong credentials, non-existing SFTP key file path, etc., in which case you can simply update the corresponding processing element with the correct configuration, and stop and re-run the integration flow. If the message does not make sense, by any chance, feel free to forward it to us or shout out for help so we can provide a speedy resolution.
Next steps
Once the flow is working fine, you can deploy it on a standalone UltraESB-X Enterprise Integrator instance, which comes in multiple flavours:
- a Docker container if you have access to an in-house container cluster driven by something like Kubernetes, OpenShift or Docker Swarm, or a containerization service like or ECS/EKS, GKE or ACS; or,
- the native distribution if you have access to any server where Java is available/installable; or,
- an IPS project deployment if you are a customer of—or have access to a shared instance of—the IPS Enterprise Integration Platform.
Alternatively, if you are already using the AS2Gateway On-premise (a.k.a. AS2Station), the dedicated, on-premise AS2Gateway solution, the new workflow can be directly deployed on your existing AS2Station infrastructure without incurring any additional costs. If you are interested, contact the AS2Gateway development team for further details.
You can always write to AS2Gateway for further instructions or clarifications - regarding further clarifications or customizations of this sample, its architecture, deployment options, or any other queries related (or unrelated) to AS2Gateway.
Congratulations, and welcome to The Age of UltraIntegration!
No comments:
Post a Comment