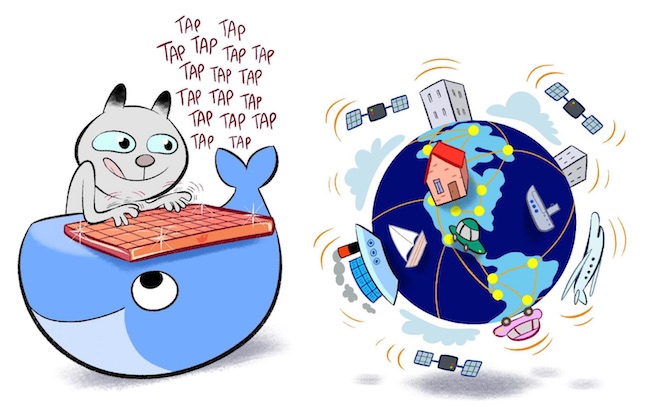
Simple Storage Service, more commonly known as S3, is the second most popular among AWS-offered cloud services. Originally meant to be a key-value store, it eventually transformed into one of the world's most popular file storage services. Its simple (just like the name!), intuitive, filesystem-like organization, combined with handy features like bucket hosting and CDN support via CloudFront, has made S3 an ideal choice for content hosting and delivery among organizations of all sizes.

However, when it comes to using S3 as a filesystem, there are some really cool features that I miss; and I'm sure others do, too. A good example is extra support for archive-type entries (e.g. zip files); right now if you want to change a zip file on S3, you need to download it into a real filesystem (local, EC2, etc.), unpack (unzip) it, make the modification, repack (zip) it and upload it back to S3. Just think how cool it would have been possible to do this in-place in S3 itself, just like how archives can be modified on-the-fly in OSs like Ubuntu!
Of course, my dream is out-of-scope for S3, as it is simply supposed to provide key-value type storage. But it would be really cool if AWS guys could provide it as a feature, or if I could hack together a way to do it in-cloud (in-AWS) without having to sacrifice my local bandwidth or spin up an EC2 instance every time a modification is needed.
And the good news is: thanks to the recent advent of AWS Lambda, we can now hack together a lambda function to do just the thing for us!
If you're a total newbie, AWS Lambda allows you to host a snippet of logic (well, maybe even a fully-fledged application) that can be triggered by an external event (like an API call or a timer trigger). No need to run a virtual machine or even deploy a container to host your code; and the best part is, you only pay for the actual runtime - makes sense, because there is practically nothing running (meaning zero resource consumption) while your lambda is idle.
Ah, and I lied.
The best part is, with the AWS free tier, you get a quota of 1 million executions per month, for free; and 3.2 million seconds of execution time, also for free. At full capacity, this means that your lambda can run one million times each month, every invocation taking up to 3.2 seconds, before AWS starts charging for it; and even that, in tiny increments (just $0.00001667 per GB-second).
Wow, I can't think of a better place to host my own S3 zip file editor; can you? I won't be using it much (maybe a couple times a month), and whenever I need it, it will just come alive, do its job, and go back to sleep. Now, how cool is that?!
As if that wasn't enough, downloading and uploading content between S3 and lambda (in the same region) is free of charge; meaning that you can edit all the files you want, no matter how large (imagine a huge archive where you need to change only a teeny weeny 1 KB configuration file) without spending an extra cent!
Okay, let's roll!

We'll be using Sigma, the brand new serverless IDE, in our dev path. There are some good reasons:
- Firstly, Sigma is completely browser-based; nothing to install, except for a web browser - which you already have!
- Secondly, Sigma completely takes care of your AWS stuff, including the management of AWS entities (lambdas, S3 buckets, IAM roles and whatnot) and their interconnections - once you give it the necessary AWS account (IAM) permissions, you don't have to open up a single AWS console ever again!
- Last but not the least, Sigma automagically generates and maintains all bits and pieces of your project - including lambda trigger configurations, execution roles and permissions and related resources under a single CloudFormation stack (kind of like a deployment "definition"; somewhat like AWS SAM in case you're familiar, but much more flexible as Sigma allows integration with already existing AWS entities as well).
(In fact, behind the scenes, Sigma also leverages this "edit a zip file in S3" approach to drive its new QuickBuild feature; which will go public pretty soon!)
If the above sounded totally Greek to you, chill out! Lambda - or AWS, for that matter - may not look totally newbie-friendly, but I assure you that Sigma will make it easy - and way much fun - to get started!
TL,DR: if you're in a hurry, you can simply open the ready-made sample from my GitHub repo into Sigma and deploy it right away; just remember to edit the two S3 operations (by clicking the two tiny S3 icons in front of the s3.getObject() and s3.putObject() calls) to point to your own bucket, instead of mine - otherwise, your deployment will fail!
Okay, time to sign up for Sigma; here's the official guide, and we'll be putting out a video pretty soon as well!
When you are in, create a new project (with a nice name - how about zipchamp?).

Sigma will show you the editor right away, with boilerplate code for a default lambda function named, well, lambda.js. (Sigma currently supports NodeJS, and we will surely be introducing more languages in the near future!)

For this attempt, we'll only focus on updating small textual files inside an S3 archive (don't worry; the archive itself could still be pretty big!), rather than binaries or large files. We will invoke the lambda with a payload representing a map of file changes: with keys representing the paths of files inside the archive, and values representing their content (to be added/modified, or to be removed if set to null).
{
    "path": "path/to/zip/file/within/bucket",
    "changes": {
        "path/to/new/file/1": "content for file 1",
        "path/to/existing/file/2": "new content of file 2",
        "path/to/to-be-deleted/file/3": null
    }
}
Sending such a map-type payload to a lambda would be quite easy if we use JSON over HTTP; luckily lambda provides direct integration with API Gateway, just the thing we would have been looking for.
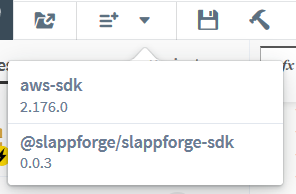
Firstly, let's add the jszip dependency to our project, via the Add Dependency toolbar button, bestowing upon ourselves the power to modify zip files:


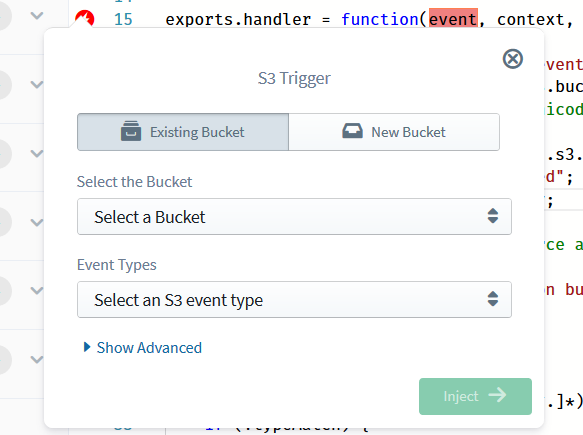
Time to add a trigger to our function, so that it can be invoked externally (in our case, via an HTTP request coming through API Gateway). Click the API Gateway entry on the Resources pane on the left, drag it into the editor, and drop it right on to the function header (contaning the event parameter highlighted in red, with a red lightning symbol in front):

Sigma will open a pop-up, asking you for the configurations of the API Gateway trigger that you are about to define. Let's define a new API having API Name zipchamp, with a Resource Path /edit which accepts requests of type (Method) POST and routes them into our lambda. We also need to specify a Deployment Stage name, which could practically be anything (just an identifier for the currently active set of "versions" of the API components; we'll stick to Prod.

Since we want to modify different files at different times, we would need to also include the path of the file in the payload. It would be easy if we can define our payload format at this point, to prevent possible omissions or confusions in the future.
    /* The request payload will take the following format:
    {
        "path": "path/to/zip/file/within/bucket",
        "changes": {
            "path/to/new/file/1": "content for file 1",
            "path/to/existing/file/2": "new content of file 2",
            "path/to/to-be-deleted/file/3": null
        }
    }
     */
Now, assuming a payload of the above format, we can start coding our magical zip-edit logic.
Planning out our mission:
- fetch the file content from S3
- open the content via JSZip
- iterate over the entries (filenames with paths) in the
changesfield of our payload:- if the entry value is
null, remove it from the archive - otherwise, add the entry value to the archive as a file (with
nameset to the entry key); which would be an update or an insertion depending on whether the file already existed in the archive (we could identify this difference as well, by slightly modifying the algorithm)
- if the entry value is
- once the modifications are done, we could have uploaded the modified payload directly to S3, but the upload requires us to know the size of the upload in advance; unfortunately JSZip does not provide this yet. So we'd have to
- save the modified zip file to the filesystem (
/tmp), and - upload the file to S3, via a stream opened for the saved file, and specifying the
Content-Lengthas the size of the saved file
- save the modified zip file to the filesystem (
Let's start by require-ing the JSZip dependency that we just added (along with fs, which we'll need real soon):
let AWS = require('aws-sdk');
let JSZip = require("jszip");
let fs = require("fs");

const s3 = new AWS.S3();

exports.handler = function (event, context, callback) {
    /* The request payload will take the following format:
And defining some variables to hold our processing state:
}
*/
let changes = event.changes;
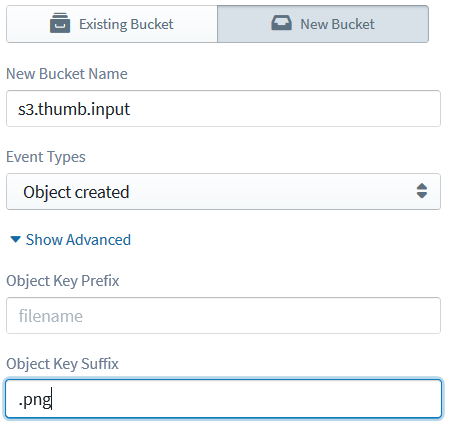
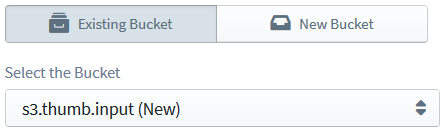
let modified = 0, removed = 0;First, we need to retrieve the original file from S3, which requires an S3 operation. Drag an S3 entry into the editor, and configure it for a Get Object Operation. For the Bucket, you can either define a new bucket via the New Bucket tab (which would be created and managed by Sigma at deployment time, on your behalf - no need to go and create one in the S3 console!) or pick an already existing one from the Existing Bucket tab (handy if you already have a bucketful of archives to edit - or a default "artifacts" bucket where you host your archive artifacts).

Here I have:
- used an existing Bucket,
hosted-archives: the "stage" where I wish to perform all my zip-edit magic, - selected Get Object as the Operation, and
- picked the
pathparam from the original payload (event.path) as the S3 Object Key,@{event.path}(basically the path of the file inside the bucket, which we are interested in fetching); notice the@{}syntax in the pop-up field, which instructs Sigma to use the enclosed content as JS code rather than a constant string parameter (similar to${}in JS).
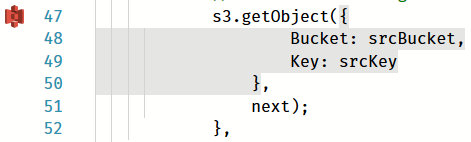
If all is well, once you click the Inject button (well, it only gets enabled when all is well, so we're good there!), Sigma will inject an s3.getObject() code snippet - rich with some boilerplate stuff - right where you drag-dropped the S3 entity. As if that isn't enough, Sigma will also highlight the operation parameter block (first parameter of s3.getObject()), indicating that it has understood and is tracking that code snippet as part of its behind-the-scenes deployment magic! Pretty cool, right?
    s3.getObject({
        'Bucket': "hosted-archives",
        'Key': event.path
    }).promise()
        .then(data => {
            console.log(data);           // successful response
            /*
            data = {
                AcceptRanges: "bytes",
                ContentLength: 3191,
                ContentType: "image/jpeg",
                ETag: "\\"6805f2cfc46c0f04559748bb039d69ae\\"",
                LastModified: ,
                Metadata: {...},
                TagCount: 2,
                VersionId: "null"
            }
            */
        })
        .catch(err => {
            console.log(err, err.stack); // an error occurred
}); 
In the s3.getObject() callback, we can load the resulting data buffer as a zip file, via JSZip#loadAsync(buffer):
        .then(data => {
            let jszip = new JSZip();
            jszip.loadAsync(data.Body).then(zip => {

            });
Once the zip file is loaded, we can start iterating through our changes list:
- If the value of the change entry is
null, we remove the file (JSZip#remove(name)) from the archive; - Otherwise we push the content to the archive (
JSZip#file(name, content)), which would correspond to either an insertion or modification depending on whether the corresponding entry (path) already exists in the archive.
            jszip.loadAsync(data.Body).then(zip => {
                Object.keys(changes).forEach(name => {
                    if (changes[name] !== null) {
                        zip.file(name, changes[name]);
                        modified++;
                    } else {
                        zip.remove(name);
                        removed++;
                    }
                });
We also track the modifications via two counters - one for additions/modifications and another for deletions.
Once the changes processing is complete, we are good to upload the magically transformed file back to S3.
- As mentioned before, we need to first save the file to disk so that we can compute the updated size of the archive:
                let tmpPath = `/tmp/${event.path}`
                zip.generateNodeStream({ streamFiles: true })
                    .pipe(fs.createWriteStream(tmpPath))
                    .on('error', err => callback(err))
                    .on('finish', function () {

                    });
- Time for the upload! Just like before, drag-drop a S3 entry into the
'finish'event ofzip.generateNodeStream(), and configure it as follows:- Bucket: the same one that you picked earlier for
s3.getObject(); I'll pick myhosted-archivesbucket, and you can pick your own - just remember that, if you defined a new bucket earlier, you will have to pick it from the Existing Bucket list this time (because, from Sigma's point of view, the bucket is already defined; the entry will be prefixed with(New)to make your life easier). - Operation: Put Object
- Object Key:
@{event.path}(once again, note the@{}syntax; the Sigma way of writing${}) - Content of Object:
@{fs.createReadStream(tmpPath)}(we reopen the saved file as a stream so the S3 client can read it) - Metadata: click the Add button (+ sign) and add a new entry pair:
Content-Length=@{String(fs.statSync(tmpPath).size)}(reporting the on-disk size of the archive as the length of content to be uploaded)
- Bucket: the same one that you picked earlier for

                    .on('finish', function () {
                        s3.putObject({
                            "Body": fs.createReadStream(tmpPath),
                            "Bucket": "hosted-archives",
                            "Key": event.path,
                            "Metadata": {
                                "Content-Length": String(fs.statSync(tmpPath).size)
                            }
                        })
                            .promise()
                            .then(data => {

                            })
                            .catch(err => {

                            });
});- Lastly, let's add a successful
callbackinvocation, to be fired when our S3 uploader has completed its job, indicating that our mission completed successfully:
                            .then(data => {
                                callback(null, {
                                    modified: modified,
                                    removed: removed
                                });
                            })
                            .catch(err => {
                                callback(err);
                            });
Notice the second parameter of the first callback, where we send a small "summary" of the changes done (file modifications and deletions). When we invoke the lambda via an HTTP request, we will receive this "summary" as a JSON response payload.
Throw in some log lines and error handling logic, until our lambda starts to look pretty neat:
let AWS = require('aws-sdk');
let JSZip = require("jszip");
let fs = require("fs");

const s3 = new AWS.S3();

exports.handler = function (event, context, callback) {
    /* The request payload will take the following format:
    {
        "path": "path/to/zip/file/within/bucket",
        "changes": {
            "path/to/new/file/1": "content for file 1",
            "path/to/existing/file/2": "new content of file 2",
            "path/to/deleted/file/3": null
        }
    }
     */

    let changes = event.changes;
    let modified = 0, removed = 0;

    console.log(`Fetching ${event.path}`);
    s3.getObject({
        'Bucket': "hosted-archives",
        'Key': event.path
    }).promise()
        .then(data => {
            let jszip = new JSZip();
            console.log(`Opening ${event.path}`);
            jszip.loadAsync(data.Body).then(zip => {
                console.log(`Opened ${event.path} as zip`);
                Object.keys(changes).forEach(name => {
                    if (changes[name] !== null) {
                        console.log(`Modify ${name}`);
                        zip.file(name, changes[name]);
                        modified++;
                    } else {
                        console.log(`Remove ${name}`);
                        zip.remove(name);
                        removed++;
                    }
                });

                let tmpPath = `/tmp/${event.path}`
                console.log(`Writing to temp file ${tmpPath}`);
                zip.generateNodeStream({ streamFiles: true })
                    .pipe(fs.createWriteStream(tmpPath))
                    .on('error', err => callback(err))
                    .on('finish', function () {
                        console.log(`Uploading to ${event.path}`);
                        s3.putObject({
                            "Body": fs.createReadStream(tmpPath),
                            "Bucket": "hosted-archives",
                            "Key": event.path,
                            "Metadata": {
                                "Content-Length": String(fs.statSync(tmpPath).size)
                            }
                        })
                            .promise()
                            .then(data => {
                                console.log(`Successfully uploaded ${event.path}`);
                                callback(null, {
                                    modified: modified,
                                    removed: removed
                                });
                            })
                            .catch(err => {
                                callback(err);
                            });
                    });
            })
                .catch(err => {
                    callback(err);
                });
        })
        .catch(err => {
            callback(err);
        });
}
The hard part is over!
(Maybe not that hard, since you hopefully enjoyed the cool drag-drop stuff; we sincerely hope you did!)
Now, simply click the Deploy Project button on the toolbar (or the menu item, if you like it that way) to set the wheels in motion.
Sigma will guide you through a few steps for getting your lambda up and running: committing your code to GitHub, building it, and displaying a summary of how it plans to deploy zipchamp to your AWS account via CloudFormation.

Once you hit Execute, Sigma will run the deployment gimmicks for you, and upon completion display the URL of the API endpoint - the trigger that we defined earlier, now live and waiting eagerly for your zip-edit requests!

Testing the whole thing is pretty easy: just fire up your favourite HTTP client (Postman, perhaps, sir?) And send a POST request to the deployment URL from above; with a payload conforming to our smartly-crafted zip-edit request format:
POST /Prod/edit HTTP/1.1
Host: yourapiurl.execute-api.us-east-1.amazonaws.com
Content-Length: 139

{
    "path": "my-dir/my-awesome-file.zip",
    "changes": {
        "conf/config.file": "property.one=value1\nproperty.two=value2"
    }
}
If you are a curl guy like me:
curl -XPOST --data '{
    "path": "my-dir/my-awesome-file.zip",
    "changes": {
        "conf/config.file": "property.one=value1\nproperty.two=value2"
    }
}' https://yourapiurl.execute-api.us-east-1.amazonaws.com/Prod/edit
If you would rather have zipchamp play with a test zip file than let it mess around with your premium content, you can use a simple zip structure like the following:
file.zip:
├── a/
│   ├── b = "bb"
│   └── d/
│       ├── e = "E"
│       └── f = "F"
└── c = ""
with a corresponding modification request:
{
    "path": "file.zip",
    "changes": {
        "b": "ba\nba\r\nblack\n\n\nsheep",
        "a/d/e": null,
        "a/c": "",
        "a/b": "",
        "a/d/f": "G"
    }
}
which, upon execution, would result in a modified zip file with the following structure:
file.zip:
├── a/
│   ├── b = ""
│   ├── c = ""
│   └── d/
│       └── f = "G"
├── b = "ba\nba\r\nblack\n\n\nsheep"
└── c = ""
Obviously you don't need to pull out your hair, composing the JSON request payload by hand; a simple piece of code, like the following Python snippet, will do just that on your behalf, once you feed it with the archive path (key) in S3, and the subpaths and content (local filesystem paths) of files that you need to update:
import json

payload = {
 "changes": {
  "file path 1 inside archive": open("file path 1 in local filesystem").read(),
  "file path 2 inside archive": open("file path 2 in local filesystem").read(),
  "file path inside archive, to be deleted": None
 },
 "path": "s3://temp-playground/cf-shell.zip"
}
print json.dumps(payload)
Nice! Now you can start using zipchamp to transform your long-awaited zip files, without having to download them anywhere, ever again!
Ah, and don't forget to spread the good word, trying out more cool stuff with Sigma and sharing it with your fellow devs!